How to enable UAC on Windows 10, 8,1, 8
![]() 3 min. read
3 min. read
![]() Updated on
Updated on
Share this article

Improve this guide
Read our disclosure page to find out how can you help Windows Report sustain the editorial team Read more
Managing the Windows 10, 8 in built features and programs is easy as Microsoft developed an intuitive OS that can anytime be customized, optimized and personalized. But, for being able to tweak your Windows 10, 8, 8.1 based device you first have to perform some basic operations and knowing how to enable / disable UAC is a must.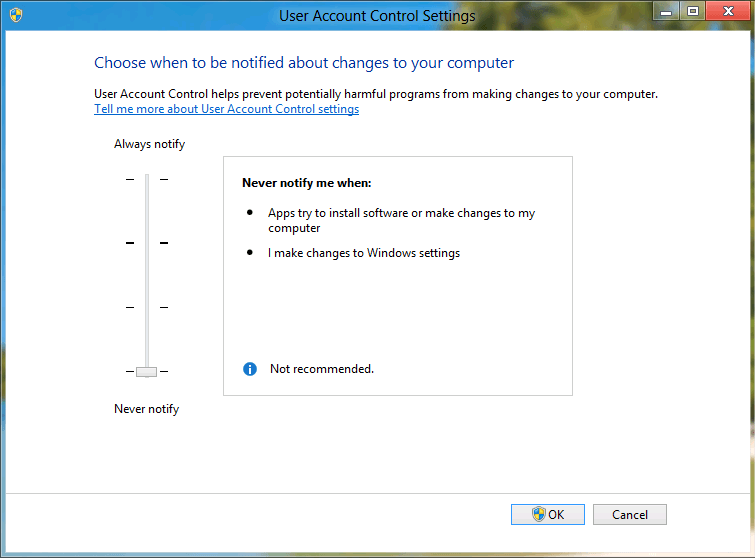
That’s why in the guidelines from below, I will show you how to easily turn off or turn on the User Account Control feature on your Windows 10, 8 or Windows 8.1 system.
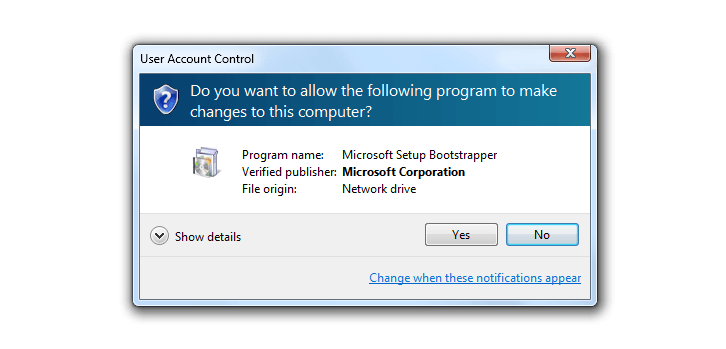
As you know, the UAC (User Account Control) tool is used as a security software that can help you protect your data, programs and also the processes that are running on your Windows 10, 8 device. If the UAC is enabled you can receive precious info related to the changes that are being performed on your computer. Basically the User Account Control notifies you when changes are going to be made to your computer that requires administrator-level permission.
Of course, this is a useful feature, but in some cases it might get quite frustrating an annoying. So, if you want to enable / disable the UAC feature on your Windows 10/ Windows 8 / Windows 8.1 based device don’t hesitate and follow the guidelines from below.
- RELATED: Security flaw in Windows 10 UAC can change your system files and settings
How to turn off / turn on UAC on Windows 10, 8
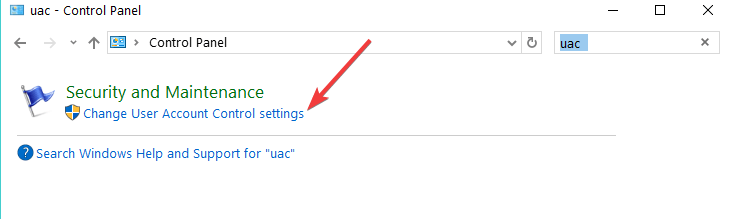
- On your computer, go to your Home Screen.
- From there press on the Wind + X dedicated keyboard keys.
- Tools Menu will be displayed; from there head towards Control Panel.
- Within the Search box that is available on the Control Panel window type “UAC” and press enter.
- From the results choose Change User Account Control Settings.

- Up next you will be able to enable or disable UAC feature.
- Confirm the changes and save the same.
- In the end reboot your device and you are done.
There are four options available:
- Never notify: You won’t receive any alerts when apps and programs make changes on your computer. Microsoft doesn’t recommend enabling this option as you won’t be notified when new software is installed on your machine.
- Notify me only when apps try to make changes to my computer (do not dim my desktop): You’ll receive a quick alert whenever an app is trying to make changes to your computer.
- Notify me only when apps try to make changes to my computer (default): You can enable this option if you use familiar apps and software and visit familiar websites.
- Always notify me when apps try to install software: You often install new software on your machine, then this is the right option to enable.
So that’s how you can manage the User Account Control service on your Windows 10, 8, 8.1 tablet, laptop or desktop. For similar tutorials check out our how to section where you can find relevant step by step guides compatible with your Windows 10, Windows 8 and Windows 8.1 devices.
RELATED STORIES TO CHECK OUT:
- UAC dialog now supports Dark Mode in Windows 10
- Researchers release Windows 10 UAC malware information
- Fix: Windows Apps Crash Because Of Corrupted User Account