FIX: Access denied when editing hosts file in Windows 10/11
![]() 6 min. read
6 min. read
![]() Updated on
Updated on
Share this article

Improve this guide
Read our disclosure page to find out how can you help Windows Report sustain the editorial team Read more
Key notes
- For any type system errors, you will definitely find a solution in our System Errors hub.
- Command Prompt is one of tools for troubleshooting Windows issues. For more details about Command Prompt check out this handy article.
- To edit files in Windows you can use the default Notepad app. If like an HTML editor better, take a look at our list with some of the best HTML editors.
- If you have issues with Windows errors check our dedicated Windows 10 errors hub.
Sometimes in order to fix a certain problem or to block a certain website on your Windows 10 PC, you have to edit the hosts file.
Editing hosts file is a relatively advanced procedure, and a number of users reported “Access denied” message while trying to edit the hosts file on Windows 10.
The hosts file is located in your Windows 10 installation directory, and it’s protected from unauthorized access, but if you need to edit the hosts file, you can avoid “Access denied” message by following one of our solutions.
Here are some more examples of this problem:
- Can’t edit hosts file Windows 10 – If you can’t edit the hosts file in Windows 10, it’s probably because you don’t have required permissions. We’ll explore that problem here
- Hosts file being used by another process – This is another common issue that prevents users from editing the host file.
- Don’t have permission to save hosts file Windows 10 – This is the same case as the first error message.
Table of contents:
- Run Notepad as administrator
- Copy the hosts file to a different location
- Make sure hosts isn’t set to Read-only
- Change the security settings for hosts
- Use the hidden administrator account
How to edit the hosts file on Windows 10 and avoid Access denied message?
1. Run Notepad as administrator
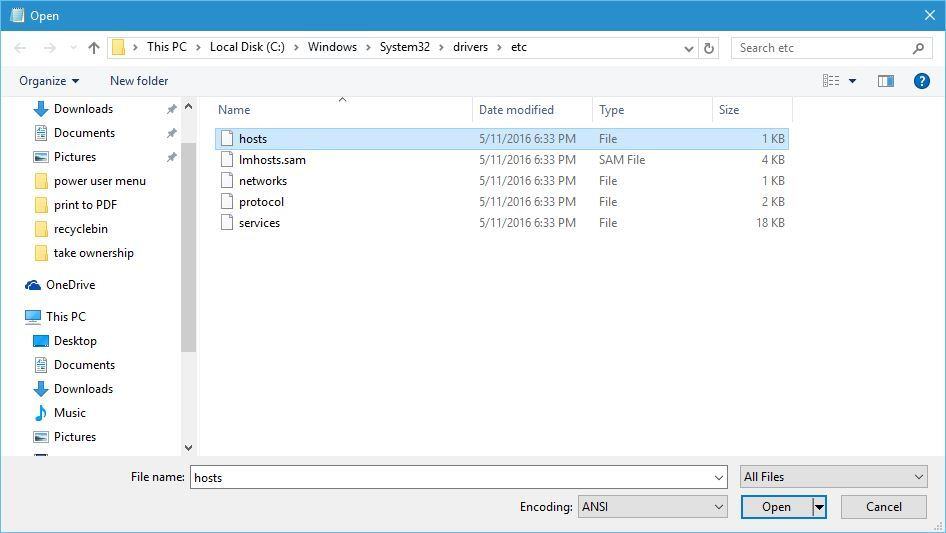
- Press Windows Key + S, enter Notepad. Right-click Notepad from the list of results and choose Run as administrator.

- Once Notepad opens, choose File > Open.
- Navigate to C:WindowsSystem32driversetc folder and make sure to change Text Documents (*.txt) to All Files. Select hosts and click Open.

- Make the changes you want and save them.
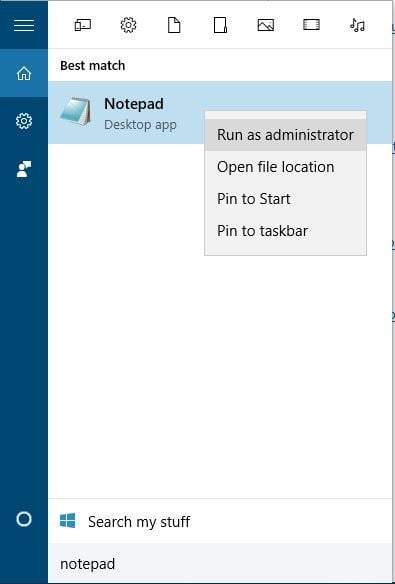
If you use Notepad as your text editor, you need to run it as administrator before you can edit the hosts file. To run Notepad as administrator and to edit the hosts file, do the following:
We have to mention that this solution should work with any other text editor, so if you don’t use Notepad, just run your desired text editor as administrator and you should be able to edit hosts file without any problems.
Looking for some Notepad alternatives? Here are the 6 best text editors available right now.
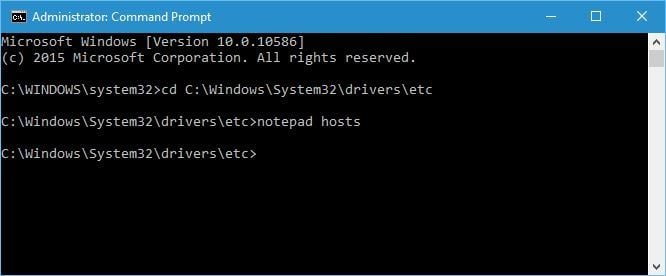
Alternatively, you can start Command Prompt as administrator and use it to start Notepad and edit the hosts file. To do that, follow these instructions:
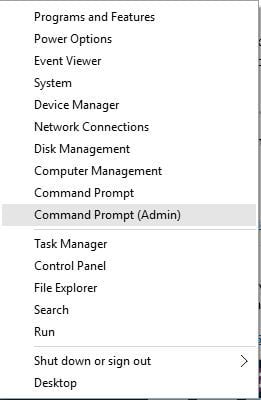
- Press Windows Key + X and choose Command Prompt (Admin) from the menu.

- Once the Command Prompt opens, enter the following lines and press Enter after each line:
- cd C:WindowsSystem32driversetc
- notepad hosts

- Notepad will now open the hosts file, and you should be able to make the necessary changes.
2. Copy the hosts file to a different location
- Go to C:WindowsSystem32driversetc and locate hosts file.
- Copy it to your Desktop, or any other folder that you can easily access.
- Open the hosts file on your Desktop with Notepad or any other text editor.
- Make the necessary changes and move the hosts file back to C:WindowsSystem32driversetc directory.
Edit your hosts file easily by following this step-by-step guide.
3. Make sure hosts isn’t set to Read-only
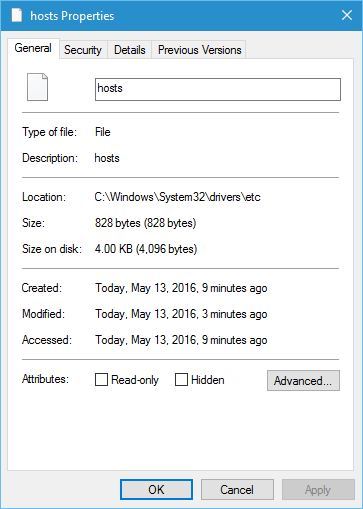
- Go to C:WindowsSystem32driversetc.
- Locate the hosts file, right-click it and choose Properties from the menu.
- Go to the Attributes section and make sure the Read-only option isn’t checked.

- Click Apply and OK to save changes.
Now you should be able to make the necessary changes to the hosts file. After you’re finished, it might be a good idea to set hosts file back to Read-only mode again.
Sometimes, all your documents are read-only, including your hosts file. If you want to change them properly, you can find more info about that in this quick guide.
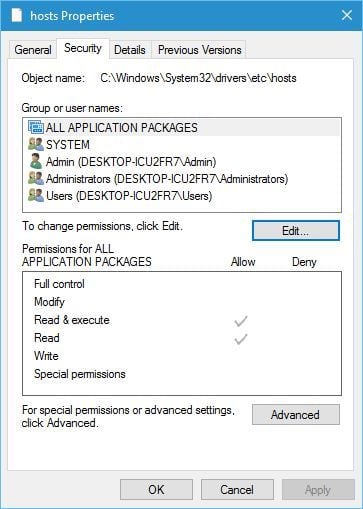
4. Change the security settings for hosts
- Navigate to C:WindowsSystem32driversetc.
- Locate hosts file, right-click it and choose Properties.
- Navigate to the Security tab and click the Edit button.
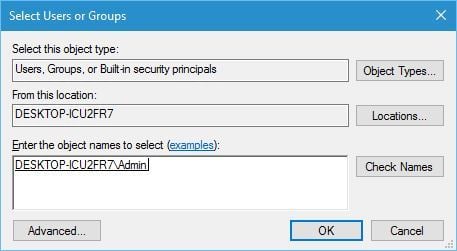
- You should see the list of users and groups on your PC that have access to the hosts file. If your user name or group is on the list, click it and make sure that it has Permissions set to Full control. If your user name isn’t on the list, click the Add button.
- Enter the user name or the group name in the Enter the object names to select the field and click Check Names and OK.

- A new user or group will be added to the list. Now you need to select the newly added group or user and check the Full control option below.
- Click Apply and OK to save changes.
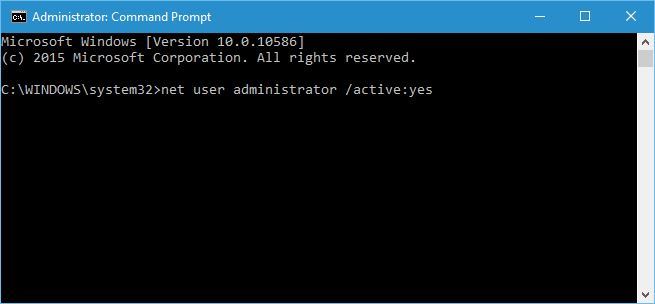
5. Use the hidden administrator account
- Press Windows Key + X and choose Command Prompt (Admin).
- When Command Prompt opens, enter net user administrator /active:yes and press Enter. This will activate the hidden administrator account.

- After you have activated the administrator account, you can switch to it, and try editing the hosts file.
Most system files are protected, therefore you need an administrator account in order to make changes to them. Since hosts are one of the system files, it requires an administrator account in order to edit it.
If you don’t use an administrator account, you can enable a hidden administrator account and use it to make the changes to the hosts file.
After you made the changes to the hosts file, you can come back to your original account, start Command Prompt as administrator again and enter net user administrator /active:no to disable the hidden administrator account.
The hosts file is a system file, so it’s protected, and usually, it’s not advised that you edit it, but if you decide to do so, it’s always good to know how to reset hosts file to default in Windows 10 in case anything goes wrong.
If you have any more questions, feel free to leave them in the comments section below.
[wl_navigator]