Fix Close programs to prevent information loss error
![]() 4 min. read
4 min. read
![]() Updated on
Updated on
Share this article

Improve this guide
Read our disclosure page to find out how can you help Windows Report sustain the editorial team Read more
Key notes
- Computer memory problems are nothing out of the ordinary these days.
- If getting the Close programs to prevent information loss error, you’re likely looking at a computer memory issue. Be sure to restart your PC and check available RAM.
- If you encounter similar problems, you’ll surely find these computer memory tips handy.
- You may also be interested in checking out more useful guides in our Windows 10 errors hub.

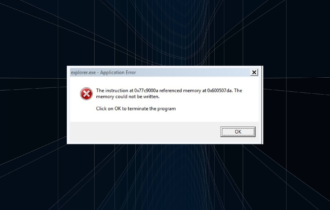
There’s a large variety of pop-up notifications you may encounter in Windows 10. One of the errors that are uncommon, but still occurs from time to time will inform you to close programs in order to prevent information loss.
Basically, this occurs due to substantially reduced RAM or Virtual Memory. As you probably know, RAM is, among other things, responsible for real-time progress saving within apps.
So, the system informs you that you may lose sensitive data because RAM can’t cover some of the active applications. For that purpose, we prepared the most common solutions for the issues at hand.
How can I fix Close programs to prevent information loss error?
1. Restart your PC

On some occasions, due to extensive use without restart, your PC can get into resource problems. Namely, the entire Virtual Memory may get relocated between active and recently closed programs.
That will cause a lack of available memory and you’ll be prompted with the above-mentioned message. Basically, memory allocation get’s maxed and that might slow down the system or cause errors.
So, the first obvious step is to restart your PC and let it completely reshuffle resources. After that, you should be able to continue with the seamless use.
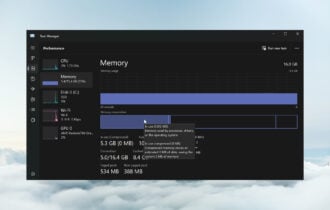
2. Check available RAM
Yes, you might have 32GB of RAM and still have this problem. Firstly, even though RAM is physically present, it doesn’t always mean that the system can read it.
So, navigate to System Properties and make sure that your PC has enough RAM available. Sometimes you may need to remove and place RAM sticks again or change slots.
It’s not advised to run Windows 10 without at least 1GB or 2GB of RAM depending on the system architecture.
3. Check startup programs and RAM-hogging processes
- Right-click Taskbar and open Task Manager.
- Open the Startup tab.

- Disable non-essential programs from starting with the system.
- Confirm changes and restart your PC.

Even though you pack more than enough RAM to multitask immensely, there’s always a limit. Especially if your system is overwhelmed with resource-hogging programs.
So make sure to navigate to Task Manager and kill processes that aren’t used at the moment or the ones that use too much RAM. Just make sure not to kill any system-related process and you should be fine.
Moreover, a startup can heavily impact all-around system performance. If it takes too much for a PC to start, there’s a chance that it will affect later usage and substantially reduce available RAM.
In Windows 10, we get startup preferences within Task Manager, so it’s easy to regulate startup programs. If you’re still seeing the warning message, make sure to try out the final step below.
4. Change Virtual Memory relocation
Virtual memory is an essential part of your system even though you can’t track its usage like RAM or HDD.
It utilizes both hardware and software and without it, even the standard computing procedures would be barely usable and their respective progress lost.
So, it’s imperative to have enough relocated virtual memory in order for your system to function as intended. In addition, if there’s not enough virtual memory, you can get prompted with the pop-up notification just like the one we’re addressing today.
For that purpose, we advise you to set memory relocation to Automatic manage paging file size for all drives. How do you change your virtual memory?
You need to open Control Panel > System Properties and under the Advanced tab > Performance, click Settings. Under the Advanced tab > Virtual memory, click Change.
Check the Automatic manage paging file size for all drives box. Then, confirm changes and restart your PC.
You can’t open Control Panel? Take a look at this step-by-step guide to find a solution.
That should resolve your problems and relieve you of frequent warnings. If you have any questions or an alternative solution for this problem, make sure to tell us in the comments.
[wl_navigator]