How to Disable Skype Ads on Windows Computers
Say goodbye to ads forever with this quick tweak
![]() 2 min. read
2 min. read
![]() Updated on
Updated on
Share this article

Improve this guide
Read our disclosure page to find out how can you help Windows Report sustain the editorial team Read more
Key notes
- When you're using Skype on a Windows PC, you encounter ads in the app.
- Skype ads are a built-in feature, that is present on all devices.
- Luckily, you can disable ads on Skype without using any software or complicated solutions.

Are you tired of seeing Skype ads everywhere?
If you want to get rid of or remove the Skype ads that are being displayed in the home menu and also in the chat window, follow the steps below and learn how to use a “clean” Skype app and environment.
Are there ads on Skype?
The latest versions of Skype have brought annoying ads displayed not only in the home menu but also on the chat windows which can be stressful for all of us.
The ads have led to people uninstalling Skype from their Windows 10, 8, and Windows 8.1 devices. However, this is a last-resort measure that doesn’t need to be applied, as we have a fix for the ads.
Anyway, if you are tired of these ads, then you should learn how to disable them as there is an easy method that can be applied to that matter.
This procedure can be performed on any Windows system, so the steps below are also compatible with Windows 11, Windows 10, 8, and Windows 8.1 devices.
How can I disable ads on Skype?
1. Launch Control Panel on your Windows PC.
You can access Control Panel by pressing Win + R and by searching for “control”. After, click on “ok” and then run Control Panel.
Also you can just search for Control Panel by using the Windows Search feature – just type the word “control” on the search box and choose Control Panel from the list that will be displayed.
2. Navigate to Network and Internet (Network and Sharing Center).

3. From the window that will be displayed, tap on the Security tab.
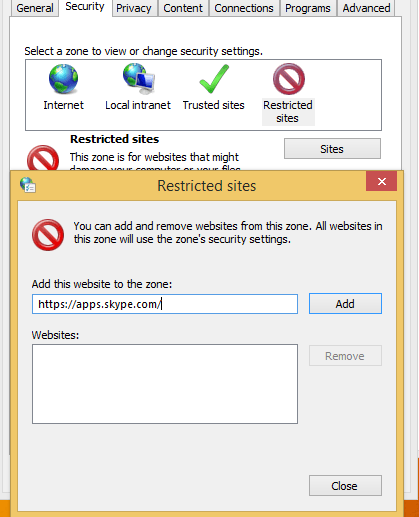
4. Then, from the first box, click on Restricted sites.
5. Up next, tap on the Sites button. A dialog box dubbed as Restricted sites should be now displayed.
6. In the same dialog box, type https://apps.skype.com/.
7. Save your changes and close Control Panel.
8. Now just restart Skype and enjoy the ads-free program. Instead of the annoying ads, you should now see an empty placeholder.
No matter what Windows OS you are using, whether it is Windows 11, Windows 10 or even Windows 8, it is just as easy to disable Skype ads.
All you need to do is add Skype to the list of restricted sites via Internet Properties. In doing so, you will ensure that the app’s ads will no longer show up, and will display a placeholder in their stead.
Speaking of blocking ads, you can also block them on your browser as well. There are many browser extensions that allow you to disable ads and enjoy a smooth browsing experience. Here are some examples of such extensions:
- The Adguard AdBlocker extension is now available on Microsoft Edge
- Adblock and Adblock Plus extensions available now for Microsoft Edge
- How to Block Bing Ads in Windows 10, 8.1
Perfect; you now know how to remove Skype ads from the home menu and chat window. Remember that this method can be applied on any Window system, so you can anytime try it on your own Windows 11, Windows 10, 8, and Windows 8.1 device.
We hope you successfully removed ads from your Skype app on your computer. Write down in the comments section below whether you encountered any difficulties following our guide.