Toshiba webcam not working
![]() 6 min. read
6 min. read
![]() Updated on
Updated on
Share this article

Improve this guide
Read our disclosure page to find out how can you help Windows Report sustain the editorial team Read more
Key notes
- Toshiba laptops are very reliable devices, but still, many times the webcam might malfunction. First step is always check the drives. Read more about this and other methods in the full article.
- Sometimes the proper drivers might be already installed and this might not the root cause this your issue. For that purpose, we advise you to try original OEM's software or some other third-party camera app.
- If you have other similar issues, go ahead and check our Webcam Troubleshooting Hub.
- For more troubleshooting guides, you can bookmark our Laptop & PC Hub.
Toshiba laptops are very reliable devices, but still, their users are not without issues. One commonly reported issue concerns the webcam which isn’t always working on Windows 10.
There are so many reasons why this may occur, so we’ll cover all approach angles in order to help you. If you need to fix the Toshiba webcam, check the steps below.
What can I do if Toshiba webcam is not working
- Check drivers
- Scan for malware
- Run Windows Troubleshooter
- Use OEM’s camera software
- Check BIOS
- Tweak Registry
- Check hardware
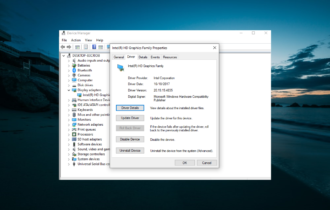
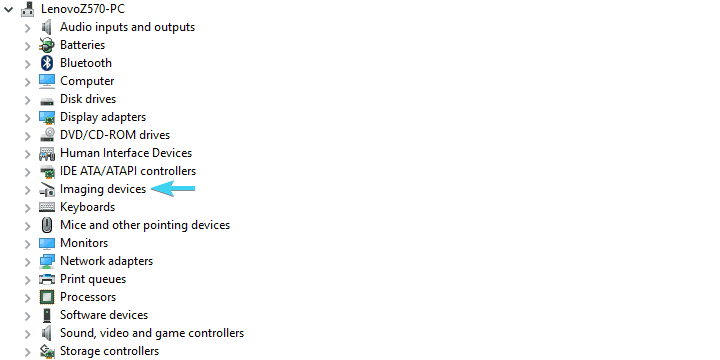
1. Check drivers
- Right-click Start and open Device Manager.
- Navigate to Imaging devices.

- Right-click on your webcam and choose Update driver.
- Restart your PC and look for changes.
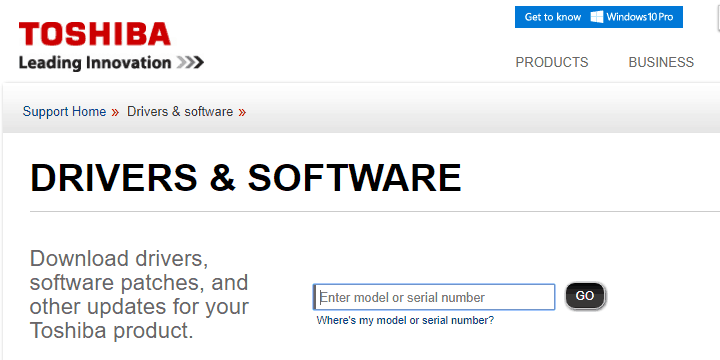
Now, if this wasn’t enough, you should navigate to Toshiba’s official site and download proper drivers from there.
- Navigate to Toshiba’s official site by clicking on this link.
- Open the Drivers & Software section.
- In the Search bar, type your device model and press Enter.
- That way, you should be able to locate proper and updated camera drivers.
- Download, install drivers and restart your PC.
In 90% of reported issues, the problem was driver-related. As you might know, drivers are the essential part of the Windows shell, and, consequently, without proper drivers, you won’t be able to run a single piece of hardware. That includes a built-in camera.
So, for all intents and purposes, you’ll need to check your drivers firstly before we move to additional steps. When it comes to Toshiba webcam drivers, most of the time, those are provided by Windows Update. Now, this might work for some users, while for others, the generic driver won’t suffice.
Automatically update drivers (third-party tool suggested)
We also strongly recommend a third-party driver updater tool that uses advanced updating technology to will help you update your drivers in order to avoid permanent damage to your computer by manually downloading the wrong driver versions.
- Download and install the Outbyte Driver Updater app.
- Launch the software and wait for the app to detect all incompatible drivers.
- Now, it will show you a list of all outdated drivers to select the ones to Update or Ignore.

- Click on Update & Apply Selected to download and install the latest versions.
- Restart your PC to ensure the applied changes.


Outbyte Driver Updater
Maintain your device healthy by letting OutByte Driver Updater find the latest driver options.2. Scan for malware
Some users tried every known workaround but succeeded in resolving camera issues only after dealing with viruses. It seems that certain malicious software affects laptop cameras rendering them unusable. Namely, it seems that it automatically disables the camera, and users are left with the black screen.
Now, for in order to address this concern, you’re going to need either third-party antivirus or up-to-date Windows Defender.
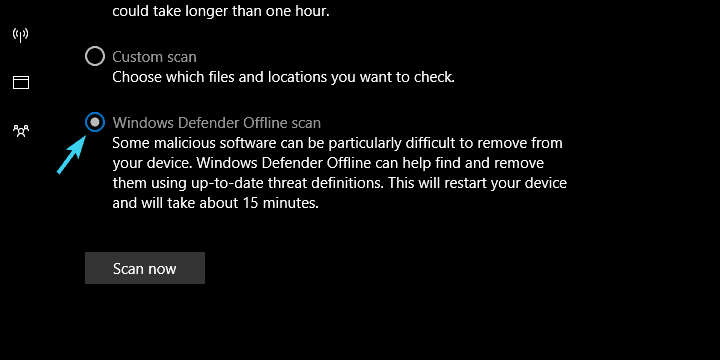
If you’re not sure how to perform a deep scan with Windows Defender make sure to check the instructions we presented below.
- Double-click on Windows Defender icon in the notification area to open the dashboard Security Center.
- Open Virus & threat protection.
- Choose Advanced scan.
- Select Windows Defender offline scan.
3. Run Windows Troubleshooter
This might seem like an extremely generic solution, but, when in doubt — try every given option. Windows’ native troubleshooting tools changed a lot on the latest few system iterations, but they remained useful for minor issues troubleshooting and fixing. If nothing else, they can give you a better insight into the cause of the problem.
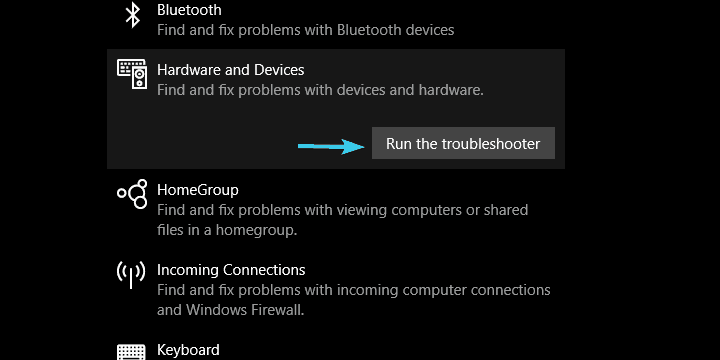
- Press Windows key + I to open the Settings app.
- Choose Update & security.
- Select Troubleshooting from the left pane.
- Run Hardware and Devices troubleshooter.
4. Use OEM’s camera software
Occasionally, it doesn’t matter if your camera drivers are properly installed. It all falls down to the individual program that’s responsible for the camera. In Windows 10, once you install the system, the default Camera app will take over the camera device. And, as we already said in one of the previous articles, this app can misbehave occasionally.
For that purpose, we advise you to try original OEM’s software or some other third-party camera app and look for changes.
Just make sure not to download the untrusted applications and you should be good to go. A detailed explanation of the best-suited apps for the job can be found in this article.
5. Check BIOS
We all know that UEFI and BIOS settings on laptops are fairly limited option-wise. However, some users reported that their Toshiba laptops have an option to enable or disable the built-in camera in BIOS settings. We can’t say with certainty what models have this option, but it will cost you nothing to go and check out on your own.
If you have this option, there’s a chance that this mistakenly led to disabling your web camera. In order to do so, follow the instructions below:
- Restart your PC and, while booting, press repeatedly the Delete button.
- Once you’re in the Boot Settings menu, choose the Advanced tab. It may differ on various Toshiba laptops.
- Choose System Configuration.
- Select Web Camera and make sure to Enable it.
- Save changes and exit BIOS settings.
6. Tweak Registry
Due to differences in the encoding standard, webcams available on older devices start misbehaving in Windows 10. If your Toshiba laptop falls into this category, you might need to turn to a subtle Registry trick in order to use your camera like before the problem emerged.
This might come as a surprise, but there’s a registry entry that fixes the problem completely. However, act with caution. We don’t want to make rush moves while in the Registry Editor.
So, in order to avoid additional issues and to resolve the camera problem, follow closely the instructions below:
- In the Search bar, type Regedit.
- Right-click the Registry Editor and run it as an administrator.
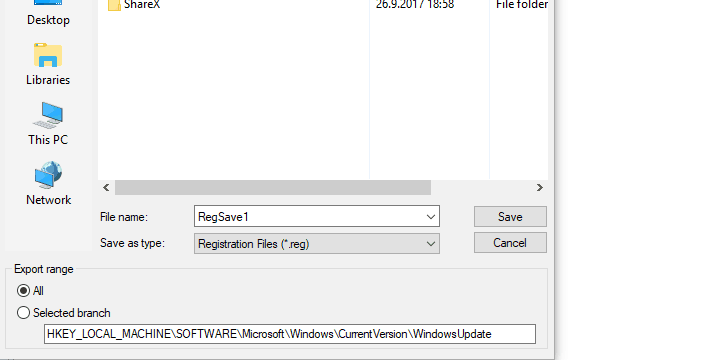
- Click on File, choose Export, and backup your registry. This is a security measure in case something goes wrong.
- Follow this path:
- For 32-bit system: HKEY_LOCAL_MACHINESOFTWARE
MicrosoftWindows media foundationPlatform - For 64-bit system: HKEY_LOCAL_MACHINESOFTWARE
WOW6432NodeMicrosoftWindows media foundationPlatform
- For 32-bit system: HKEY_LOCAL_MACHINESOFTWARE
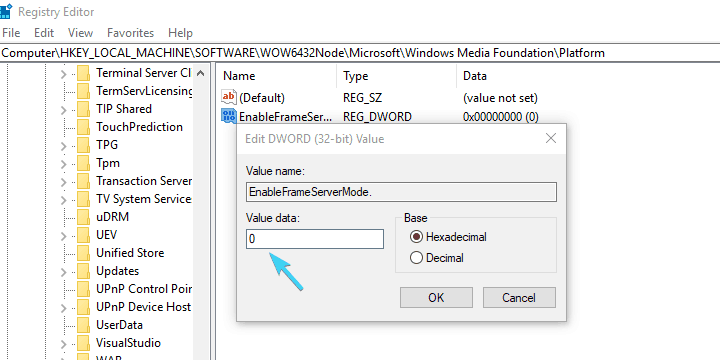
- Right-click in the right window and choose New > DWORD (32) Value.
- Rename this value and name it EnableFrameServerMode.
- Right-click and choose to Modify this newly created registry value.
- Set its value to 0 (zero) and save changes.
- Restart your PC.
7. Check hardware
Finally, if none of the previous software-related workarounds helped you, there’s a chance that the hardware is malfunctioning. There are some things you can do in this department, too, but we advise you to rather take your PC for a repair.
If you’re inexperienced, it’s always better to let the professionals take care of your laptop. And, as we’re aware, the camera sensor replacement isn’t too pricey. On the other hand, if you’re an experienced user, you can try googling for hardware troubleshooting and perform minor repairs on your own.
Either way, that should conclude it. We certainly hope you were able to resolve the issues with your Toshiba webcam in Windows 10 by following the aforementioned steps.
In addition, don’t forget to share with us your webcam issues in detail. You can do it in the comments section below.
In the search bar type Device Manager and select. Click the dropdown arrow next to Imaging devices/Camera. Right-click Integrated Camera and select Disable device. If your Toshiba webcam not working, this guide will help.