FIX: Windows 7 Update Center gets stuck checking for updates
![]() 9 min. read
9 min. read
![]() Updated on
Updated on
Share this article

Improve this guide
Read our disclosure page to find out how can you help Windows Report sustain the editorial team Read more

Many Windows 7 users who have recently tried to install the latest updates on their computers reported they couldn’t because the Windows Update center wouldn’t work.
The most common cause for this type of issue can easily be eliminated because users have confirmed they had disabled their antivirus program during the update attempt.
This issue is so annoying that users are even considering upgrading to Windows 8.1, hoping that a new Windows will unblock the Windows Update center.
Windows 7 users are complaining that Windows Update gets stuck while checking for updates
I reinstalled windows 7 after a error with windows automatic repair, and now windows update will not work.[…] I have tried the automatic repairs from Microsoft, removing downloaded files in software distribution folder, using CCleaner, and disk cleanup. I am running no antivirus programs because of this to make sure that’s not a problem. I am also considering updating to windows 8.1 because maybe a new windows will help. My only issue with that is I don’t want to loose any files.
On top of that, here are some more common error messages related to this issue:
- Windows 7 update checking for updates forever – Sometimes, Windows is not even able to find updates, leaving you stuck in an infinite loop of checking for updates.
- Windows 7 update stuck installing – There’s a chance Windows will actually download updates, but actually get stuck installing them.
- Windows 8.1 update stuck on checking for updates – It’s also common for Windows 8.1 to get stuck during installing updates.
- Windows 10 update stuck on checking for updates – The same thing goes for Windows 10.
- Windows 7 update stuck downloading – There’s a chance Windows 7 will manage to find updates, but get stuck downloading them.
What to do if Windows 7 Update Center gets stuck while checking for updates
Table of contents:
- Use the Microsoft Update Catalog
- Go to Microsoft’s Download Center
- Run the Windows Update troubleshooter
- Run the built-in Update troubleshooter
- Delete the Software Distribution folder
- Make sure the Update service is running
- Run the System File Checker tool (SFC.exe)
- Reset the content of the Catroot2 folder
- Run the System Update Readiness tool (CheckSur.exe)
- Change DNS server settings
- Perform System Restore
- Use WindowsUpdateLoopFix
Fix: Windows Update got stuck in Windows 7
Solution 1- Use the Microsoft Update Catalog
The Microsoft Update Catalog is a very reliable method, but the catch is that you have to use Internet Explorer, otherwise you can’t access the site.
- Go to Control Panel > change the View to Small icons so you can see things easier.
- Go to Settings > select Never search for updates.
- Save the changes > restart your computer.
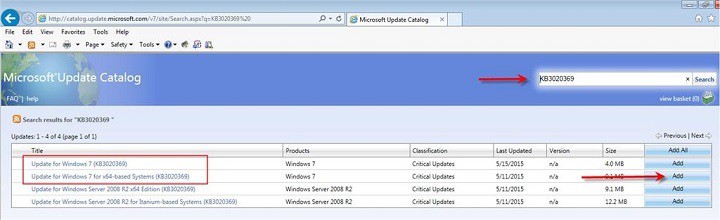
- Launch Internet Explorer > go to the Update Catalog.

- Select the latest updates > add them to your update basket.

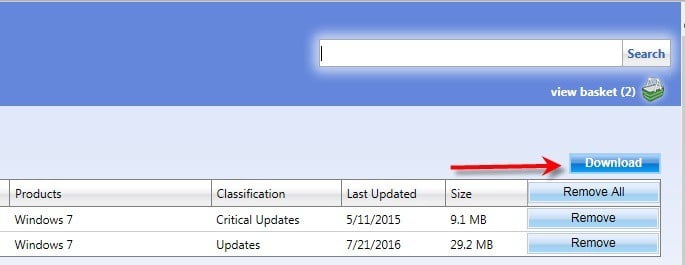
- Click on View Basket > download the content of your basket to your desktop

- Locate the updates on your desktop > double-click them to launch the installer.
- Once the updates have been installed, restart your computer.

Epic guide alert! Everything you need to know about keeping your Windows 7 forever!
Solution 2 – Go to Microsoft’s Download Center
- Select the latest updates > download them on your computer.
- Double-click them > wait for the installation to complete.
- Restart your computer.
There you go, you can update your Windows 7 without using the automatic update feature.
Solution 3 – Run the Windows Update troubleshooter
Download the troubleshooter from Microsoft, launch it, and follow the on-screen indications. Once the process is completed, restart your computer.
Solution 4 – Run the built-in Update troubleshooter
Besides Microsoft’s troubleshooting tool from above, Windows 7 also has a built-in troubleshooter. So, you can also run this tool to solve your update problems.
In case you don’t know how to run Windows 7’s troubleshooting tool, follow the instructions below:
- Go to Control Panel
- Now, head over to Troubleshooting
- Under System and Security, choose Fix Problems with Windows Updates
- Follow further on-screen instructions
- Wait for the process to finish
- Restart your computer
Update Troubleshooter stopped working? Here’s how to fix the problem with our guide!
Solution 5 – Delete the Software Distribution folder
The Software Distribution folder is a specific folder where all data and files of Windows updates are temporarily stored. If there’s something wrong with this folder, you won’t be able to install updates.
So, we’re going to delete this folder, in order to make your Windows Update mechanism work again. Here’s how to do that:
- Right-click the Start menu and run the Command Prompt (Admin).
- In the command line, type the following commands and press Enter after each:
- net stop wuauserv
- net stop bits
- rename c:windowsSoftwareDistribution SoftwareDistribution.bak

- net start wuauserv
- net start bits
- Now, try to run Windows Update and check for changes.

Solution 6 – Make sure the Update service is running
As its name says, Windows Update service is essential for installing Windows updates. Now, if you’ve wanted to skip some update in the past, there’s a chance you got this service disabled.
So, we’re going to check if this service is disabled and re-enable it, if needed. Here’s how to do that:
- Go to Control Panel
- Click on System and Security
- Go to Administrative Tools > Services

- Find the Windows Update service
- If the service is disabled, right-click it and go to Enable

Solution 7 – Run the System File Checker tool (SFC.exe)
- Launch Command Prompt >type sfc /scannow > press Enter.
- After the scan is finished > try to install updates again.
Check out our guide and learn to use System File Checker like a real technician!
Solution 8 – Reset the content of the Catroot2 folder
- Launch Command Prompt
- Type the following commands, hitting Enter after each command:
net stop cryptsvc
md %systemroot%system32catroot2.old
xcopy %systemroot%system32catroot2 %systemroot%system32catroot2.old /s - Delete the content of the catroot2 folder, but keep the folder itself. You should find it here: C:Windowssystem32CatRoot2.
- Type the command net start cryptsvc.
- Exit the Command Prompt window.
Solution 9 – Run the System Update Readiness tool (CheckSur.exe)
This tool runs a scan for inconsistencies that may prevent servicing operations. After you run the tool, the CheckSur.log file is saved in the following location: .
- Download the System Update Readiness tool from Microsoft for the 32-bit Windows 7 version, or for the 64-bit Windows 7 OS.
- Install and run the tool.
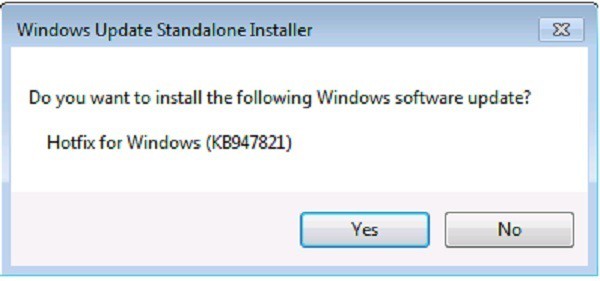
- In the Windows Update Standalone Installer dialog box, click Yes.

- Wait for about 15 minutes for the tool to install. When installation is complete, click Close.
Try to install the latest Windows 7 updates again.
Solution 10 – Change DNS server settings
Some users also suggest that changing the DNS server can also help with faulty updates. That’s mainly because your network operator’s default DNS servers are not working so well.
So, we’re going to change the DNS server settings to widely-used Google DNS.
Here’s how to do that:
- Open Network Connections. You can do that by pressing Windows Key + X on your keyboard and choosing Network Connections option.
- Locate your network connection, right click it and choose Properties from the menu.
- When Properties window opens, select Internet Protocol Version 4 (TCP/IPv4) and click the Properties button.
- Now select Use the following DNS server addresses option.
- As Preferred DNS server enter 8.8.8.8. As for Alternate DNS server, you need to enter 8.8.4.4. If you want, you can also use 208.67.222.222 as Prefferedand 208.67.220.220 as Alternate DNS server.
- After you’re done, click OK to save changes.
Here’s what to do if the DNS server cannot be reached. It’s really simple!
Solution 11 – Perform System Restore
And finally, if none of the previous solutions worked, we’ll perform System Restore. There’s a chance something got disrupted in your system, so (hopefully) System Restore will solve that.
Here’s how to perform System Restore in Windows 7:
- Go to Control Panel.
- Go to System and Security > System.
- Under the Control Panel Home menu, click System protection.
- Click System Restore.
- Choose the Restore point.
- Follow further on-screen instructions.
- Once you initiate the process, your computer will restart, and System Restore will get it to the selected previous state.
Solution 12 – Use WindowsUpdateLoopFix
If you want to quickly fix this problem, it’s advised to use the WindowsUpdateLoopFix script. This script was available on the Microsoft Answers forum, but it has since moved to GitHub for ease of management. At the time of writing, the original post on Microsoft Answer’s forum has over 1600 upvotes, so the script should be safe to use and it won’t cause any damage to your PC.
It seems that this issue appears because KB3020369, KB3172605 and Windows Update Agent for Windows 7 (v7.6.7600.256) updates are missing from your PC. By using this script, the updates will be downloaded and installed automatically. To use this script, just follow these steps:
- Download the latest version of WindowsUpdateLoopFix.
- Close all running applications.
- Now double-click on UpdateFix.exe.
- Select Express Fix (Recommended) option and wait for the script to finish.
After the script is completed, the issue should be resolved.
We hope these workarounds help you to fix the Windows 7 update issues.
RELATED STORIES YOU NEED TO CHECK OUT: