Windows Shell Experience Host High CPU: 5 Ways to Fix it
Follow our guide for a quick fix of Windows Shell Experience Host high CPU
![]() 5 min. read
5 min. read
![]() Updated on
Updated on
Share this article

Improve this guide
Read our disclosure page to find out how can you help Windows Report sustain the editorial team Read more
Key notes
- High CPU usage can cause system crashes and ruin the user experience on Windows 10.
- Display settings like the desktop background and image play an important role in the Windows Shell CPU usage.

As great as Windows 10 has proven to be, it has flaws. For example, users have recently complained about the Windows Shell Experience Host high CPU usage. It is scary because problems with CPU usage often lead to system crashes.
We have investigated this problem and have come up with some effective resolutions and possible causes so that you may avoid future occurrences.
Why is Windows Shell Experience Host using so much CPU?
From interacting with users who faced this problem, we have gathered the primary trigger, which includes:
- Problems with system files – For most users, this will refer to corrupted or bad system files on the computer.
- Issues with the graphics driver – This is often because the driver is corrupted or outdated. Whichever it is is dangerous for your computer, and we will explain the best steps in this guide.
- OS updates – While these are mainly beneficial, there are a few times when an update may introduce a system bug leading to the Windows Shell Experience Host’s high CPU usage.
- Conflicting software – These are often third-party tools that may not best suit your computer.
- Desktop Backgrounds – Many users report slideshow background as the main reason for Windows Shell Experience Host causing high CPU usage.
You need not worry because regardless of the cause, we have solutions to help resolve it and make your computer more usable.
What is Windows Shell Experience Host used for?
Its primary function is connected to changing desktop backgrounds in Windows 10 computers. We could say that it provides users with a visual interface on their computers.
This most often includes OS elements like the Search, Start menu, and notification, as well as other aspects that enable you to interact with Windows 10.
If a process uses your CPU more than it should, it can be a problem since your computer will use more power and produce more heat, which is especially bad for laptops. For example, users report that Windows Shell Experience Host uses 30-35% of CPU, which is a lot, so let’s see how to fix that.
How do I fix Windows Shell Experience Host high CPU usage?
Before going into these solutions, we advise that you restart your computer. A reboot helps end troublesome processes and could correct the high CPU usage.
1. Change your desktop to a static background
- Press Windows + I to open the Settings app.
- Click on Personalization and select Background from the menu on the left.

- From the drop-down menu, select Picture.

- Save your settings, and Windows Shell Experience Host issues should be resolved.


Users report that this process uses your hardware power if you set your desktop background to a slideshow, so the best solution is to put your desktop to a static picture.
2. Turn off the automatic color changing
- Press Windows + I to open the Settings app.
- Click on Personalization and select Colors from the menu on the left.

- Find the Automatically pick an accent color from my background option and turn it off.

- Save your changes.


If changing the background behavior didn’t get the job done, you can try disabling automatic color changing.
3. Update your computer
- Press Windows + I, and select Security & Update.

- Click on Windows update and click the Check for updates button on the right pane.


Ensure you’re running the latest Windows OS updates on your machine. As you know, Microsoft regularly rolls out system updates to fix various issues and improve Windows 10‘s stability.
It’s possible that the pending updates are actually aimed at focusing on high CPU usage and may quickly fix your problem.
4. Run SFC
- Press Windows + R, type cmd, then hit Ctrl + Shift + Enter.

- When the elevated Command Prompt opens up, type the script below and hit Enter.
sfc /scannow
- Wait for the scanning process, and then restart your computer. All corrupted files will be replaced on reboot.


If specific Registry keys have been incorrectly changed or even deleted, you may encounter various issues on Windows 10, including high CPU usage.
Try repairing your Registry to cross this hypothesis off your list. However, remember to back up your registry first in case anything goes wrong.
The safest way to check for system file corruption is to use Microsoft’s System File Checker. With the help of a simple Command Prompt instruction, you can check the integrity of all system files and repair the problematic ones.
You can also repair your registry using a registry cleaner like CCleaner.
5. Limit CPU usage
- Press Ctrl + Shift + Esc to open the Task Manager.
- Click on the Details tab and locate Windows Shell Experience Host.
- Right-click on it, select Set Affinity, then choose the CPU limit threshold.

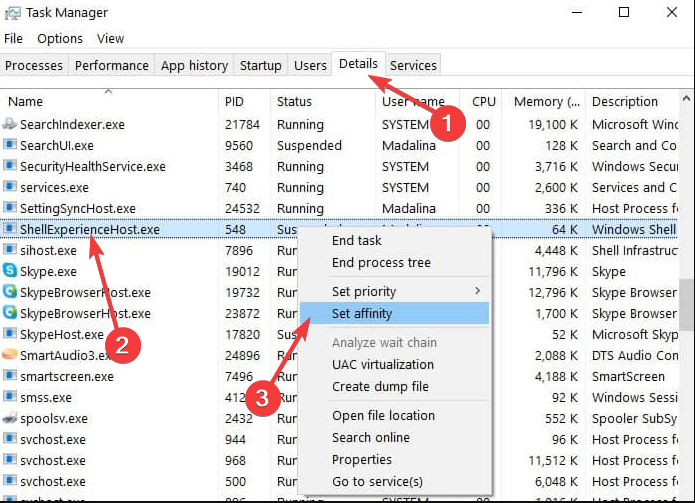
You can also manually limit Windows Shell Experience Host’s CPU usage. However, remember that this action may severely impact graphics quality and trigger other graphics-related issues, so proceed at your own risk.
6. Run a virus scan
- Type Windows Security in the Search bar, and click on the relevant search result.

- Now, click on Virus & threat protection here.

- Click on Scan options.

- Select Full scan and click the Scan now button at the bottom.


That is all; we hope this article helped you to reduce CPU usage on your Windows 10 computer to normal. If you have any questions, comments, or suggestions, see the comment section below.