Fix: iTunes causes high CPU usage in Windows
![]() 6 min. read
6 min. read
![]() Updated on
Updated on
Share this article

Improve this guide
Read our disclosure page to find out how can you help Windows Report sustain the editorial team Read more

When it comes to multimedia platforms and music management, not many applications are better or more popular than iTunes. Nonetheless, even Apple’s simplicity and intuitive design won’t prevail if iTunes devours your resources with abnormally high CPU usage in Windows 10. Even when in an idle state.
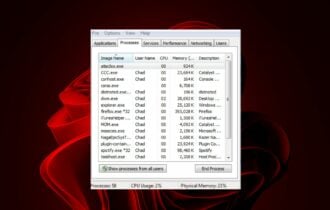
Various users reported that iTunes is consuming up to 40% of CPU which is more than strange if we take into consideration that this is, more or less, a multimedia player. For that purpose, we prepared a list of possible solutions that should help you restrain iTunes CPU hogging.
In case you’ve experienced this or a similar issue with iTunes, make sure to check the list below.
Fix: iTunes hogs on CPU in Windows 10
Solution 1 – Update iTunes
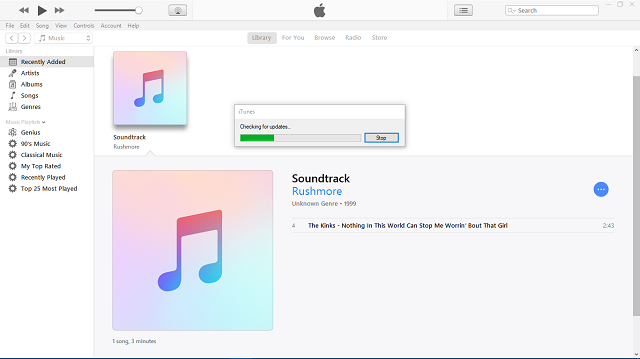
Users who reported issues stated that the problem emerged after the upgrade to Windows 10 Creators Update. Before that, iTunes worked as expected. After the Creators Update, the resource consumption hit the ceiling, which, consequently, affected the overall system performance. So, an update might just be enough to address this.
Occasionally, third-party software needs some time to adjust to system changes. In order to optimize their application for different surroundings, developers (at least, the capable ones) have to provide timely changes. That’s just the case with Apple’s iTunes for Windows, which has been lately updated to version 12.6.2. This version, allegedly, resolved the CPU hogging in Windows 10.
So, the task for you is to check for possible updates. You can do that by following these steps:
- Open iTunes.
- In the Menu bar, open Help.

- Choose Check for updates.
- Install available updates and restart iTunes.
In case you’re still experiencing critical levels of CPU activity, make sure to continue with further workarounds we presented below.
Solution 2 -Run iTunes as Administrator
In addition, there are restrictions the system creates for third-party programs. The initial thought is to prevent a program from doing something unwanted. Sadly, this occasionally does just the opposite: it slowdowns the application execution and thus downgrades its effectiveness and usability. And, occasionally (read: often), the affected program goes wild, just like iTunes in this scenario.
In order to avoid that, you can choose to run iTunes as administrator and, as some users stated, resolve the issue that way. Follow the instructions below to grant the administrative permission to iTunes in Windows 10:
- Close iTunes and kill its process in the Task Manager.
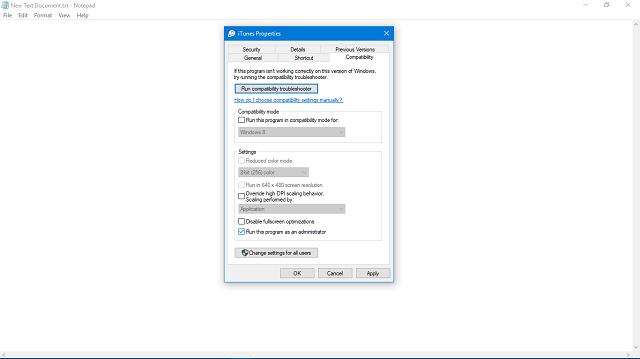
- Right-click the iTunes desktop shortcut and open Properties.
- Open the Compatibility tab.
- Check the ”Run this program as Administrator” box.
- Click OK to confirm the selection.
- Start iTunes again.
Solution 3 – Disable third-party Plug-ins
As you may know, iTunes is used to support third-party plug-ins. Yes, it seems a bit irregular if we take into account Apple’s approach to its software and hardware. With Apple, all is about exclusivity and this sounds odd, even though plug-ins vastly improve and enrich iTunes. But, there’s also the other side of the coin and the reasoning behind their decision to ditch third-party add-ons. At least the majority of them.
Some users reported that certain plug-ins affect the performance in Windows 10, and not in a positive way. After some time of extensive use, a few specific plug-ins started to misbehave and cause performance drops. Additionally, some of those add-ons may cause CPU hogging. This occurs mostly due to the incompatibility of a plugin and the current iTunes version.
So, if you run an older version of iTunes, make sure to update it and, additionally, delete the remaining plug-ins and scripts from the installation folder.
- Exit iTunes.
- Navigate to:
- C:UsersusernameApp DataRoamingApple ComputeriTunesiTunes Plug-ins
- C:Program FilesiTunesPlug-ins
- Delete Plug-ins folders and restart your iTunes Windows client.

Solution 4 – Reinstall iTunes
Starting from scratch can be painful and time-consuming, but nonetheless, reinstallation is always a valid solution for most of the issues regarding any third-party app. Especially after the system upgrade. Due to compatibility, system changes can initiate issues with iTunes. So, your safest bet to subdue the abnormal resource-hogging lies in the reinstallation.
Follow the instructions below to reinstall the iTunes Windows client:
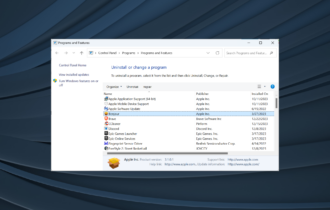
- In the Windows Search bar, type Control and open Control Panel.
- Choose Category view.
- Click Uninstall a program.
- Find iTunes on the program list and highlight it with a single click.
- Choose Uninstall and follow the prompts.
- Restart your computer.
- After the procedure is finished, download the iTunes installer here.
- Run the installer and follow the instructions to finalize the installation.
Alternatively, we recommend using a professional uninstalling tool for this process, because it can thoroughly remove all the stray files left behind by the app, something that can hardly be achieved manually.
Some apps and programs are infamous for being difficult to completely remove. Those pesky leftovers occupying disk space and the registry can be rather troublesome, so it is strongly advised to use professional removal software.
It’s a safe and convenient way to keep your system clean and highly functional. Furthermore, deleting iTunes with all of its folders might be a risky act if you are not tech-savvy and do not fully grasp how an uninstallation works.
So why not save yourself the trouble and go with an automatic option that applies clean code to clear the way for a new installation?
Solution 5 – Disable .xml in Windows Search Indexer
Finally, if none of the previous solutions normalized iTunes resource consumption, maybe Windows is causing the problem in the first place. A few tech-savvy users found out the culprit for the issue at hand. And it’s Windows Search Indexer. This Windows native service records all files and extensions you have on your storage, with the main purpose to speed up the search protocol.
Now, in theory, this is great. Just not that great for iTunes. Windows Search Indexer is indexing a .xml extension that iTunes uses to share the library data with other integrated applications. The fact that there’s an abundance of .xml files induces over-consumption of system resources. So, in order to address this, you should simply disable the indexing for this individual extension.
Follow the instructions below to disable the indexing for .xml files:
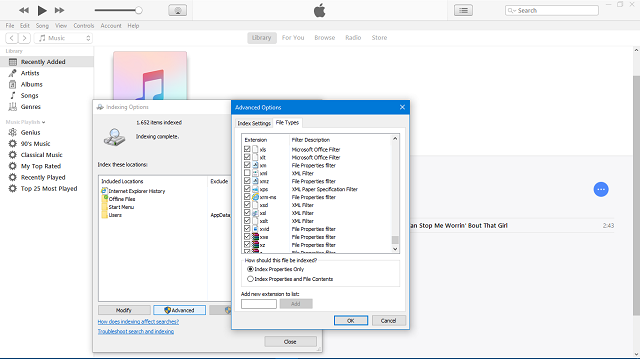
- In the Windows Search Bar, type ”Indexing” and open Indexing Options.
- Click on Advanced Options.
- In the Advanced Options tab, open File Types.
- Scroll down until you reach the .xml extension.
- Uncheck the box beside .xml and click OK.
- Restart your PC and give iTunes another try.
That should wrap it up. If you have any questions, suggestions, or remarks, we’ll be glad to hear from you. You can post your thoughts and opinions in the comments section below.