How to stop Windows 10/7 from searching for Wi-Fi networks
![]() 3 min. read
3 min. read
![]() Updated on
Updated on
Share this article

Improve this guide
Read our disclosure page to find out how can you help Windows Report sustain the editorial team Read more

Your list of wireless networks can get a tad huge if you have a lot of neighbors nearby. So, seeing that this can get very annoying very quickly, this short tutorial will show you how you can make your Windows 10, Windows 10 or Windows 7 device stop the search for Wi-Fi networks.
You can very easily access the feature to configure your very own wireless network search and stop the searches for others in Windows 8 or Windows 10. You only need to carefully follow the steps listed below and you can adjust this option as you wish.
How do I stop my PC from searching for Wi-Fi networks?
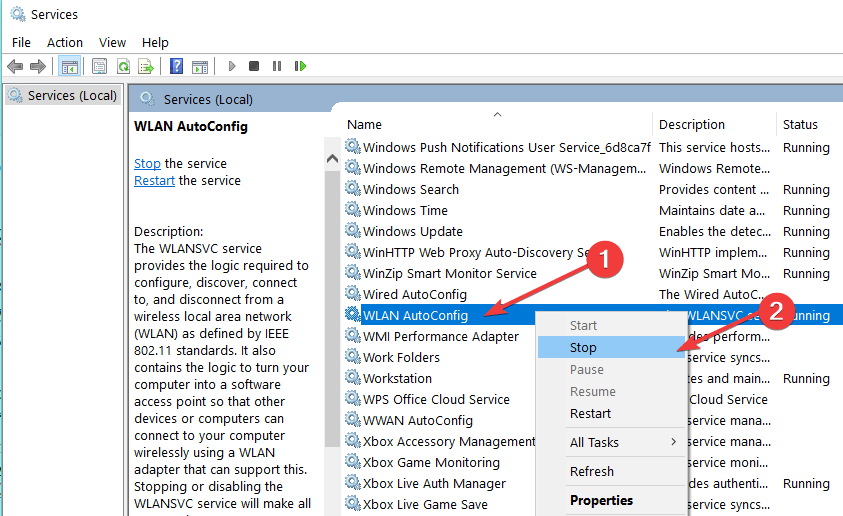
1. Disable Wireless Autoconfig
- Press the hold the “Windows” button and the “R” button.
- You should have in front of you the “Run” window.
- Write in the box within the window the following line: “Services.msc” but without the quotes.
- Press the “Enter” button on the keyboard.
- Left click on one of the options in the right panel side.
- Press on your keyboard the “W” button.
- Now you should find the Wireless Autoconfig feature or WLAN Autoconfig (on Windows 10)

- Right click on the Wireless AutoConfig option you have on the left side panel.
- Left click on the “Properties” option you have in that menu.
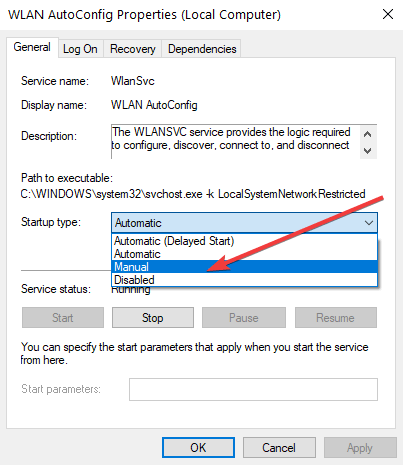
- Left click on the “Stop” button under the “Services status” topic.
- You will have there a feature that says “Startup type”.
- You will need to left click on the drop-down menu on the right side from “Startup type” and left click on the “Manual” option.

Note:You can also undo the changes by following the steps above and change back to the automatic search of the Wireless Networks - Left click or tap on the “ok” button button to close the window.
- Reboot your Windows 8 or Windows 10 device.
- Check and see if you still have your searching for the wireless networks enabled.
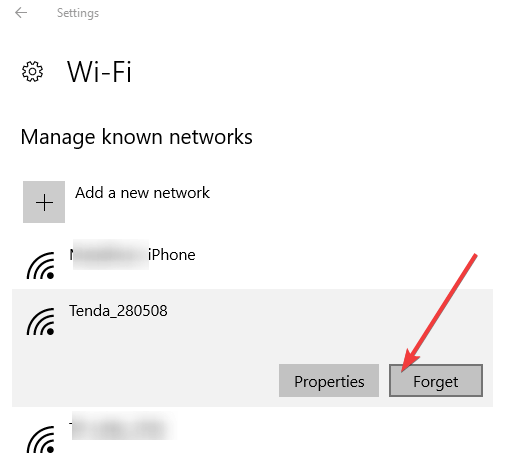
2. Forget other Wi-Fi networks
Another way to reduce the number of wireless networks available on the list is to simply use the Forget option. In this manner, you Windows computer will simply delete the networks it previously connected to or detected.
Here are the steps to follow:
- Go to Settings > Network and Internet > Manage known networks
- Right click on the wireless networks that you want to delete > select Forget > restart your computer.
Now that you know how to stop your searching for the wireless networks in Windows 8 or Windows 10, you can go ahead and configure only the network you want to use for your operating system. If you have any questions on this article, let us know in the comments below and we’ll do our best to help you further with this issue.
RELATED STORIES TO CHECK OUT:
- Block other Wi-Fi users with these 5 software solutions
- Fix: Antivirus is blocking Internet or Wi-Fi network
- 3 best Wi-Fi encryption software to protect sensitive data