Full Fix: Opencl.dll Problems in Windows 10/11, 7
![]() 7 min. read
7 min. read
![]() Updated on
Updated on
Share this article

Improve this guide
Read our disclosure page to find out how can you help Windows Report sustain the editorial team Read more
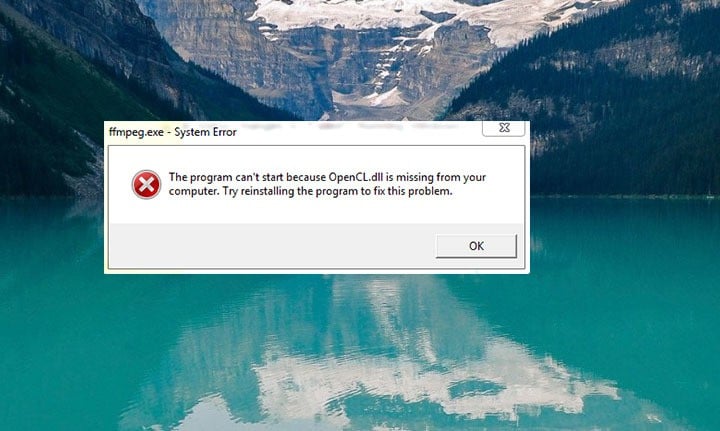
Although Windows 10 is becoming the most popular Windows on the market, it still has occasional bugs. Speaking of bugs, users have reported problems with opencl.dll in Windows 10, and today we’ll try to fix that.
How to Fix Opencl.dll Problems in Windows 10
Opencl.dll is an important file, and if this file is missing, you might encounter various issues. Speaking of issues, here are some problems reported by users:
- Opencl.dll missing Windows 10, 8, 7 – According to users, this issue can appear on any version of Windows, but you should be able to fix the problem by using one of our solutions.
- Opencl.dll corrupt – Sometimes this file can get corrupted, but you might be able to fix the problem simply by using the Windows 10 ISO file and DISM command.
- Opencl.dll missing from your computer – If this file is missing from your PC, you might not be able to run certain applications, but you can always copy the file from another PC.
- Opencl.dll missing AMD – According to users, this problem can appear due to your graphics card drivers, and to fix the problem you just need to update your drivers to the latest version.
- Opencl.dll cannot be found – Sometimes the necessary files might not be found, but you should be able to fix the problem simply by installing the latest Windows updates.
1. Update your graphics card drives
As we already mentioned, opencl.dll is related to your graphics card, so it wise to check for latest driver updates. To do this, go to your graphics card manufacturer’s website and find your graphics card model. Check for the latest drivers and install them. After the latest drivers have been installed check if the issue has been resolved.
You can manually update your graphic card drivers through Device Manager from Display adapters. Select the drivers you need and right-click to Update your drivers. After the updating process is finished restart your PC.
We also recommend a third-party tool (100% safe and tested by us) to automatically download all the outdated drivers on your PC.
- Download and install the Outbyte Driver Updater app.
- Launch the software and wait for the app to detect all incompatible drivers.
- Now, it will show you a list of all faulty drivers to select the ones to Update or Ignore.

- Click on Update & Apply Selected to download and install the newest versions.
- Restart your PC to ensure the applied changes.


OutByte
Keep your GPU in a flawless state without worrying about possible driver issues.2. Use Windows Image File
In order to do this, you’ll need to have Windows 10 ISO of the exact build that you have installed. We have to mention that this solution is a bit more advanced, so if you don’t know how to do it, maybe it’s best to contact an expert.
- Mount the ISO image.
- Run Command Prompt as admin.
- Create a temporary directory to mount Windows Image File using the following command:
- mkdir C:WIM
- Mount the WIM file:
- Dism /Mount-Wim /WimFile:D:sourcesinstall.wim /index:1 /MountDir:C:WIM /ReadOnly
- Run DISM:
- Dism /Online /Cleanup-Image /RestoreHealth /Source:C:WIMWindows /LimitAccess
- After the process is completed unmount the image and delete the folder created in Step 3:
- Dism /Unmount-Wim /MountDir:C:WIM /Discard
- rmdir C:WIM
- Restart your computer.
3. Copy the missing file
According to users, one way to deal with Opencl.dll problems is to copy the missing file manually. To do this, it’s usually best to copy the file manually from another PC.
To fix the problem, simply copy the file to C:WindowsSystem32 directory. If you’re using a 64-bit version of Windows, you need to copy the missing file to the C:WindowsSysWOW64 directory as well.
Before you copy these files, be sure to create a backup of original files, just in case. Once you overwrite the original files, you’ll need to register the new files. To do that, just do the following:
- Press Windows Key + X to open Win + X menu. Now choose Command Prompt (Admin) or PowerShell (Admin).

- Now enter regsvr32 opencl.dll command and press Enter.

After doing that, the problem with the DLL file should be resolved.
A couple of users reported that you can copy the file from another directory on your PC. According to users, the file is located in Nvidia drivers directory, and you just need to copy it by following these steps:
- Go to C:Program FilesNVIDIA CorporationOpenCL directory. Locate OpenCL64.dll, right-click it and choose Copy from the menu.
- Go to C:WINDOWSSystem32 directory, and paste the file there. Be sure to change its name from OpenCL64.dll to OpenCL.dll.
After doing that, the problem should be resolved and everything will start working again.
4. Download the latest OpenCL runtime package
If you’re having problems with Opencl.dll, you might be able to fix the problem simply by downloading the OpenCL runtime package. According to users, you can download OpenCL runtime right from Intel’s website.
Once the runtime is downloaded, run the setup file to install it. After everything is installed, the issue should be resolved.
5. Uninstall your graphics card drivers and perform a DISM scan
According to users, Opencl.dll is related to your graphics card drivers, and in order to fix the problem, it’s advised that you uninstall your graphics card drivers and switch to the default drivers. To do that, just follow these steps:
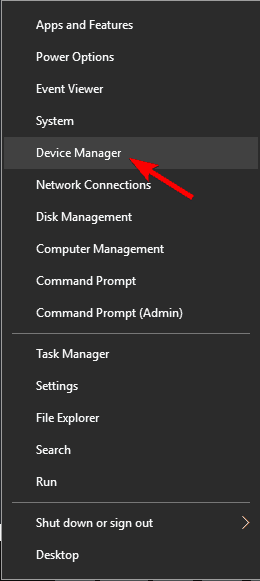
- Press Windows Key + X and choose Device Manager from the list.

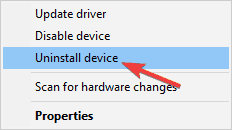
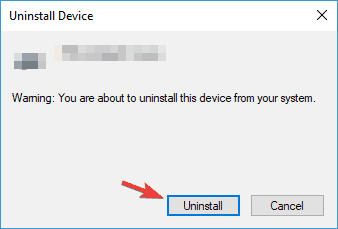
- Locate your graphics card driver, right-click it and choose Uninstall device.

- Confirmation menu will now appear. If available, check Remove driver software for this device button. Now click the Uninstall button.

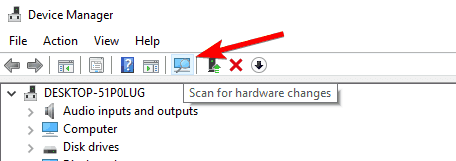
- After removing the driver, click on Scan for hardware changes icon and your system will automatically install the missing drivers.

Once you remove your driver, repeat the steps from Solution 2 to repair your system.
6. Prevent the driver from automatically updating
According to users, in order to fix this problem you need to prevent your graphics card driver from updating automatically. If you have a graphics card driver already installed, be sure to uninstall it from Device Manager.
Now, you need to prevent Windows from automatically updating the driver. After doing that, download the latest driver from your graphics card manufacturer and install it. Once the driver is installed, the problem with opencl.dll will be completely resolved.
7. Disable your dedicated graphics card
Opencl.dll issues are usually caused by your graphics card drivers, and if you can’t fix the problem, it’s advised that you temporarily disable your dedicated graphics card.
Keep in mind that this is just a workaround, and until the proper drivers are released, it’s advised to use an integrated graphics card. Your integrated graphics card might not be able to handle the latest games, but at least your PC will be stable so you can perform the most basic tasks without issues.
To disable your dedicated graphics card, be sure to check the graphics card software on your PC. Alternatively, you can disable your graphics card right from BIOS.
8. Perform a DISM and SFC scans
Users found out which directory is causing problems with opencl.dll, and in order to fix the problem, you just need to run DISM and SFC scans. To do that, just follow these steps:
- Mount Windows 10 ISO image.
- Start Command Prompt as administrator and run the following commands:
- Dism /Online /Cleanup-Image /RestoreHealth /Source:esd:F:sourcesinstall.esd1WindowsWinSxSwow64_microsoft-windows-r..xwddmdriver-wow64-c_31bf3856ad364e35_10.0.10586.0_none_3dae054b56911c22
- sfc /scannow
After doing that, the problem should be completely resolved.
9. Install the latest updates
This can be just a Windows 10 bug, and like most Windows bugs, you can fix it with the latest updates. Microsoft is working hard to fix various Windows issues, and if you want to ensure that your system is bug-free, it’s advised to keep your system up to date.
By default, Windows 10 installs the missing updates automatically, but sometimes you might miss an update or two. However, you can always check for updates manually by doing the following:
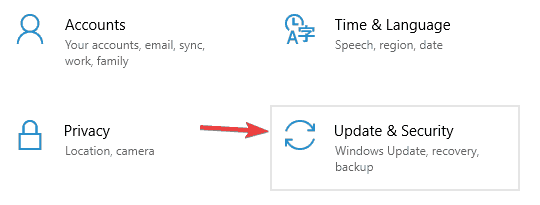
- Press Windows Key + I to open the Settings app.
- Go to Update & Security section.

- Click Check for updates button.

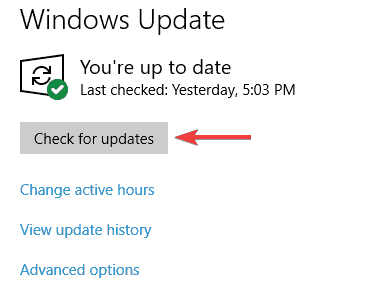
Windows will now check for available updates and download them automatically in the background. Once the updates are downloaded, restart your PC to install them and the issue should be completely resolved.
That’s about it, I hope this article helped you to solve the problems with Opencl.dll on your computer. To find out more about solving the problem with missing DLL files in Windows 10, check out this article.
If you have any comments, or questions, just write them down below.