Acquiring Network Address Message: How to Fix it
Updating network drivers usually fixes this problem
![]() 5 min. read
5 min. read
![]() Updated on
Updated on
Share this article

Improve this guide
Read our disclosure page to find out how can you help Windows Report sustain the editorial team Read more
Key notes
- To fix acquiring IP address issue, you might need to reset certain network components.
- Enabling the required network services can help with this problem.
Is your PC stuck while acquiring a network address? This can be a problem since your PC won’t get an IP address assigned to it.
This will prevent users from accessing the Internet, so it’s crucial to fix this issue, and in today’s guide, we will show you how to do it.
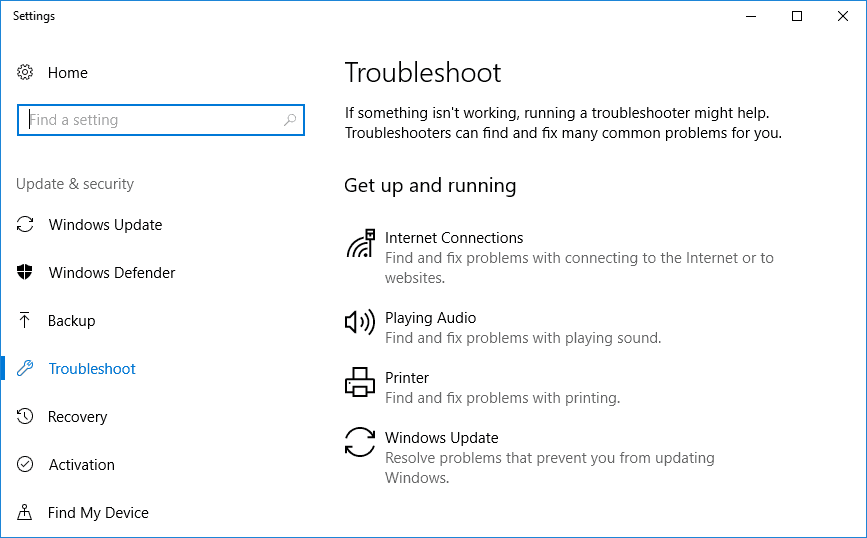
How do I fix acquiring network address in Windows 10?
1. Update the LAN (Network Adapter) Driver
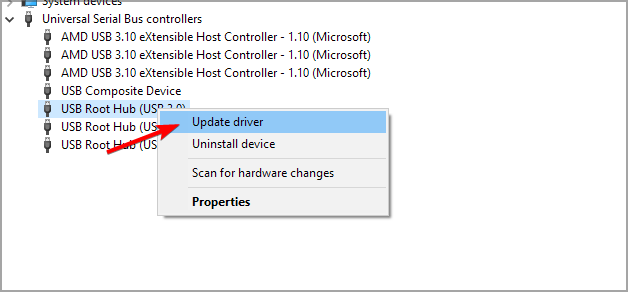
- Press the Windows key + X and choose Device Manager from the list.

- Double-click Network adapters and right-click the listed wireless LAN device to open its context menu.
- Select Update driver to open the Update Drivers window.

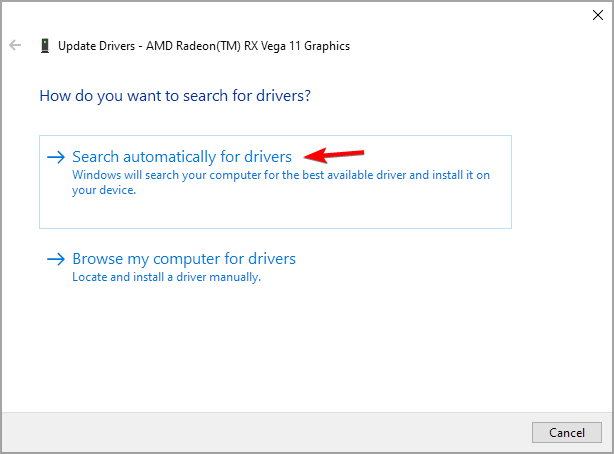
- Click the Search automatically for updated driver software option to obtain and install the latest device driver.

- Some prefer to download and install drivers manually. You can do that by entering a hardware device listed on the Device Manager window in a search box on the network adapter’s manufacturer website.
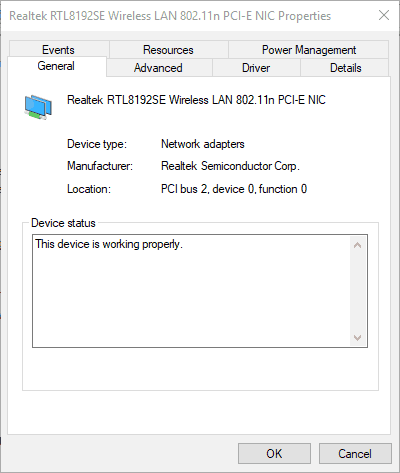
- If you’re not sure which manufacturer website to download a driver from, right-click the wireless LAN device listed on the Device Manager window and select Properties. The General tab includes manufacturer details.

- Download a driver that’s compatible with your Windows platform from the manufacturer’s website. Select the Browse my computer for driver software manually option on the Update Driver window.
- Press the Browse button to select the new driver, and click Next to install it.

On the other hand, it’s recommended to have a driver update manager to ensure your PC driver software works properly and the OS benefits from the latest updates.
Performed regularly, this action can lead to significant speed gains and protect your device from security breaches and malware. So, you should consider a dedicated application that can update the desired driver with a few clicks in a secure way.
You can prevent these problems by using an automatic tool that will search and install the correct drivers on your computer with just a few clicks. That's why we recommend you use Outbyte Driver Updater. Here's how to do it:
- Download and install the Outbyte Driver Updater app.
- Launch the software.
- Wait for the app to detect all incompatible drivers.

- Afterward, it will show you a list of the drivers found to select the ones to Update or Ignore.
- Click on Update & Apply Selected to download and install the newest versions.
- Restart your PC to ensure the applied changes.


Outbyte Driver Updater
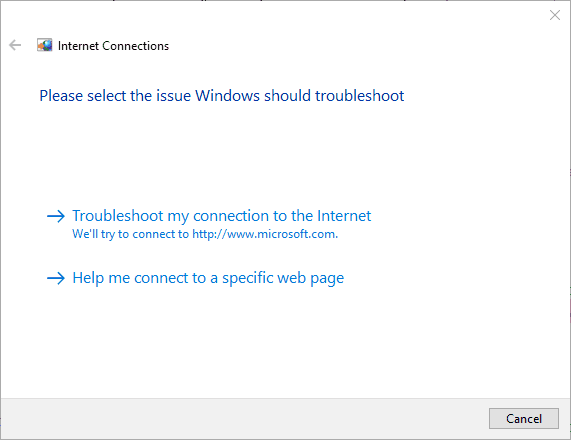
Use this software and solve all driver-related issues from your PC.2. Open the Internet Connections Troubleshooter
- The Internet Connections troubleshooter might shed some light on and perhaps even fix the issue. To open that troubleshooter, press the Cortana button on Windows 10’s taskbar.
- Input troubleshoot in the search box. Select Troubleshoot to open the window shown directly below.

- Select Internet Connections and press its Run the troubleshooter button.
- Click the Troubleshoot my connection to the internet option in the troubleshooter’s windows. The troubleshooter might then provide some potential resolutions.

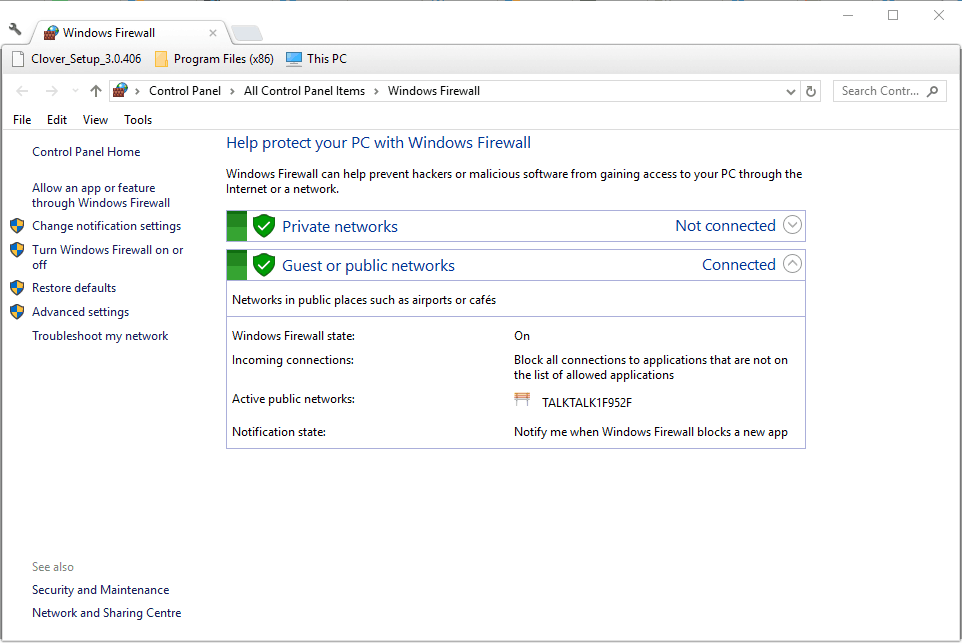
3. Switch off firewalls
- First, enter the keyword firewall in the Cortana or Start menu search box.
- Select Windows Firewall to open its Control Panel tab shown below.

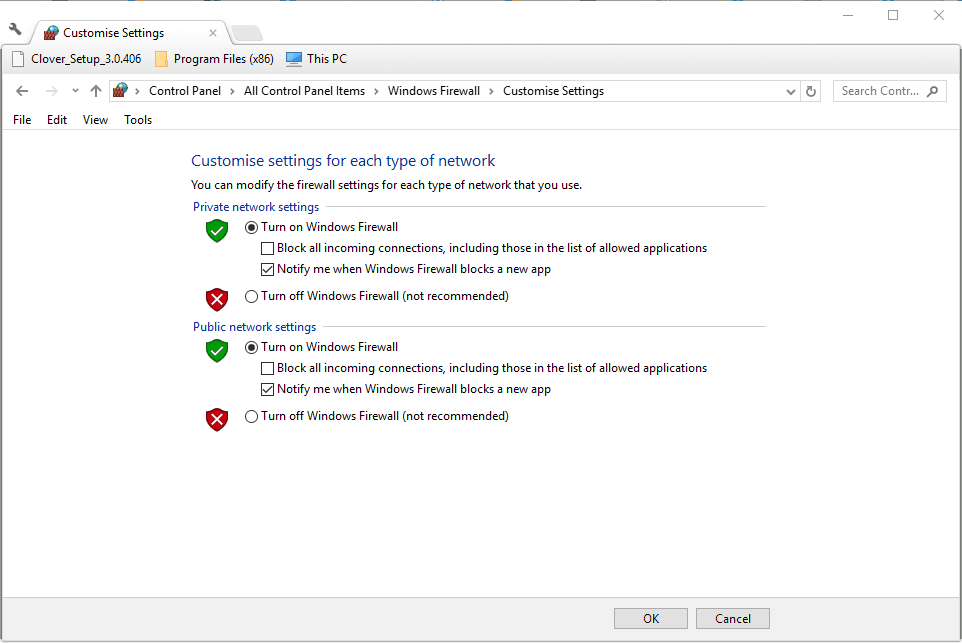
- Click Turn Windows Firewall on or off to open the Customize Settings tab in the snapshot directly below.
- Select both the Turn off Windows Firewall options.
- Click OK at the bottom of the Customize Settings tab.
- You can switch third-party anti-virus software firewalls off via their system tray icons. Right-click your anti-virus utility’s system tray icon to open its context menu.
- Select a disable option on the context menu to switch the anti-virus software off.

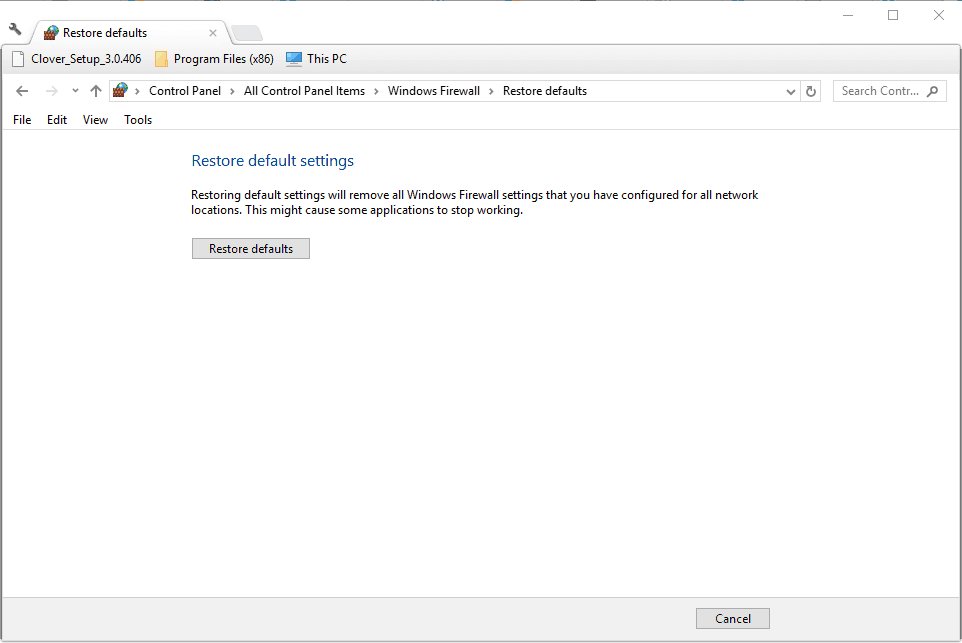
- If switching firewalls off resolves the acquire network address error, restore them to their default configurations. You can restore the Windows Firewall to its default settings by clicking Restore Defaults on the Firewall tab and pressing the Restore defaults button.

The Windows or third-party firewalls might be blocking the DHCP (Dynamic Host Configuration Protocol) ports 67 and 68. The DHCP protocol enables automatic IP address and network parameter requests. Switching firewalls off will ensure they aren’t blocking the DHCP.
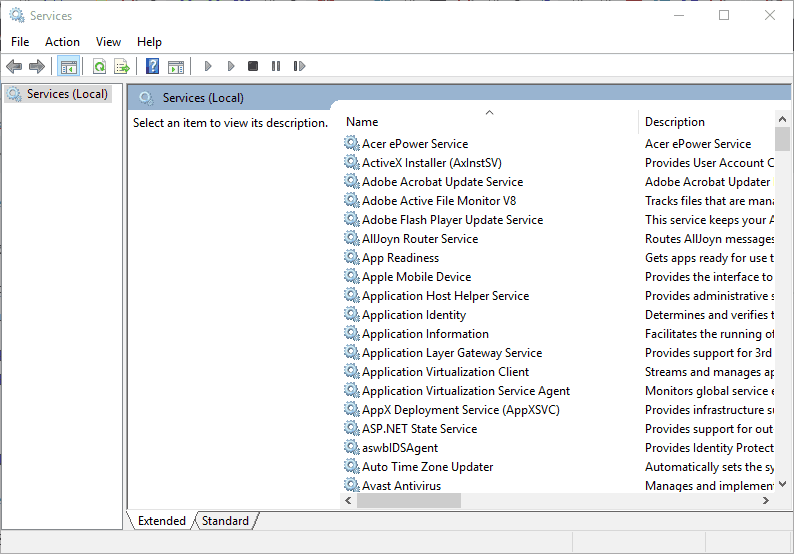
4. Check the DHCP client
- Press the Win key + R hotkey to open Run.
- Enter services.msc in Run, and press the OK button.

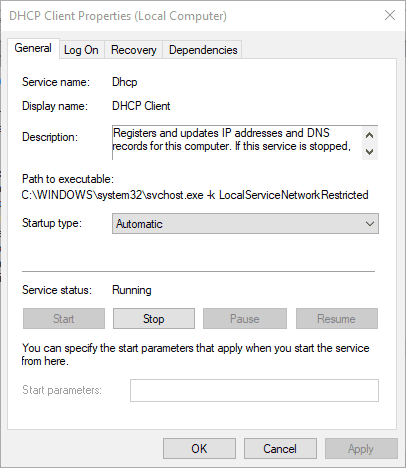
- Double-click the DHCP Client to open its properties window shown directly below.

- Select Automatic from the Startup type drop-down menu if that’s not already selected.
- Click Apply and OK to confirm the new setting.
5. Clear the DNS Cache and Renew the IP Address
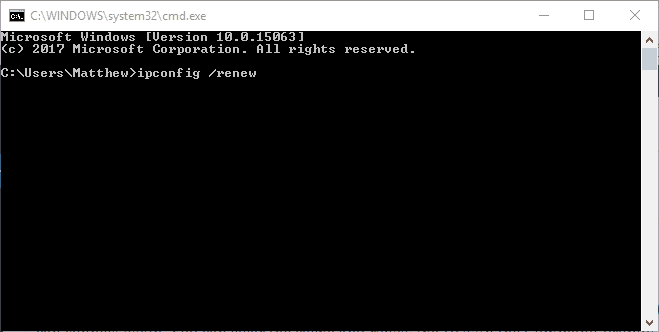
- Open Command Prompt as administrator.
- Run the following commands:
ipconfig /flushdns
ipconfig /release
ipconfig /renew
- Close Command Prompt and check if the problem is gone.
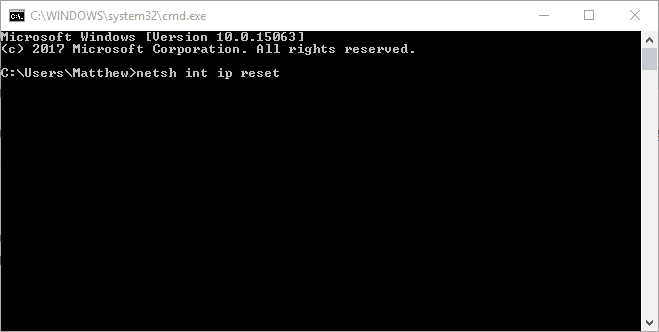
6. Reset the TCP/IP Protocol
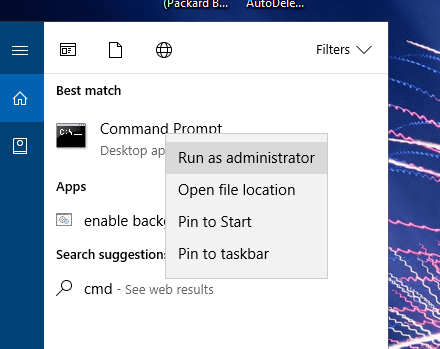
- Open the Command Prompt as an administrator by entering cmd in the Windows search box and right-clicking Command Prompt. Then you can select a Run as administrator option.

- Run the following command:
netsh int ip reset - Thereafter, restart the desktop or laptop.
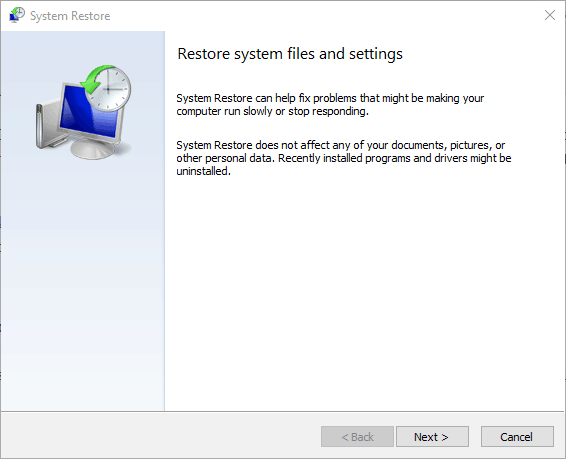
How can I roll Windows back to a restore point?
- To open System Restore, press the Win key + R keyboard shortcut to open Run.
- Enter rstrui in Run’s text box, and click the OK button.

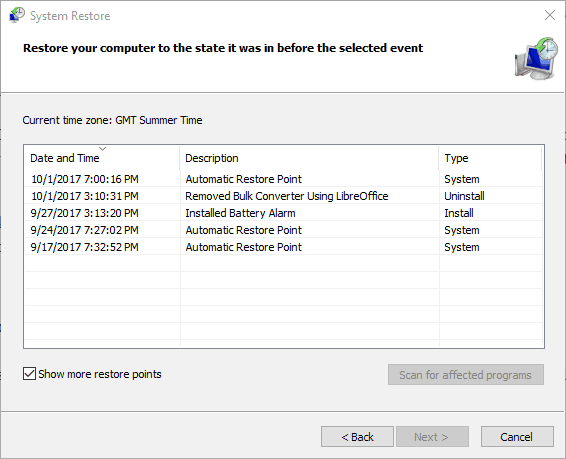
- Press the Next button, and select the Show more restore points option.
- Select a listed restore point that predates the acquire network address error.
- System Restore might also remove some software. Click Scan for affected programs to open a list of software that will be deleted.
- Press the Next > Finish buttons to confirm your restore point and restart Windows.
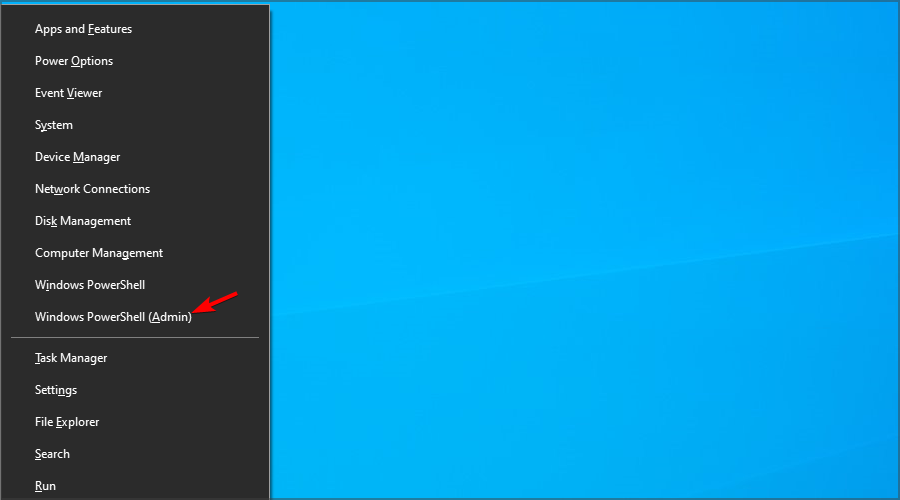
How do I find the IP address of my computer?
- Press Windows key + X and choose PowerShell (Admin).
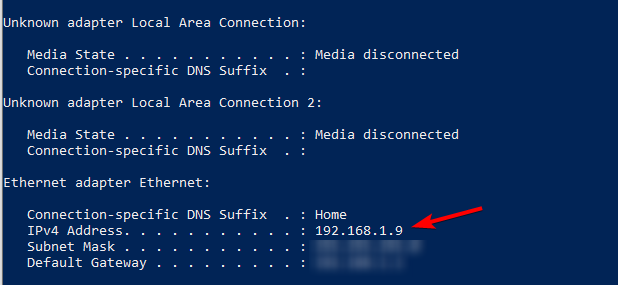
- Next, run the following command: ipconfig
- Look for IPv4 value for your network connection and you’ll find your local IP address.

Some of the resolutions above will probably fix the Acquiring network address error and re-establish the internet connection.
This can be a serious error since it can lead to a lost Internet connection and many other problems, but we hope you managed to fix it.
In case you’ve found a different solution that worked for you, please share it with us in the comments section.