FIX: Remove Everything recovery option won't work
![]() 3 min. read
3 min. read
![]() Updated on
Updated on
Share this article

Improve this guide
Read our disclosure page to find out how can you help Windows Report sustain the editorial team Read more
Key notes
- Every once in a while, your favorite OS acts out and all sorts of Windows 10 errors lead to severe workflow disruptions.
- When the Remove Everything recovery option fails to work properly, you’ll want to take one of the measures here described.

One of the most common Windows 10 reported issues concerns the Remove Everything recovery option. Namely, something prevents it from restoring your PC from scratch.
How do you delete everything off your computer Windows 10? In case you have a large variety of issues and lack the enthusiasm for the ISO/USB reinstall, the Remove Everything tool comes in handy.
As a short recap, it reinstalls Windows 10 and removes all your personal files, deletes apps and drivers you installed, and removes changes you made to settings. It also removes any apps your PC manufacturer installed.
If you’ve tried this advanced feature and ran into problems, be sure that these possible workarounds will help you resolve the issue. Just don’t postpone applying the solutions described below.
How can I fix the Remove Everything recovery option?
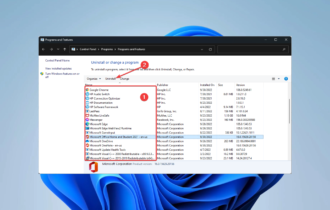
1. Uninstall Office 365
- Right-click Start.
- Open Programs and Features.
- Right-click Office 365 and choose Uninstall.


The main culprit for this issue is, as stated by Microsoft, Office 365. So, your best bet to resolve this issue is to uninstall Office 365 prior to performing any restoring procedures.
Hopefully, once you’ve finished with the restoring process, you can download Office 365 from the official Microsoft site.
2. Fire up DISM and SFC Scans
- Open the Start menu and type cmd in the search bar.
- Don’t hesitate to right-click Command Prompt.
- When prompted by the UAC, hit Yes to open it with administrator privileges.
- An elevated Command Prompt window will now appear, so type the following commands and press Enter:
Dism.exe /online /cleanup-image /scanhealth
Dism.exe /online /cleanup-image /restorehealth
- The system will commence the verification phase to identify the corrupt files and resolve the issue for you. Do not close the command line window until you see the message verification 100% complete.
- Up next, you may restart your PC.
- You need to open Command Prompt as an administrator again.
- Once the Administrator: Command Prompt window opens, you can run sfc /scannow.

- Since it is an extensive scan, it could take some time to complete.
- The system will inform you once the procedure has been completed successfully and you may restart your computer.


SFC and DISM are advanced tools that hold the potential to detect the deeply rooted problems which cause the Remove Everything recovery option issues. Give them a try as described above.
Don’t know what to do when DISM failed? Check out this quick guide and get rid of the worries.
scannow command has stopped before the process finished? Don’t worry, we’ve got an easy fix for you.
3. Keep your system updated

In case you uninstalled Office 365, tried the above tools, and the Remove Everything feature is still malfunctioning, remember this. Fresh updates could be your best bet, so don’t hesitate to look for any new ones.
Having trouble updating your Windows? Check out this detailed guide that will help you solve them in no time.
Users also describe performing a clean Windows 10 install as a working solution. For the complete reinstallation process walkthrough, look here.
Moreover, if you have any questions related to the subject, do not hesitate to ask. You may use the comments area below in that regard.
[wl_navigator]