How to Delete Locked Files & Folders on Windows 10
Learn to get rid of unwanted files from your device
![]() 6 min. read
6 min. read
![]() Updated on
Updated on
Share this article

Improve this guide
Read our disclosure page to find out how can you help Windows Report sustain the editorial team Read more
Key notes
- Dealing with stubborn files and folders that are locked can be a nuisance.
- To remove those locked files in no time, you can try to delete them from Command Prompt.
- Alternatively, you can safely delete locked files and folders from your Windows 10 device using dedicated third-party software.

For a Windows user, it’s possible that at one time or the other, there might be a situation in which the computer’s disk space gets crowded.
There might be attempts by the user to get rid of unneeded files without success.
When trying to delete an unneeded item, an annoying dialog box pops up, indicating that the action is not permitted as a result of a locked file.
The inability to delete a file or folder may either be because it’s locked (encrypted with a security code or password) or because the file is open in a program.
Sometimes, it may be a background program that is preventing the file from being deleted. To completely get rid of the locked files/folders, follow the procedures listed below.
How can I remove locked files and folders?
1. Use specialized file eraser software
If you’re unable to delete user folders in Windows 10 using conventional methods, you might want to try a different, more professional approach.
Using dedicated file erasure software such as Stellar BitRaser comes with many advantages one of which is permanently erasing files that are beyond the scope of data recovery.
By securely erasing confidential data from all devices (running on Windows and Mac as well), servers, and partitions, this privacy safeguarding software meets all your media sanitization requirements.
You can schedule the erasure of files, folders, and traces to occur once, daily, weekly, monthly, or at system boot. You may also examine planned jobs and data such as status, state, algorithm, mode, frequency, and more. You can also add files to a “ignore list” to prevent them from being erased, and keep them secured.
Using it is as simple as a breeze too: all you need to do is download the.EXE file, install the tool, select the items you want to erase, and Delete.
2. Delete the locked file from Command Prompt
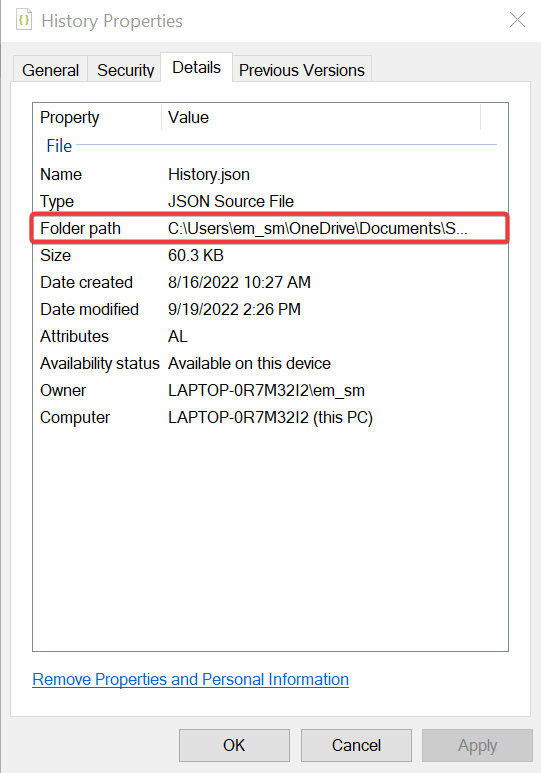
1. Right-click on the locked folder or file that you want to remove from your PC and select Properties.
2. Navigate to the Details tab.
3. Scroll down to the Folder path section and copy the path written there.
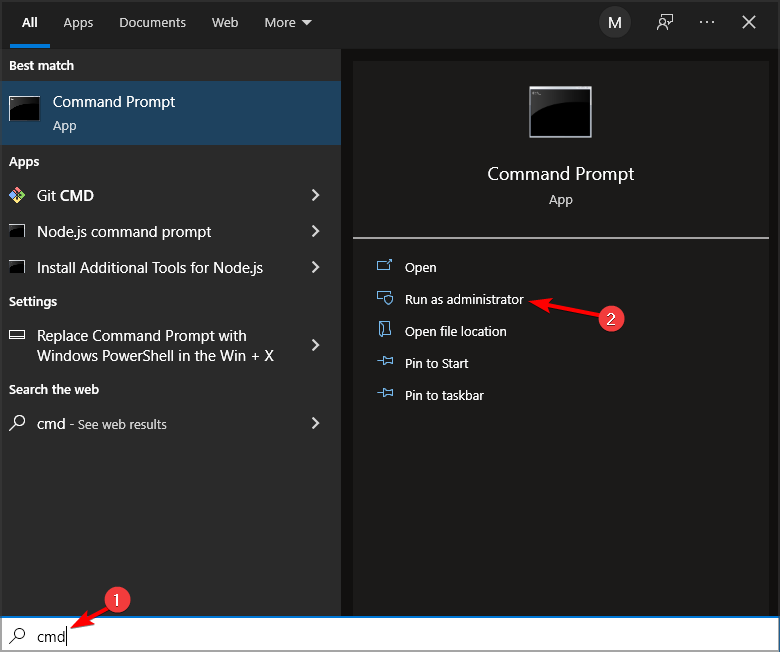
4. Press the Windows key to open the Windows search box. Alternatively, you can open it by clicking on the Start button on your taskbar.
5. Type cmd in the search box and right-click on the first result, then select Run as Administrator.
6. Now you need to navigate to the folder path using Command Prompt. To do that, you need to input the following command, but replace folderpath with the actual path that you previously copied: cd folderpath
7. Press Enter to run the command.
8. Type the following command, where filename represents the name of the locked file to be deleted: del /f /s <filename>
9. Press Enter and the file will be gone.
A locked file or folder can be easily deleted from your Windows 10 PC using commands in a command-line tool such as Command Prompt.
With Command prompt, you can navigate to the file path of the specific file and perform an automatic removal.
Some locked files may not be this easy to remove. This might prompt going the extra mile by trying out the Windows Recovery method described below. Alternatively, you can download software to fix this.
3. Use Windows Recovery to delete locked folders
- Switch the computer off and insert the windows re-installation disc into the disc drive.
- Turn the PC on, and let it boot (not from the hard disk this time but from the disc).
- Put the computer into the recovery console mode by pressing the key R on the keyboard: this mode is a troubleshooting option built into windows.
- In the recovery mode, go to the location of the locked file using the Command Prompt. For example, a command like
cd C: Documents Settings My Documents filename - The pattern given in this example should be followed using the directory of the locked file to be deleted.
- After locating the file, it can be removed by typing in del and leaving the recovery mode. Type the command exit and restart the computer.
Windows Recovery is another method by which locked files can easily be deleted. Refer to the above procedure in that regard.
4. Use dedicated software to manage your locked files
There are a number of software tools that can be downloaded and used to manage locked files from the PC. Here are a few options:
4.1. IOBit Unlocker
This is a handy software that can unlock and manage files and folders to keep them safe and available. What’s more, IOBit Unlocker is incredibly easy to use.
All you need to do is to drag and drop the locked file or folder into the software’s interface and choose the delete option (or unlock, rename, move, copy, and so on, according to your specific needs).
It also provides details about the location of the file and directory alongside the details of the process, so you’ll easily use it even if you’re not a pro.
4.2. Process Explorer
A renowned software called Process Explorer comes in a similar format to the Windows Task Manager.
It’s easy to use and doesn’t require installation, all that is needed is to run it and allow administrator permission, then follow these steps.
- Go to the File menu on the menu tab and choose show details for all processes.

- While still on the menu tab, select the Find option, and click on Find Handle or DLL.
- Enter the name of the locked folder in the search field of the process explorer task manager.
- Choose the locked file and check out the handle in the details section below the window.
- In the same manner that the process can be ended on the regular windows task manager: right-click on the filehandle and click on close handle.
- You would have effectively stopped it from running in the background and stopped it from getting deleted. You can now go back to the file location and delete the file.

4.3. LockHunter
This comes in as very helpful software. LockHunter also helps in identifying the particular program that is keeping the file locked.
Going forward, the processes can be stopped in an expedited manner before the file gets deleted.
Lockhunter doesn’t permanently remove the file. However, it sends the file to the recycle bin allowing the user the chance of restoring the file if need be.
4.4. FileASSASSIN
This is an easy-to-use software tool and its line of action is similar to 10bitunlocker. It is useful in deleting locked files, especially those that are inaccessible due to a virus or other malware.
- Access FileASSASSIN on the computer.
- Drag the locked file or folder into the FileASSASSIN text area.
- Select how exactly how the file or folder should be deleted from the various menu options and click on execute to get the file deleted.
- Access to the files will be possible using the FileASSASSIN thereafter.
Depending on which of these options are a point of interest, deleting a locked file should not pose a problem anymore.
What software are you using to deal with locked folders in Windows 10? Share your experience with us via the comments section below.