Windows Update Error 0x8024200D: 8 Quick Fixes
The troubleshooter should fix this in a few minutes
![]() 6 min. read
6 min. read
![]() Updated on
Updated on
Share this article

Improve this guide
Read our disclosure page to find out how can you help Windows Report sustain the editorial team Read more
Key notes
- The update error 0x8024200D is just another example of how Windows 10 and its forced update features can occasionally cause issues.
- Give the Windows Update troubleshooter a chance to shine and prove worthy, so run it right away.
- You can also use a dedicated repair tool that will scan your system automatically in no time.
- Make sure to uninstall peripheral drivers as they are known to cause such conflicts as well.

There’s no secret that Windows 10 and its forced Update features can occasionally do more harm than good to users. Special emphasis goes to major updates, like the previous Anniversary or Creators Update.
All of those frustrating error issues are followed by an alphanumeric code. The update error we are going to address today goes by the code 0x8024200D.
There are countless reasons for this exact error and we’ll try to resolve them step by step. So, if you have been prompted with this error while trying to update your Windows 10, follow the instructions below.
How can I fix the error 0x8024200D?
1. Run the Windows Update troubleshooter
- Download the Windows Update troubleshooter.
- Save the file.
- Run the troubleshooter and wait for the process to finish.
- You’ll be informed if the problem is resolved.
Firstly, let’s give the Windows update troubleshooter a chance to work properly. At least for sake of acknowledging the problem so we can know what measures to take later.
You can use a built-in troubleshooter, but we advise you to download and run the special tool from Microsoft’s official site.
2. Uninstall third-party antivirus
The impact of third-party antimalware software on updates can be enormous. It seems that those two are not functioning well for different reasons.
Firstly, your antivirus can accidentally delete or block some of the update files and even make a conflict with Windows Defender.
That battle for supremacy over your PC security can prove fatal for both updates and all-around system performance.
Because of that, we advise you to uninstall antivirus before updates and lower the chances of something going wrong.
Have in mind that you can reinstall your antivirus software after the updating procedure is finished.
3. Use a dedicated repair tool
You can try to do things manually, and we certainly provide all the means to do so, but if you’re not a technical person, you can fix such update errors with a dedicated repair tool.
4. Use batch script to reset Windows Update components
- Download the batch file from here.
- Save the file on the desktop.
- Right-click on batch and Run as Administrator.
- After the process is finished, try updating again.
When trying to resolve update issues such as the error code 0x8024200d, there are a few processes you’ll probably want to reset. Additionally, you’ll probably want to rename/delete the folder with all update installation files.
Well, you can do that manually or, thanks to the Windows enthusiasts, use the batch script file that will do it for you.
Follow these instructions above to employ batch and resolve various update issues. Additionally, you can create your own batch file by following the instructions in this Windows Update reset script article.
5. Repair corrupted files with SFC
- Right-click Start and run Command Prompt (Admin).
- In the command line type the following and press Enter to confirm:
sfc/scannowThe SFC tool is one of the most valuable tools you can run in the Command prompt. Basically, it addresses all system corruptions and there so, it can fix failed update issues, as well.
This tool is easy to run so follow the instructions above to launch it. This will scan and fix all corrupted files. However, for specialized scan and fix tools, you should look out for DISM below.
6. Uninstall peripheral drivers
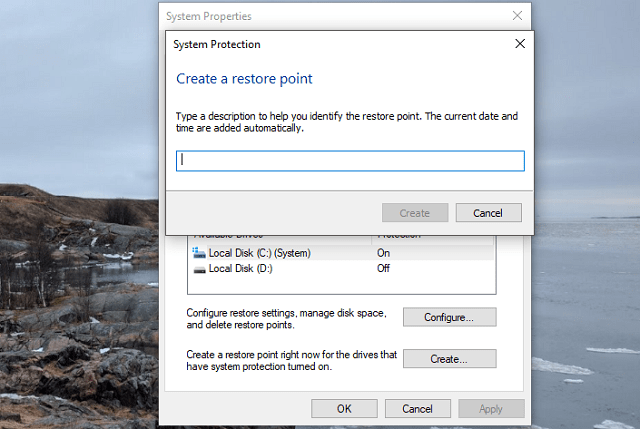
- On Search Windows, type Create a restore point.
- Open System properties.
- In the System Protection tab, on the bottom of the list, click Create.

- Enter the description and create a restore point.
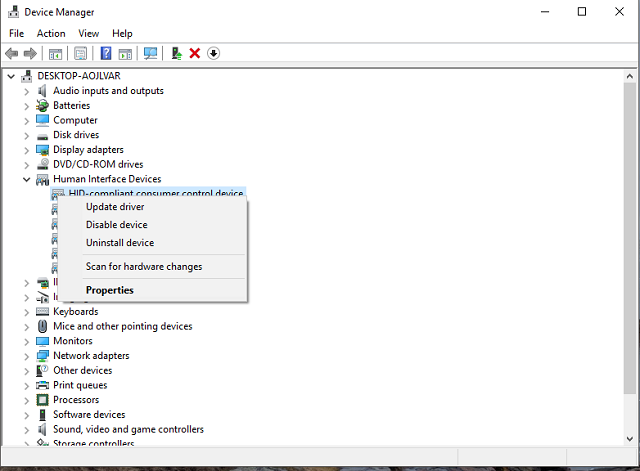
- Now, right-click Start and open Device Manager.
- Unplug all peripheral devices except the mouse and the keyboard.
- Go to their respective drivers and uninstall them one by one (printer, scanner, webcam, etc.).

- Restart your PC and try updating again.
- After the update, reinstall drivers.
Issues with Windows 10 update and legacy drivers are well-known. The conflict that may occur will not just prevent the updates, but affect system stability and eventually lead to errors and crashes.
Because of that, follow the above instructions. Sometimes, the issue might not be solved this way as the peripherals may create lots of errors when used by the system via a driver system that thinks it’s good.
4.1 Update drivers automatically
Sometimes installing the wrong driver version can cause irreversible damage to your PC, for this reason, is highly recommended to advise using a dedicated tool for automating the operation.
Keeping in mind that all drivers need to be updated, so you won’t experience these types of errors, you will need to choose the correct driver version for your device.
7. Use DISM to repair update files
- Right-click Start and open Command Prompt (Admin).
- In the command line type the following and hit Enter to start the procedure:
DISM.exe /Online /Cleanup-image /Restorehealth Besides the restarting the update components and SFC scan, you can also try to fix the update files corruption. And the good thing is that you don’t have to use third-party programs.
DISM is a built-in tool that scans update files and fixes possible corruption while restoring the deleted files.
You can use DISM to repair your system update files this way, so don’t hesitate to apply the above procedure right away.
8. Perform a clean install with Media Creation Tool
Your last resort is complete reinstallation. We know that may sound like a time-consuming process but it will fix most of your issues.
Since you can’t do it inside the running system, you’ll need the drive (USB stick, DVD) for installation setup files. Use the Windows Media Creation tool to create the bootable drive.
Do not hesitate to create a backup of your files from the system partition and write down your license key.
With that said, we are at the end of the list of fixes for the Windows Update error 0x8024200d. In case you have any remarks or questions, please share them with us in the comments section. We’ll be glad to help.