Windows 10 gets improved battery life for connected standby PC’s
![]() 3 min. read
3 min. read
![]() Published on
Published on
Share this article

Read our disclosure page to find out how can you help Windows Report sustain the editorial team Read more
Battery life can sometimes cause a huge headache to all laptop and tablet owners. To extend the battery life as much as possible, operating systems offer various options to reduce the power consumption, in order to make the battery as long-lasting as possible.
Since the majority of Laptop users run Windows operating systems on their machines, and a lot of them already switch to Windows 10, Microsoft introduced some additional power options that will optimize the battery life of your laptop or tablet running Windows 10.
From Windows 10 Preview build 14332 onwards, Windows 10 uses the same technology as the Battery Saver to close all unneeded processes during Connected standby, and leave your computer running with only necessary connectivity processes. Microsoft claims that that the result of using this technology will be much longer battery life of Windows 10 laptops and tablets.
How to manage Connected standby in Windows 10
Starting from build 14322 for Windows 10 Preview, the new standby mode should be enabled by default on all compatible devices. However, not all devices are compatible with the new technology, so you should run a simple test, and determine if your computer is able to use the new standby.
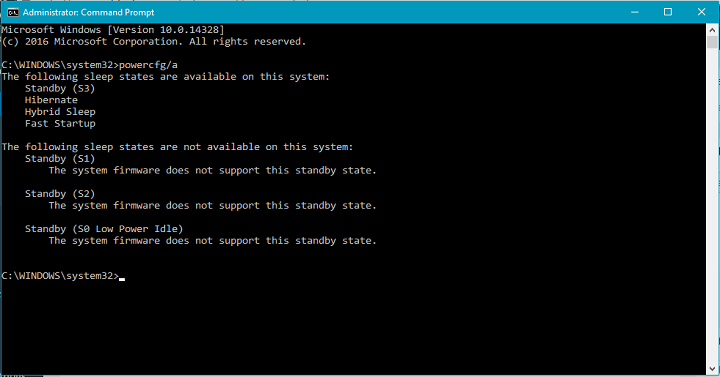
To check if your computer is compatible with the new Windows 10 standby technology, do the following:
- Go to Search, and type cmd
- Right-click on the Command Prompt, and select Run as Administrator
- Enter the following command, and press Enter:
- powercfg /a
- Wait for the results to show up
If the first listed state says “Standby (S0 Low Power Idle) Network Connected,” your computer is capable of running Connected standby. On the other hand, your first result is different, your computer probably can’t run this standby state. The command will also show a list of all available states, as well as states that are not supported on your computer. So, you can easily find out what your computer is capable of.
Microsoft also introduced an option which allows you to turn of Connected standby, in case something doesn’t work properly. To disable Connected standby in Windows 10, do the following:
- Go to Search, and type cmd
- Right-click on the Command Prompt, and select Run as Administrator
- Enter the following command lines, and press Enter:
- powercfg /setdcvalueindex SCHEME_CURRENT SUB_ENERGYSAVER ESPOLICY 0
- powercfg /setactive scheme_current
- Restart your computer
After performing this your computer will go back to the old standby state. If you want to re-enabled Connected standby, just change the value 0 from above’s command to 1.
This is the very first version of connected standby that arrived to Windows 10, so occasional errors or bugs are possible, so don’t be surprised if you get forced to disable the new standby state. However, we’re sure that Microsoft will continue working on this feature, and that we’ll see a polished version in the future Preview builds.
RELATED STORIES YOU NEED TO CHECK OUT:
- Start Menu gets a new look in latest Windows 10 Preview build
- Gmail app for Android now supports Microsoft Exchange
- Microsoft reveals how its Windows 10 Linux subsystem works