How to fix power supply issues in Windows 10/11
![]() 5 min. read
5 min. read
![]() Updated on
Updated on
Share this article

Improve this guide
Read our disclosure page to find out how can you help Windows Report sustain the editorial team Read more
If you’re still unsure whether you want an upgrade or not, you’ll encounter a lot of pros and cons on the way. Windows 10 is indeed an upgrade over Windows 7 in some manner, but there are so many drawbacks that may frustrate a newcomer.
One of the issues that some users reported is related to, believe it or not, Power Supply Unit malfunction. Namely, the PSU worked quite well before the upgrade occurred. However, after the upgrade to Windows 10, some power issues emerged. Of course, troubled users are sure that the upgrade had an impact on the matter at hand.
For that purpose, we provided you with some of the fundamental things you should check before you take your PC for repair. If you have experienced sudden shutdowns, Blue Screen of Death, or similar issues, make sure to check the list below.
How to inspect power supply in Windows 10
1. Check hardware
First things first. Power Supply is the most common piece of hardware that tends to malfunction. So, before you try some of the alternatives, make sure to check some of the hardware-wise features and confirm that everything works just like intended.
- Make sure that everything is connected properly.
- If you upgraded GPU or other PC components, make sure that the Power Supply (PSU) is powerful enough. You can calculate wattage before you upgrade your PC. If the power isn’t sufficient, make sure to upgrade the PSU first.
- Google your motherboard and search for the tools that can check PSU readings. If the delivered voltage is subpar, there’s a chance that your PSU isn’t powerful enough for all included components.
- Check the PSU temperature. Power Supply overheating can lead to numerous problems.
- Unplug the power cable and plug it after 30 seconds.
- Check HDD. Besides the PSU, faulty HDD can cause issues with similar symptoms.
If something is wrong with the PSU, it’s safe to say that the replacement is needed. After you’re certain that everything is just like before, but the system upgrade caused issues, follow the instructions below.
2. Remove CMOS battery
Some users managed to resolve this problem by temporarily removing the CMOS battery from the motherboard. This battery main usage is to retain your BIOS settings, time, and date. This shouldn’t be affected by the system upgrade, but everything is possible in the PC world. We suggest a cautious approach, so if you’re inexperienced with the hardware meddling. Albeit, this isn’t exactly a demanding operation, not in the slightest. Just take your time.
So, follow these instructions and look for changes:
- Shutdown your PC.
- Unplug power cord.
- Remove screws from the casing in order to access the motherboard.
- Place your hands on some metal to remove static electricity.
- Find the CMOS battery and remove it.
- Wait for some time and insert battery again.
- Start your PC and configure BIOS settings again.
- Check for changes in PSU behavior.
3. Check and update BIOS
If you can update BIOS, make sure to do it. The BIOS version that was sufficient for Windows 7 or its predecessors, may prove underwhelming for Windows 10. In addition, some of the settings within BIOS may affect sudden changes. What you’ll need to look for are Fast Startup and Anti-Surge. Disable both and start your system, and your problems should be resolved.
All of this, of course, stands only if the PSU is perfectly functional. If not, you’ll need to replace it in order to restore the previous usability of your computer.
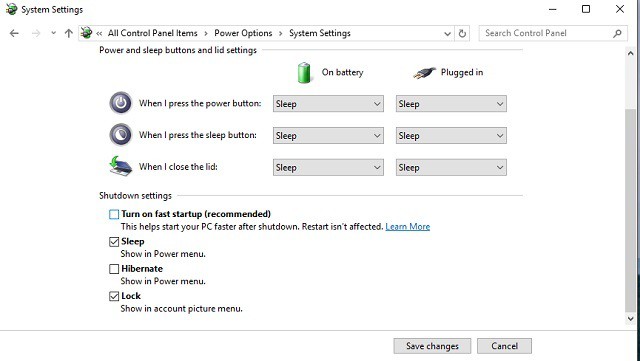
4. Disable FastBoot and Hybrid Sleep state
Once they’ve eliminated all possible hardware issues from the equation, determined users tried some alternative ways to address Power Supply issues. What they did is disabling Fast Boot and Hybrid Sleep. These two may be improvements in some regards, but not all of the motherboards are supported. So, if you’re not sure if your motherboard can or can’t support, especially if it’s older than 10 years or so, make sure to disable both features.
If you’re not certain how to do that, follow the instructions below:
- Right-click Start and open Power Options.
- Click on Choose what the power buttons do.
- Click on Change settings that are currently unavailable.
- Uncheck the ‘‘Turn on fast startup” box to disable it.

- Now return to Power Options and highlight the active/preferred Power plan.
- Click on Change plan settings.
- Open Change advanced power settings.
- Click Change settings that are currently unavailable.
- Under Sleep, extend by clicking +.
- Turn ‘‘Allow Hybrid Sleep” to off.

That should do it. There are various ways to check what’s wrong with your PSU but they require advanced tools and knowledge. So, if the problem is persistent, make sure to replace your PSU or take it to a technician for a thorough check-up.
In addition, you can post any questions or alternative workarounds. The comments section is just below.
RELATED STORIES YOU NEED TO CHECK OUT: