Windows Update Error 0x80070663 [SOLVED]
![]() 7 min. read
7 min. read
![]() Updated on
Updated on
Share this article

Improve this guide
Read our disclosure page to find out how can you help Windows Report sustain the editorial team Read more
Key notes
- Error 0x80070663 is associated with the Windows Update installer package or with an Office update failure.
- This issue can be fixed by checking and repairing system files, resetting Office, or installing cumulative updates.
- Stay on top of the news and see the latest guides similar to this by visiting the Windows Updates Errors area with curated content.
- Learn to fix Windows Errors by following the step by step instruction from our articles in the Windows 10 Errors Troubleshooting Hub.

Since the beginning, new Windows updates have been bringing a lot of issues to users. Moreover, with the introduction of Windows 10 and the mandatory updates, the problems vastly increased.
Nonetheless, the importance of updates is unchanged: your security and overall performance are substantially improved with updates.
But, what to do if the updates won’t install and you are prompted with a certain error code, in this case, 0x80070663?
Well, this code seems to show up because of, either Microsoft Office package corruption or a general update failure. So, if you have any of the 2 mentioned issues, we prepared some workarounds for you.
How can I fix the 0x80070663 error?
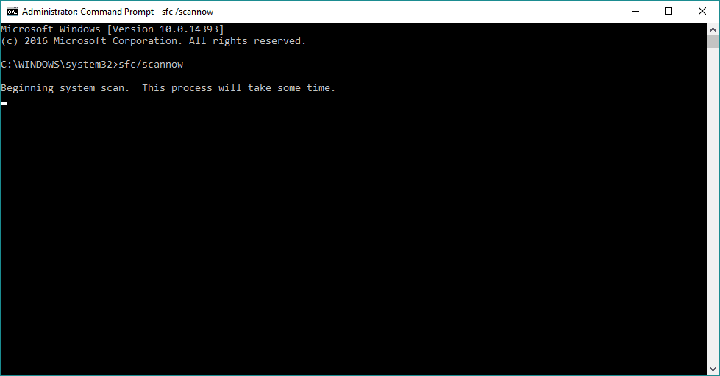
1. Use SFC to check the integrity of the system file
SFC tool is a valuable built-in tool with the main purpose to scan and resolve system files corruption. Due to a virus infection or misuse, certain files can get corrupted or even deleted.
That can heavily affect update features and cause errors like the one we are sorting out today.
You can use the SFC tool easily by following these instructions:
- Right-click Start and run Command Prompt (Admin).
- In the command line, type (or copy-paste) sfc/scannow

- Press enter to start the scanning.
- After the process is finished, you’ll be informed of possible errors.
If you are looking for the safest and faster solution; a specialized repair tool will scan, detect and replace any missing or corrupted file on your device with a new one one
2. Disable antivirus
You’ve probably already read numerous times that third-party antivirus programs can block Windows updates.
To make sure that’s not the case, temporarily disable your antivirus, and try to install updates.
If you can install your updates after disabling your antivirus, we recommend you try another security tool that won’t interfere with your system.
We recommend you to get one of the antivirus software with the highest detection rates because these have good threat databases and will most likely not detect false positives.
3. Reinstall Office
As we already stated, this specific error can occur due to Office update files corruption. As you are probably aware of, updates for Microsoft Office come through standard update procedure.
And they can, as same as other cumulative updates, get corrupted. Because of that, we advise you to uninstall and reinstall Office. At least temporarily, before some of the future patches fix this issue permanently.
Here’s how to do that:
- Open Control Panel.
- Choose Add or Remove programs.
- Find Microsoft Office and choose Uninstall.
- You may as well repair the installation. but that’s not your safest bet.
- Once the uninstalling task is finished, use CCleaner to clean remaining registry files.
- Restart the PC.
- Install Office again and check for updates.
Once it’s done, you should be able to download and install the latest Microsoft Office updates.
4. Hide the corrupted update with Show and Hide troubleshooter
Even though updates are forced in Windows 10, you can at least prevent certain, individual updates from downloading.
There so, you’ll temporarily resolve the issue and continue with the seamless updating process. Follow these steps to utilize this tool:
- Download Show or Hide Update tool.
- Save the file.
- Once you run the tool, it will search for available updates.
- Choose to hide the update file that provokes the error.
- Install updates.
Have in mind that some security updates are essential. So, it’s not recommended to restrict them from updating. Luckily, we have another solution that will address that sensitive update issue.
5. Manually download cumulative updates from MicrosoftCatalogue
When online updates don’t work because of various reasons, you can download and install those files manually. Microsoft Catalogue is the collection of all of the files used in updates.
Starting with small cumulative updates and leading to the major updates and patches. In case you’ve tried previous workarounds and the problem with certain files is persistent, follow these steps:
- Copy the name of the issued file.
- Go to Microsoft Catalogue here.
- Paste the name into the search box.
- Download the file. Keep mind on your system architecture (x86 or x64).
- Install the update file.
- Restart your PC.
- Check for additional updates to make sure the update is up and running.
6. Run DISM
If the aforementioned SFC scan didn’t get the job done, we’re going to try a perhaps more advanced troubleshooting tool. You guessed it, we’re talking about DISM.
DISM stands for Deployment Image Servicing and Management, and as its name says, it deploys the system image all over again. Hopefully, the potential issue will vanish along the way.
Here’s how to run DISM in Windows 10:
- Open the Command Prompt as shown above.
- Enter the following command and press Enter:
- DISM.exe /Online /Cleanup-image /Restorehealth

- DISM.exe /Online /Cleanup-image /Restorehealth
- Wait for the process to finish.
- Restart your computer.
- In case the DISM can’t obtain files online, try using your installation USB or DVD. Insert media and type following command:
- DISM.exe /Online /Cleanup-Image /RestoreHealth /Source:C:RepairSourceWindows /LimitAccess
- Make sure to replace ”C:RepairSourceWindows” path of your DVD or USB.
- Follow further on-screen instructions.

7. Run the Windows Update Troubleshooter
The third troubleshooter we’re going to try and mention in this article is Windows 10‘s built-in troubleshooting tool. You can use this tool for resolving all kinds of issues, including update problems.
Here’s how to run Windows 10‘s built-in troubleshooter:
- Go to Settings.
- Head over to Updates & Security > Troubleshoot.
- Select Windows Update, and go to Run the Troubleshooter.

- Follow further on-screen instructions and let the process finish.
- Restart your computer.

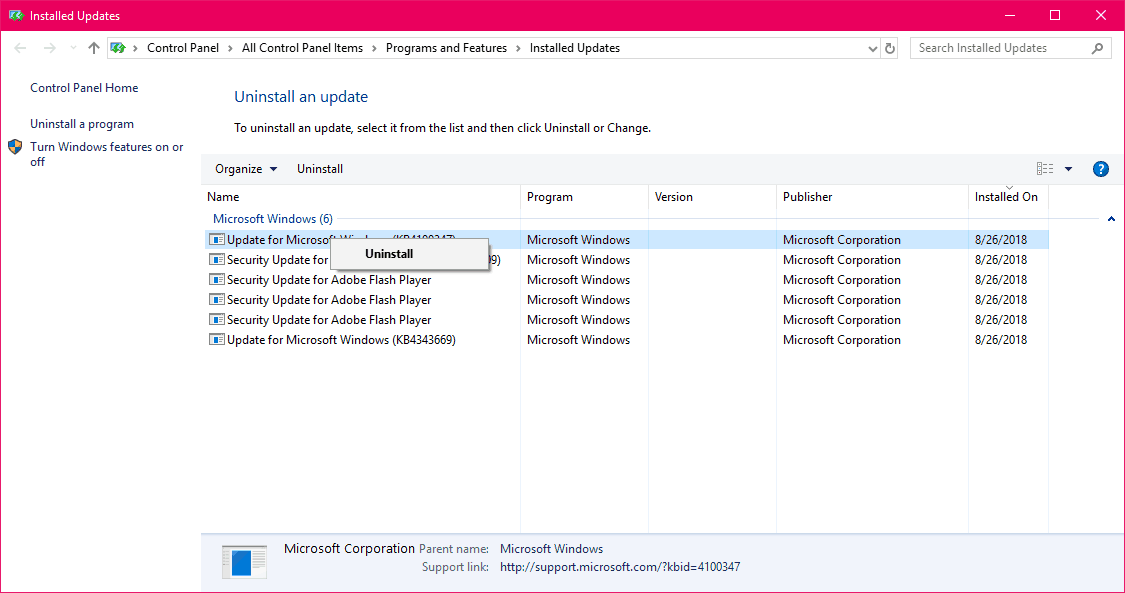
8. Uninstall previous updates
It’s also possible that the previous update you installed actually messed up your system. For example, it may disrupt the update mechanism, preventing you from installing future updates, thus leading to the error code 0x80070663.
If you doubt the legitimacy of the previous Windows update you installed on your computer, go and uninstall it.
Here’s how to do that:
- Go to Settings.
- Head over to Updates & Security > Windows Update.
- Go to Update history > Uninstall updates.

- Now, find the latest update installed on your computer (you can sort updates by date), right-click it, and go to Uninstall.
- Restart your computer.
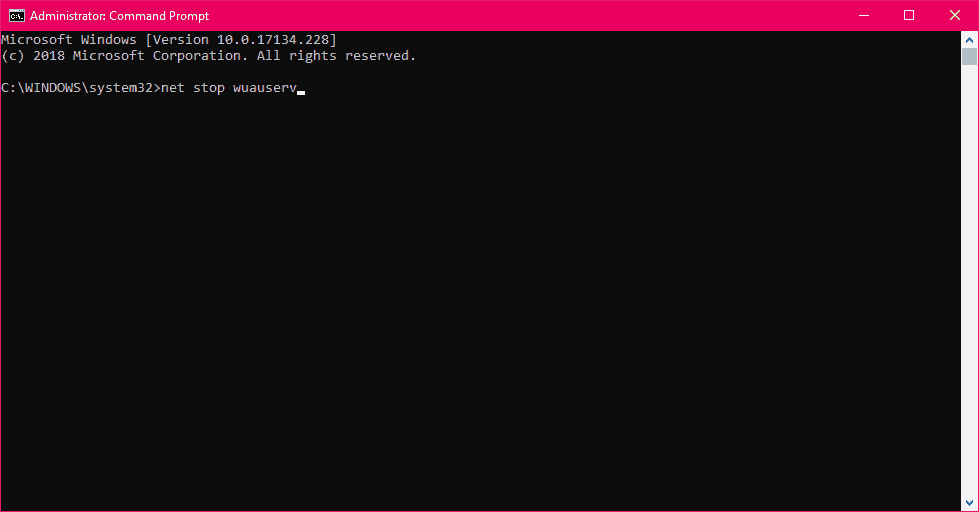
9. Restart Windows Update components
Another thing we’re going to try is resetting crucial Windows Update components inside your system. Here’s what you need to do:
- Start Command Prompt as administrator.
- When Command Prompt starts, run the following commands:
- net stop wuauserv
- net stop cryptSvc
- net stop bits
- net stop msiserver
- ren C:WindowsSoftwareDistribution SoftwareDistribution.old
- ren C:WindowsSystem32catroot2 Catroot2.old
- net start wuauserv
- net start cryptSvc
- net start bits
- net start msiserver
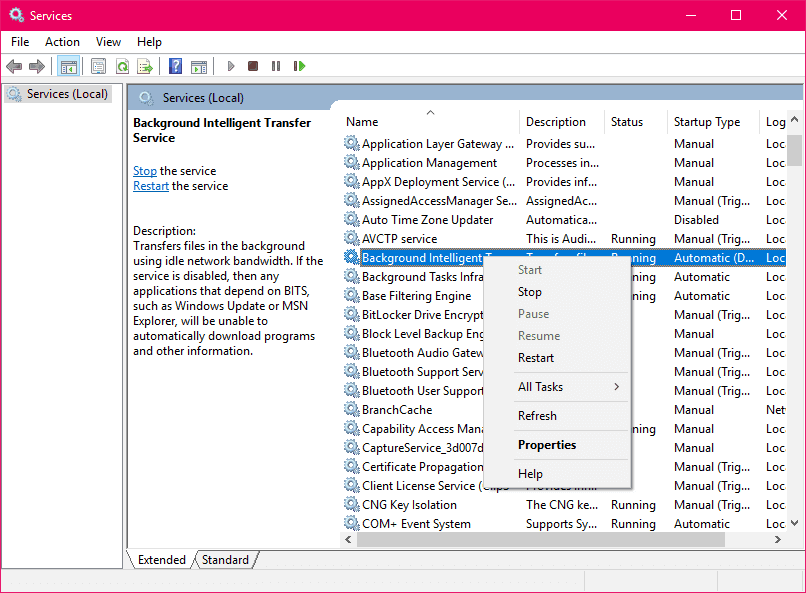
10. Restart the BITS service
Speaking of crucial Windows Update components, the BITS service is one of the most important ones. If this service isn’t running, well, you won’t be able to install any updates.
So, make sure the BITS service is on:
- Go to Search, type services.msc, and open Services.
- Find Background Intelligent Transfer Service. Right-click and open Restart.

- Wait for the process to restart.
- Now, on the General tab, find Startup type and choose Automatic.
- If the BITS is not running, right-click and choose Start.
- Confirm selection and close window.
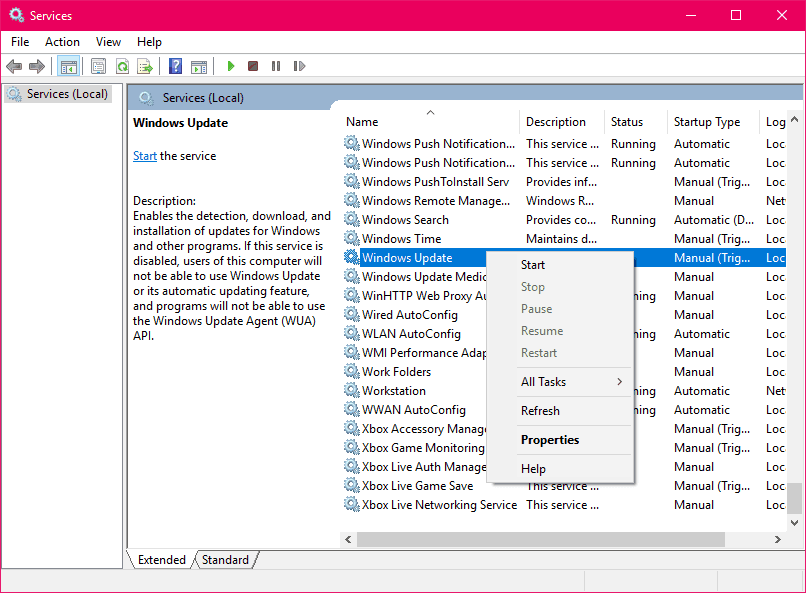
11. Make sure Windows Update service is running
The same goes for the Windows Update service:
- Go to Search, type services.msc, and open Services.
- Find the Windows Update service. Right-click and open Properties.
- On the General tab, find Startup type and choose Automatic.
- If the service is not running, right-click and choose Start.
- Confirm selection and close window.
With this, we complete the list of fixes for the 0x80070663 error. In case you have any alternative workarounds, questions, or suggestions, please tell us in the comments section.