Windows Update Error 0x8024401c [Solved]
A guide for Windows 10 & Windows 11 devices
![]() 4 min. read
4 min. read
![]() Updated on
Updated on
Share this article

Improve this guide
Read our disclosure page to find out how can you help Windows Report sustain the editorial team Read more
Key notes
- Because of inappropriate drivers, especially for older peripheral devices like printers, ethernet cards, or others, Windows updates may become obstructed.
- A good solution for fixing the error code 0x8024401c would be to run an SFC scan.
- The SFC tool is a built-in tool that lets you check and repair corrupted or incomplete system files.

We can safely say that Windows 10 is quite an improvement compared to the previous versions of the system despite Windows 7 setting a pretty high bar.
Nonetheless, it seems that Microsoft, while trying to improve the all-around experience, can get a bit stuck with some issues — especially the ones that are related to mandatory updates.
One of those issues is the Windows Update error 0x8024401c, which can be caused by various factors. Fortunately, it can be fixed by various workarounds.
So, if you’ve encountered this problem, we’ll address it with a few possible solutions.
How do I fix the Windows Update error 0x8024401c?
1. Install new drivers
Because of inappropriate drivers, especially for older peripheral devices (e.g. printers, ethernet card etc.), Windows 10 updates may become obstructed. Thus, you might encounter the error code 0x8024401c, for example.
And that goes for other update errors, not just the one we are addressing today.
For that reason, you should uninstall generic drivers and install the ones provided by the original equipment manufacturer. To do so, follow these instructions:
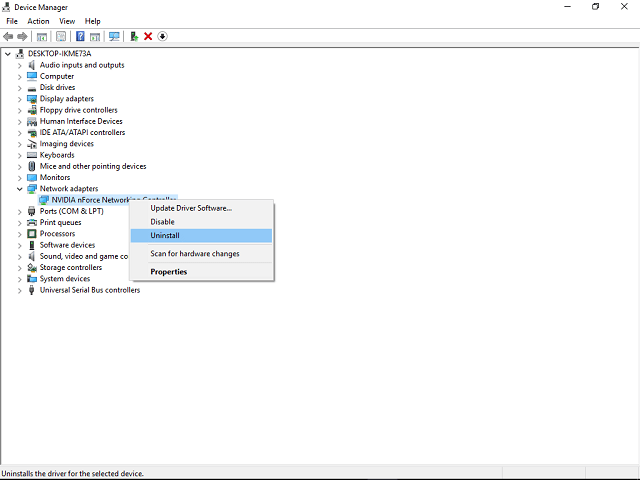
- Press Windows logo + X key.
- Click on Device manager.
- Select the not-working driver.
- Right-click on it and open Properties.
- Open the Details tab.
- Navigate to Driver Ids in the drop-down list.

- Open the Driver tab and uninstall the driver.
- Copy the first line, paste in your web browser and search for original manufacturer site.
- Download the drivers.
- Install them and restart PC.
Although you may find a lot of results for your specific device, we advise you to download the drivers from trusted sources.
1.1 Update drivers automatically
We also strongly recommend the Outbyte solution. It automatically identifies each device on your computer and matches it with the latest driver versions from an extensive online database.
Drivers can then be updated in batches or one at a time, without requiring the user to make any complex decisions in the process.
Thus, you keep your system safe from downloading and installing the wrong driver versions.
- Download and install Outbyte Driver Updater.
- Launch the software.
- Wait for the app to detect all faulty drivers.

- Now, it will show you all the malfunctioning drivers listed to select the ones to Update or Ignore.
- Click on Update & Apply Selected to download and install the newest versions.
- Restart your PC to ensure the applied changes.


Outbyte Driver Updater
Secure your Windows PC with Outbyte from various errors caused by problematic drivers.2. Perform an SFC scan
The SFC tool is a built-in tool that lets you check and repair corrupted or incomplete system files. As you are probably aware, malware can inflict system errors on your system.
For that reason, we advise you to get rid of third-party software while updating and use Windows Defender instead. Moreover, you can use this tool to scan your system for additional flaws.
Here’s what you need to do:
- Press Windows key + X and open Command Prompt (Admin).
- In the command line type sfc/scannow
- The process will check all files and automatically replace corrupt ones.
When you are sure your files are spot on, give updating another try.
3. Uncheck iPv6 and go with the iPv4 network
Some users found an interesting workaround for this issue. On some occasions, this error is related to a failed connection with servers that result in a timeout.
For that reason, updates can’t be downloaded and the whole process gives you a tough time.
When this happens, disable the iPv6 protocol and go exclusively with the iPv4 network:
- Press Windows key + X and open Network connections.
- Right-click on the connection (either LAN or Wi-FI) you’re currently using and choose Properties.
- In the list of the connection items, uncheck the iPv6 box and confirm the selection.
- Go to Windows Update and check for updates.

That should get you moving and allow needed updates to be installed on your computer.
In case you have any additional workarounds that proved successful or questions concerning the ones presented for the Windows Update Error 0x8024401c, do tell us in the comments.