7+ Hacks to Fix Windows has Detected an IP Address Conflict
![]() 7 min. read
7 min. read
![]() Updated on
Updated on
Share this article

Improve this guide
Read our disclosure page to find out how can you help Windows Report sustain the editorial team Read more
Key notes
- The Windows has detected an IP address conflict network error indicates that another device in your local area network is already using the local IP address you’re trying to use.
- You can quickly fix this network error by simply restarting your router, resetting your IP address, or refreshing network settings.
- Other possible solutions include temporarily disabling your VPN connection and taking a look at your DNS settings.
- Follow this guide for step-by-step information on how to remove this error and regain seamless Internet access.
Your router is the gateway between your home network and the public Internet. When it receives information from the outside web, it relays the message to a specific device on your LAN.
To do this, it takes into account the device’s local IP address. Otherwise, it wouldn’t be able to tell your printer apart from your smartphone or air purifier, for example.
What we draw from this is that every device with Internet access must have a unique private IP address, including Windows computers.
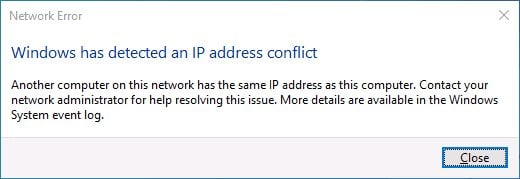
If you’re getting the Windows has detected an IP address conflict error on a computer, it means that another device in your local area network is already using that local IP address.
Here’s what it looks like:
What does it mean when Windows has detected an IP address conflict error occur?
This error message indicated that more than just one device on your network uses the same IP address.
Obviously, this should not happen. Your router is meant to automatically assign unique IPs to all devices connected.
Luckily, for the most part, the issue is caused by minor irregularities within your network configuration. It is possible that due to some errors your router used the same IP address for two or more devices.
This happens when you have not reset your router in a long time. Some users report also having it happen when they connect older devices that have not been used in a while.
Some attribute the Windows has detected an IP address conflict to a hacker attack. That can happen, but very rarely. It is difficult to access a network or connected device without an account and a password.
You can check all connected devices with the help of a network monitor. If there is an unrecognized device, change your credentials immediately.
How do I fix the Windows has detected an IP address conflict network error?
1. Restart your router
- Pick up your router and locate the power button on the back
- Press the power button to disable all Internet access in your household
- Wait a couple of minutes
- Turn the router back on
In most cases, the Windows has detected an IP address conflict message appears due to certain glitches with your router.
Join our Router Troubleshooting Hub to fix any router-related issues.
2. Reset your IP address using CMD
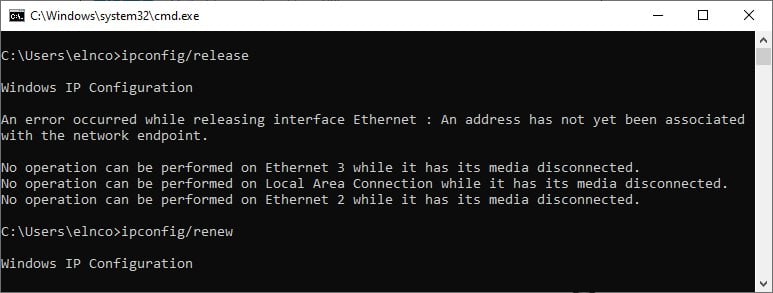
- Run Command Prompt: press Win + R , type cmd, press Enter
- Type ipconfig/release and press Enter to release your current IP
- Enter ipconfig/renew to reset your IP
A good way to fix Windows network errors is by releasing and renewing your IP address.
Don’t worry if you won’t have Internet access after using the ipconfig/release. You’ll get back online after inputting ipconfig/renew, which sends a request for a new IP address from your DHCP server.
3. Refresh your network settings
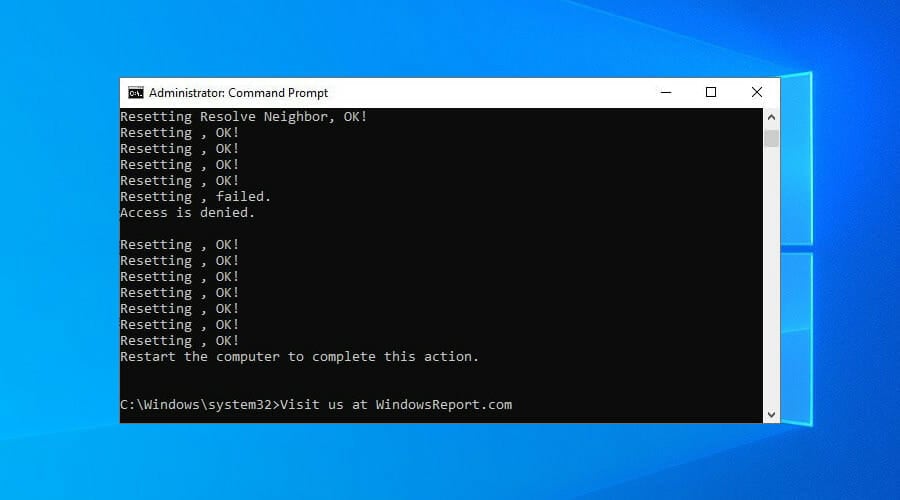
- Run Command Prompt as admin
- Copy and paste the next lines (press Enter between each line)
ipconfig /flushdns
ipconfig /registerdns
NETSH winsock reset catalog
NETSH int ipv4 reset reset.log
NETSH int ipv6 reset reset.log
exit
After quitting CMD, make sure to restart your PC.
Network conflicts can be often resolved by flushing your DNS servers and resetting Winsock, which is in charge of your TCP/IP configuration. It’s the IP equivalent of turning your Internet off and on again.
4. Disable or reconnect to the VPN
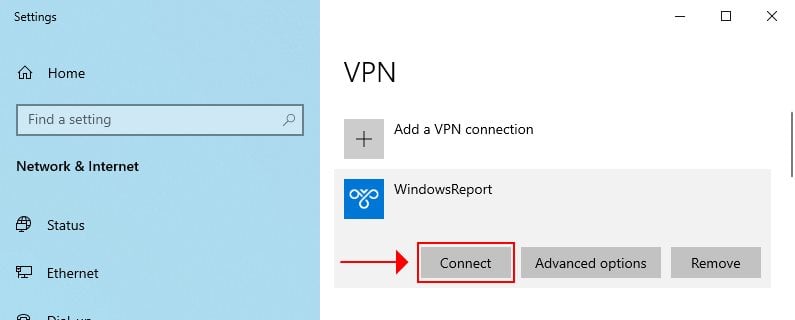
If you’re using the Windows 10 built-in VPN service to create a secure tunnel to the public Internet, it could cause network errors.
For instance, your VPN might have trouble attempting to reconnect to the web when your PC wakes up from hibernation mode.
To fix this problem, disable or manually reconnect to the VPN service. However, if you’re looking for a long-term solution, consider using a premium VPN instead of a manual VPN connection.
Dedicated VPN providers have a larger set of features than the inbuilt VPN such as split tunneling, kill switch, and built-in ad blockers.
The best VPNs for Windows 10 have top-level encryption, a large number of servers across the globe, as well as support for multiple devices and operating systems.
5. Use a dynamic IP address
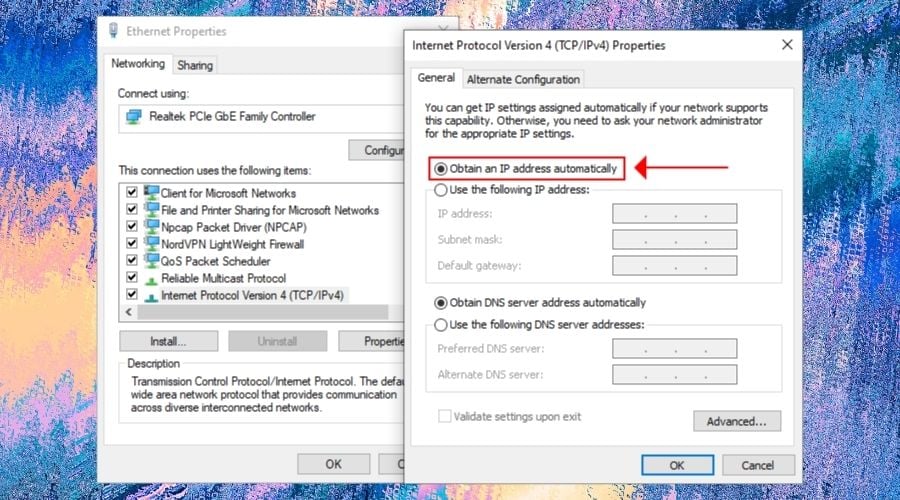
- On Windows 10, right-click the Start button and go to Network Connections
- Click Change adapter settings
- Right-click your Internet connection and select Properties
- Double-click Internet Protocol Version 4 (TCP/IPv4)
- In the General tab, select Obtain an IP address automatically
- Click OK
If you have IPv6 connectivity, then double-click Internet Protocol Version 6 (TCP/IPv6) and select Obtain an IP address automatically there, too.
A static IP address could be the reason why you keep seeing the Windows has detected an IP address conflict message.
But you can fix the problem by forcing your PC to obtain a dynamic IP address automatically from your ISP.
Private Internet Access supports both static and dynamic IP addresses.
If you have trouble with modifying the static IP address on your PC, try forcing this option using PowerShell or Command Prompt (our guide shows how).
6. Disable IPv6 connectivity
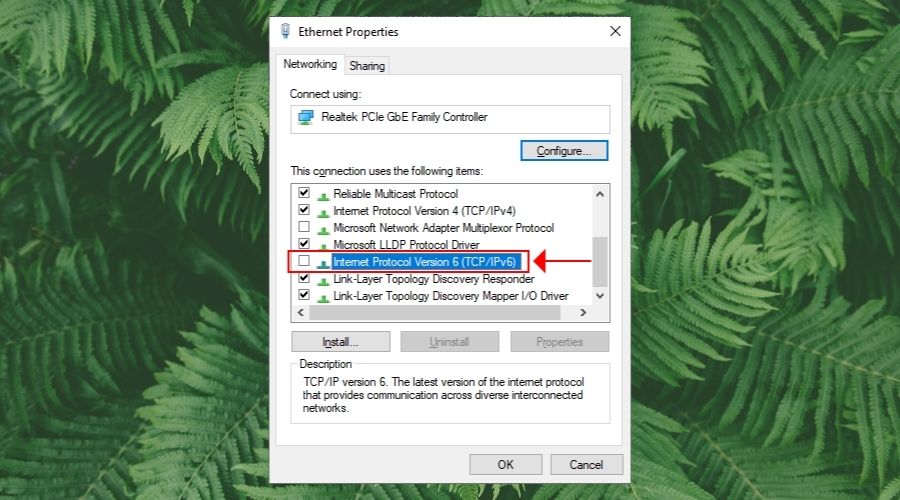
- Go to Network Connections and click Change adapter options
- Right-click your Internet connection and go to Properties
- Deselect Internet Protocol Version 6 (TCP/IPv6)
- Click OK
If your ISP didn’t assign an IPv6 address on your home network, there’s no point in keeping it enabled. In fact, it might clash with IPv4 and cause network errors due to incorrect IP assignments.
The steps above apply only to your Windows computer. If you want to be thorough about it, then you should disable IPv6 connectivity in your router admin panel.

7. Reinstall network adapters and update drivers
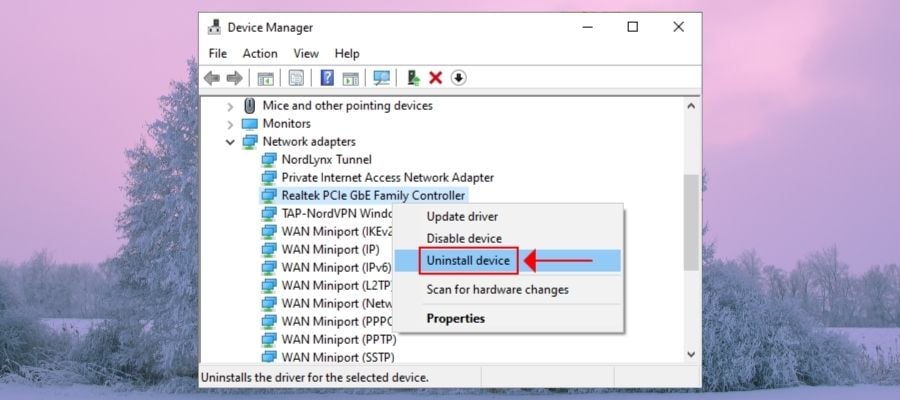
- On Windows 10, right-click the Start button and go to Device Manager
- Expand the Network adapters menu
- Right-click your network adapter and click Uninstall Device
- If you’re using a VPN, do the same for all TAP and Miniport entries
- Open the Action menu and select Scan for hardware changes
To get rid of the Windows has detected an IP address conflict message, it’s a good idea to reinstall your network adapters.
And, if this doesn’t fix the problem either, then make sure to update your network drivers to the latest version. You can do this manually or by using a driver updating tool.
8. Change your DNS servers
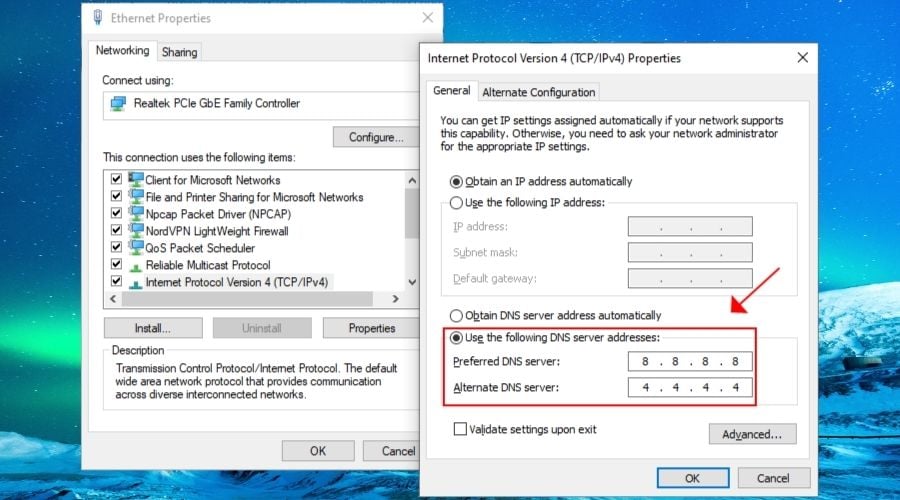
- Head over to Network Connections > Change adapter options
- Right-click your Internet connection and select Properties
- Double-click Internet Protocol Version 4 (TCP/IPv4)
- Select Use the following DNS server addresses
- Set Preferred DNS server to 8.8.8.8
- Set Alternate DNS server to 8.8.4.4
- Click OK
If your DNS resolver is faulty, it could cause various network errors, including IP conflicts on your local network. But you can fix this issue by modifying your DNS server addresses.
In our example above, we listed the free and public DNS server addresses provided by Google Public DNS.
However, if you use a premium VPN service like Private Internet Access, you don’t have to worry about DNS issues.
While staying connected to the VPN, PIA redirects your network traffic through its private DNS servers to make your Internet connection faster and protect you from DNS hijacking.
Conclusion
To sum up, you can fix PC network errors like the Windows has detected an IP address conflict message by restarting your router, resetting your IP address through Command Prompt, and refreshing your network settings.
But you can also disable or reconnect to your VPN, use a dynamic IP address instead of static, disable IPv6 connectivity if you don’t use it, change your DNS servers, as well as reinstall your network adapters and update your network drivers.
We also have a guide on what to do if Ethernet doesn’t have a valid IP configuration, so don’t miss it.
How did you manage to fix the network error? Did you use a solution not listed in this article? Let us know in the comment section below.