Fix: Right Swipe not Working in Windows 10/11
![]() 4 min. read
4 min. read
![]() Updated on
Updated on
Share this article

Improve this guide
Read our disclosure page to find out how can you help Windows Report sustain the editorial team Read more
Are you using a touchscreen device with Windows 10 or Windows 8.1 and your right swipe is not working? Well, you will be glad to find out that this feature can be easily fixed in no time at all but you will have to follow the instructions posted below very carefully in order to enable or fix the right swipe in Windows 8.1 or Windows 10.
This feature can be either disabled or bugged but you will learn in the tutorial below how you can enable it if it is the case or what are your options to fix this feature if it is broken using a Windows 8.1 or Windows 10 device.
How to fix right swipe if it is not working correctly in Windows 10:
First method:
In this method you will learn how you can enable it if by any chance when you installed Windows 10 or Windows 8.1 it was disabled.
- First of all you will need to reboot your Windows 8.1 or Windows 10 device.
- When the operating system starts you will have to log in with your administrator account.
- Now while on the start screen you will have to move the mouse cursor over to the lower right side of the screen.
Note: You can also press and hold the “Windows” button and the “C” button. - You should have the “Charms” bar in front of you.
- Left click or tap on the “Settings” icon in the charms bar.
- At the lower side of the “Settings” window you will need to left click on the “Change PC settings” feature.
- Now you will need to left click on the “PC and devices” feature.
- Now in the new window you will need to left click on “Corners and edges” which situated on the left side in the “PC and devices” window.
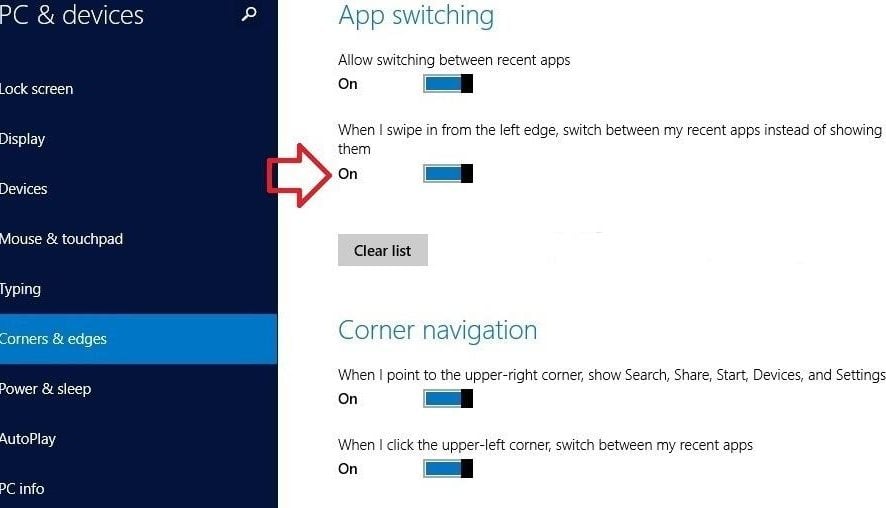
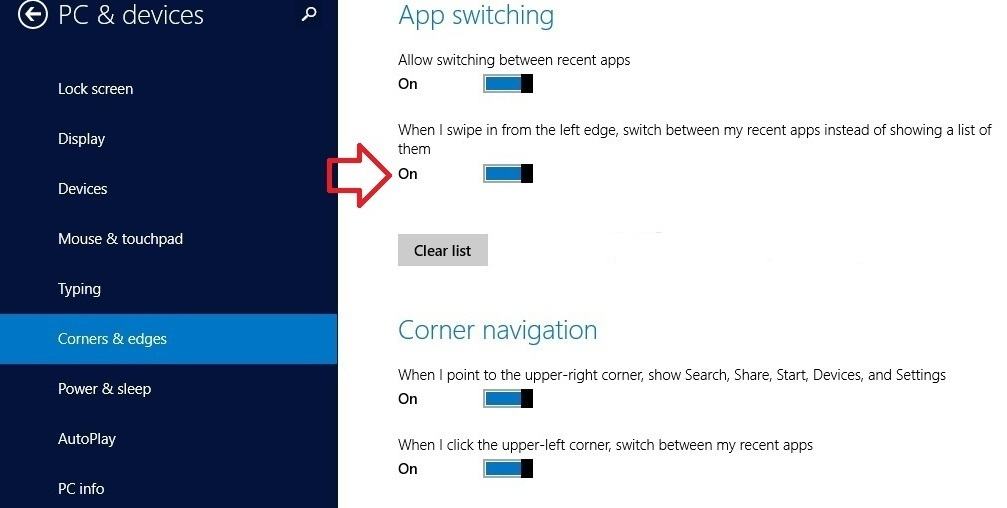
- Now you should have on the right side of the screen a “App switching” topic.
- Move the button under the “When I swipe in from the left edge, switch between my recent apps instead of showing a list of them” topic all the way to the right side in order to enable this feature.
- Now under the “Corner navigation” feature you will need to place all the buttons you have on the “ON” position as well.
- Now reboot your Windows 8.1 or Windows 10 device and try your right swipe and see if it did the trick.
Second method:
- Move the mouse over to the upper right side of the screen.
- Left click or tap on the “Settings” feature.
- Left click or tap on the “Change PC settings” feature.
- On the left side panel you will need to left click or tap on the “Update and Recovery” feature.
- In the list presented you will need to go all the way down and select the “Recovery” setting.
- Now you will need to left click or tap on the “Get started” button under the topic “Refresh your PC without affecting your files”.
- Left click or tap on the “Next” button in the next screen you get.
- Left click or tap on the “Refresh” feature.
- It will take approximately fifteen minutes depending on the hardware configuration of your system.
- After this, you will need to reboot your Windows 8.1 or Windows 10 device and try again to swipe from the right side to see if it works.
Editor’s update: There are also some other issues that are related to a touchscreen device, and it would be good for you to know that many of them may occur on your device as well. If you have a specific device model you might be interested in the fixes below. Here they are:
- Fix: Touch Screen Can’t Calibrate in Windows 10
- Fix: Lenovo Edge 15 Touchscreen Doesn’t Work
- Fix: Lenovo Touch Screen Monitor Doesn’t Work in Windows 10
- Fix: Touchscreen not working on ASUS laptop
That is it. Just two methods on how to fix your right swipe if it is not working as expected. Please write us below for any questions or thoughts on this subject and we will help you further with your issue on your Windows 8.1 or Windows 10 touchscreen device.
READ ALSO: CyberPOWER’s New FangBook Edge: Thin Gaming Laptop With 4K Display, NVIDIA GeForce GTX 860M