How to Disable Antimalware Service Executable
Using special permissions or go with another antivirus
![]() 8 min. read
8 min. read
![]() Updated on
Updated on
Share this article
This article is translated in


Improve this guide
Read our disclosure page to find out how can you help Windows Report sustain the editorial team Read more
Microsoft Defender is the built-in antimalware software on Windows, but many are wondering how to disable Antimalware Service Executable.
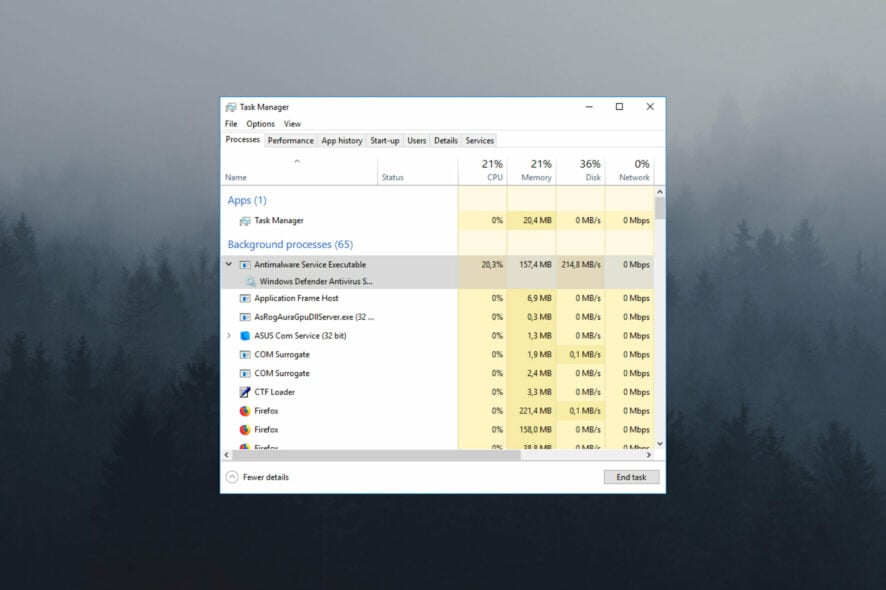
The Antimalware Service Executable, MsMpEng.exe runs even after users removed Microsoft’s AV tools, often leading to high CPU usage.
Can I turn off Antimalware Service Executable? If you don’t install any additional antivirus software, Windows Defender is the only thing that will protect your computer from malicious software. So, you should disable the service if it is causing you trouble, but purchase or install additional antivirus protection.
How do I permanently disable Antimalware Service Executable?
1. Get AdvancedRun software
 NOTE
NOTE
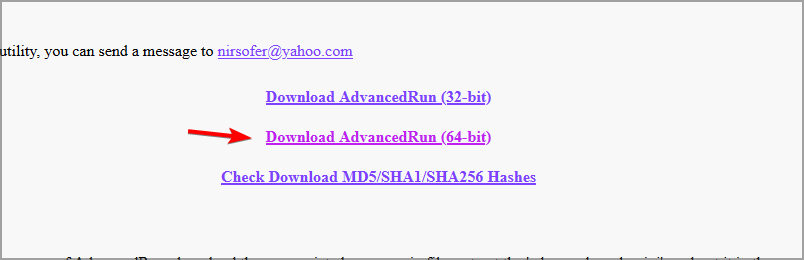
- Visit the Advanced Run download page.
- Next, download the software.

- Once the software is downloaded, extract it to a directory for quick and easy access.
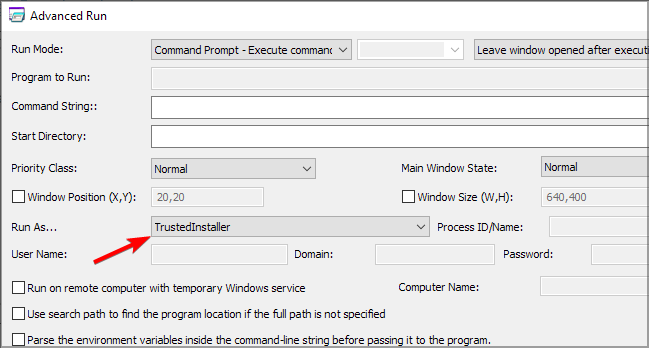
Whenever the solution requires you to use Advanced Run, always do the following:
- Start the Advanced Run software by double-clicking it.
- Crucial: Always set Run as a TrustedInstaller.

- Follow further instructions from the solution.
2. Add exclusions to Windows Defender
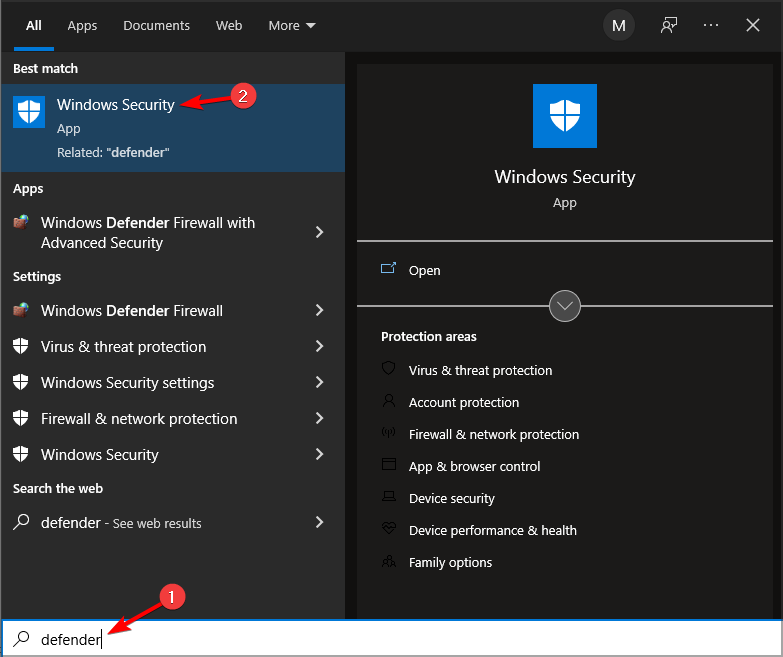
- Press Windows key + S and type defender. Choose Windows Defender from the list of results.

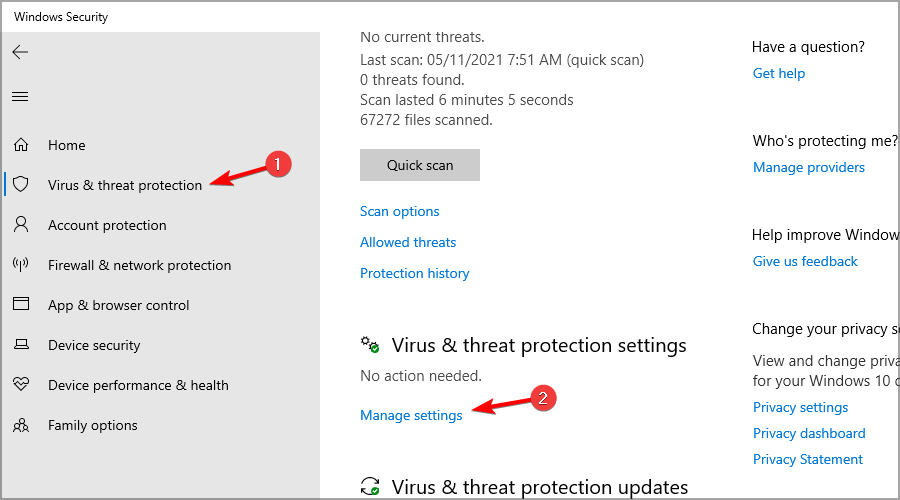
- Click on Virus & threat protection. Next, click on Manage settings.

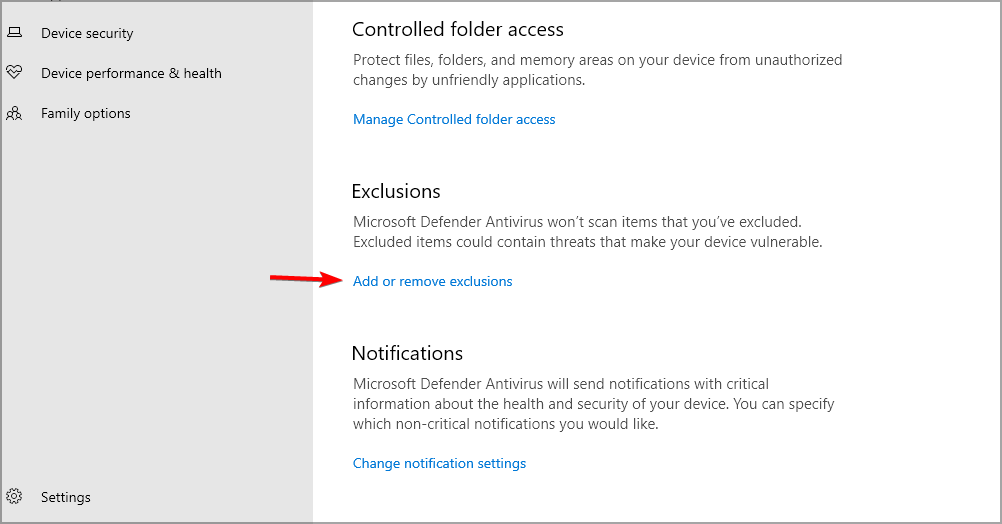
- After that, click on Add or remove exclusions in the Exclusions section.

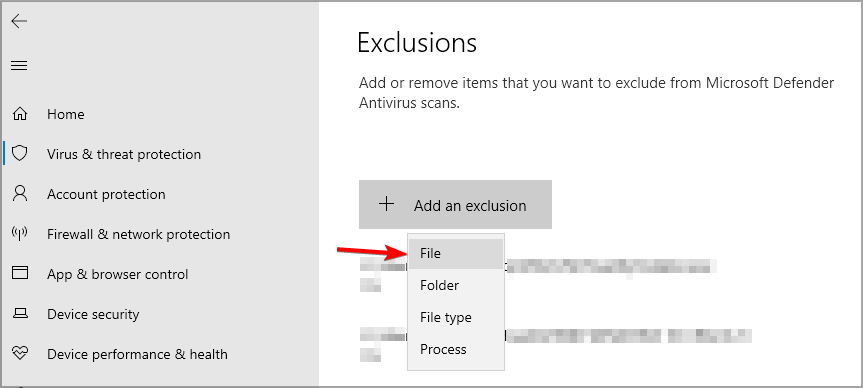
- Click on the Add an exclusion button and select File.

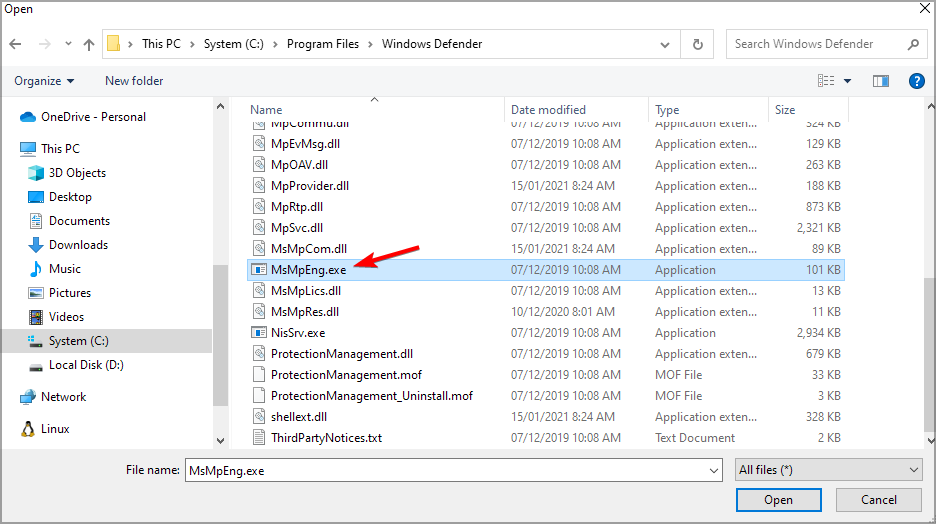
- Go to the following directory and select MsMpEnd.exe in the following directory:
C:\Program Files\Windows Defender
3. Create a batch script
NOTE
- Open Notepad.
- Now paste the following code:
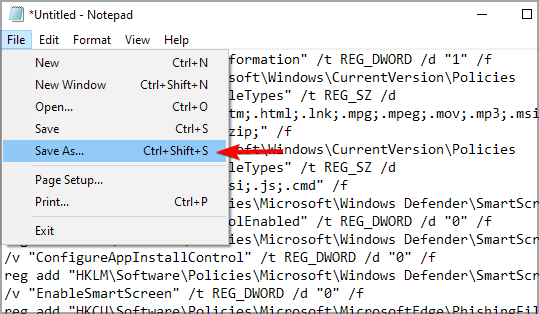
@echo off::Windows Defenderreg add "HKLM\SYSTEM\ControlSet001\Services\MsSecFlt" /v "Start" /t REG_DWORD /d "4" /freg add "HKLM\SYSTEM\ControlSet001\Services\SecurityHealthService" /v "Start" /t REG_DWORD /d "4" /freg add "HKLM\SYSTEM\ControlSet001\Services\Sense" /v "Start" /t REG_DWORD /d "4" /freg add "HKLM\SYSTEM\ControlSet001\Services\WdBoot" /v "Start" /t REG_DWORD /d "4" /freg add "HKLM\SYSTEM\ControlSet001\Services\WdFilter" /v "Start" /t REG_DWORD /d "4" /freg add "HKLM\SYSTEM\ControlSet001\Services\WdNisDrv" /v "Start" /t REG_DWORD /d "4" /freg add "HKLM\SYSTEM\ControlSet001\Services\WdNisSvc" /v "Start" /t REG_DWORD /d "4" /freg add "HKLM\SYSTEM\ControlSet001\Services\WinDefend" /v "Start" /t REG_DWORD /d "4" /f::WindowsSystemTrayreg delete "HKLM\SOFTWARE\Microsoft\Windows\CurrentVersion\Run" /v "SecurityHealth" /f::System Guardreg add "HKLM\SYSTEM\ControlSet001\Services\SgrmAgent" /v "Start" /t REG_DWORD /d "4" /freg add "HKLM\SYSTEM\ControlSet001\Services\SgrmBroker" /v "Start" /t REG_DWORD /d "4" /f::WebThreatDefSvcreg add "HKLM\SYSTEM\ControlSet001\Services\webthreatdefsvc" /v "Start" /t REG_DWORD /d "4" /freg add "HKLM\SYSTEM\ControlSet001\Services\webthreatdefusersvc" /v "Start" /t REG_DWORD /d "4" /ffor /f %%i in ('reg query "HKLM\SYSTEM\ControlSet001\Services" /s /k "webthreatdefusersvc" /f 2^>nul ^| find /i "webthreatdefusersvc" ') do (reg add "%%i" /v "Start" /t REG_DWORD /d "4" /f)::reg add "HKLM\SOFTWARE\Microsoft\Windows NT\CurrentVersion\Image File Execution Options\smartscreen.exe" /v "Debugger" /t REG_SZ /d "%%windir%%\System32\taskkill.exe" /freg add "HKCU\Software\Microsoft\Windows\CurrentVersion\Policies\Associations" /v "DefaultFileTypeRisk" /t REG_DWORD /d "1808" /freg add "HKCU\Software\Microsoft\Windows\CurrentVersion\Policies\Attachments" /v "SaveZoneInformation" /t REG_DWORD /d "1" /freg add "HKCU\Software\Microsoft\Windows\CurrentVersion\Policies\Associations" /v "LowRiskFileTypes" /t REG_SZ /d ".avi;.bat;.com;.cmd;.exe;.htm;.html;.lnk;.mpg;.mpeg;.mov;.mp3;.msi;.m3u;.rar;.reg;.txt;.vbs;.wav;.zip;" /freg add "HKCU\Software\Microsoft\Windows\CurrentVersion\Policies\Associations" /v "ModRiskFileTypes" /t REG_SZ /d ".bat;.exe;.reg;.vbs;.chm;.msi;.js;.cmd" /freg add "HKLM\Software\Policies\Microsoft\Windows Defender\SmartScreen" /v "ConfigureAppInstallControlEnabled" /t REG_DWORD /d "0" /freg add "HKLM\Software\Policies\Microsoft\Windows Defender\SmartScreen" /v "ConfigureAppInstallControl" /t REG_DWORD /d "0" /freg add "HKLM\Software\Policies\Microsoft\Windows Defender\SmartScreen" /v "EnableSmartScreen" /t REG_DWORD /d "0" /freg add "HKCU\Software\Policies\Microsoft\MicrosoftEdge\PhishingFilter" /v "EnabledV9" /t REG_DWORD /d "0" /freg add "HKLM\Software\Policies\Microsoft\MicrosoftEdge\PhishingFilter" /v "EnabledV9" /t REG_DWORD /d "0" /fgoto :EOF - Click on File and choose Save as.

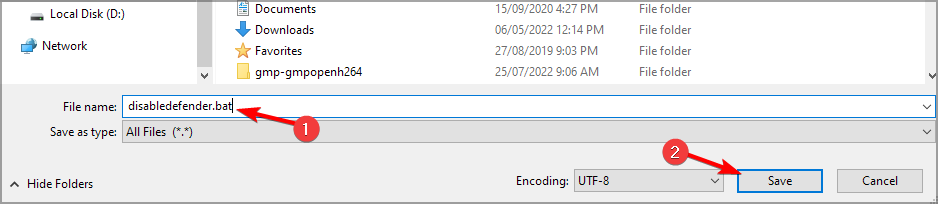
- Choose a save location. Set Save as type as All Files. Enter the save name as disabledefender.bat and save it.

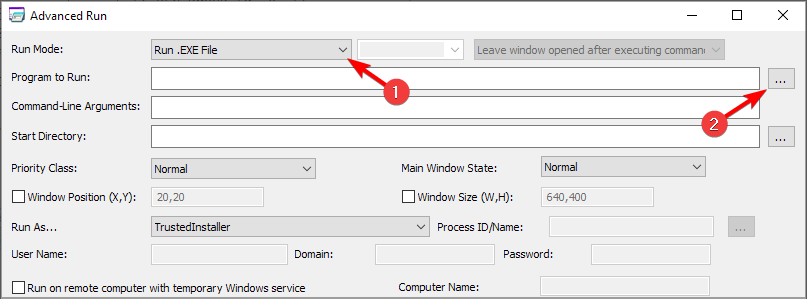
- Start Advanced Run and configure it to run the file as TrustedInstaller.
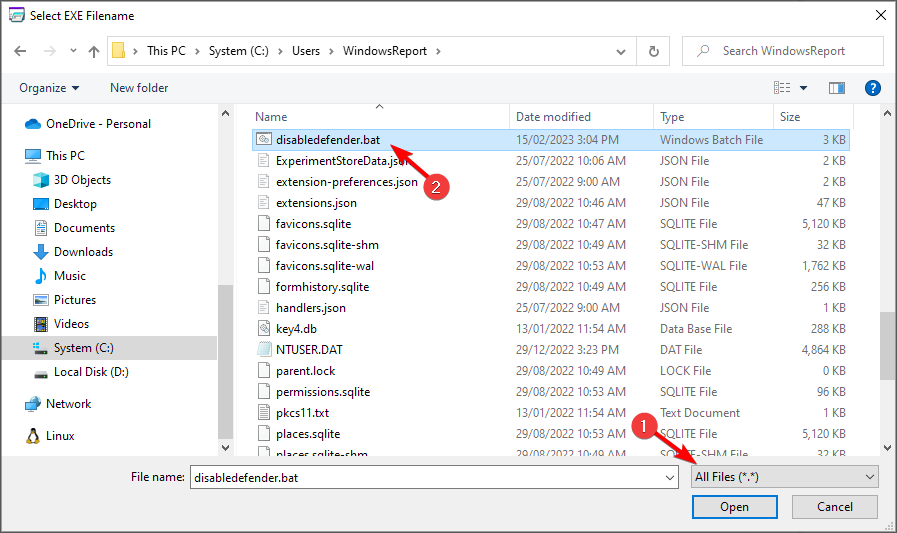
- Set Run mode to Run .EXE File. Click three dots next to the Program to Run field.

- Select All files and choose disabledefender.bat file that you just created.

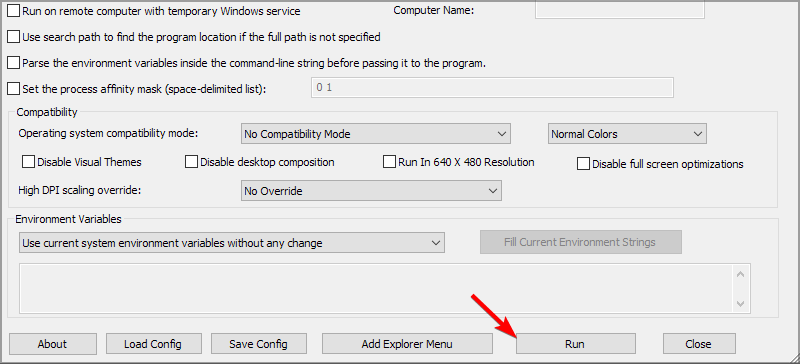
- Click the Run button and wait for the process to finish.


You can restore Windows Defender by creating a new script like this:
- Start Notepad and paste the following code:
@echo off::Windows Defenderreg add "HKLM\SYSTEM\ControlSet001\Services\MsSecFlt" /v "Start" /t REG_DWORD /d "0" /freg add "HKLM\SYSTEM\ControlSet001\Services\SecurityHealthService" /v "Start" /t REG_DWORD /d "3" /freg add "HKLM\SYSTEM\ControlSet001\Services\Sense" /v "Start" /t REG_DWORD /d "3" /freg add "HKLM\SYSTEM\ControlSet001\Services\WdBoot" /v "Start" /t REG_DWORD /d "0" /freg add "HKLM\SYSTEM\ControlSet001\Services\WdFilter" /v "Start" /t REG_DWORD /d "0" /freg add "HKLM\SYSTEM\ControlSet001\Services\WdNisDrv" /v "Start" /t REG_DWORD /d "3" /freg add "HKLM\SYSTEM\ControlSet001\Services\WdNisSvc" /v "Start" /t REG_DWORD /d "3" /freg add "HKLM\SYSTEM\ControlSet001\Services\WinDefend" /v "Start" /t REG_DWORD /d "2" /f::WindowsSystemTrayreg add "HKLM\SOFTWARE\Microsoft\Windows\CurrentVersion\Run" /v "SecurityHealth" /t REG_EXPAND_SZ /d "%systemroot%\system32\SecurityHealthSystray.exe" /f::SystemGuardreg add "HKLM\SYSTEM\ControlSet001\Services\SgrmAgent" /v "Start" /t REG_DWORD /d "0" /freg add "HKLM\SYSTEM\ControlSet001\Services\SgrmBroker" /v "Start" /t REG_DWORD /d "2" /f::WebThreatDefSvcreg add "HKLM\SYSTEM\ControlSet001\Services\webthreatdefsvc" /v "Start" /t REG_DWORD /d "3" /freg add "HKLM\SYSTEM\ControlSet001\Services\webthreatdefusersvc" /v "Start" /t REG_DWORD /d "2" /ffor /f %%i in ('reg query "HKLM\SYSTEM\ControlSet001\Services" /s /k "webthreatdefusersvc" /f 2^>nul ^| find /i "webthreatdefusersvc" ') do (reg add "%%i" /v "Start" /t REG_DWORD /d "2" /f)::reg delete "HKLM\Software\Microsoft\Windows NT\CurrentVersion\Image File Execution Options\smartscreen.exe" /freg delete "HKCU\Software\Microsoft\Windows\CurrentVersion\Policies\Associations" /freg delete "HKLM\Software\Policies\Microsoft\Windows Defender\SmartScreen" /freg delete "HKLM\Software\Policies\Microsoft\Windows Defender\Signature Updates" /fgoto :EOF - Click File and choose Save as.
- Set Save as type to All files. Name the file restoredefender.bat and save it.
- Start Advanced Run and run restoredefender.bat as TrustedInstaller.
4. Use the GitHub script
NOTE
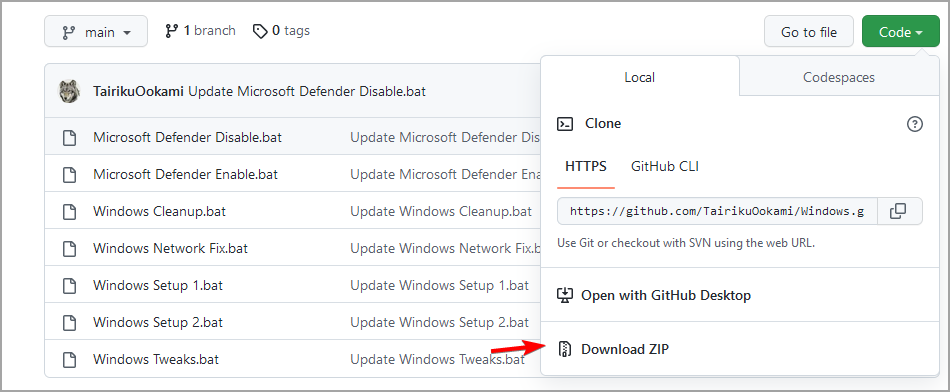
- Visit Tairiku’s GitHub page.
- Click on Code and select Download ZIP.

- Once the file is downloaded, extract it to a location that you can quickly access.
- Next, start Advanced Run and make sure you run it as TrustedInstaller.
- Set Run Mode to Run .EXE File and click three dots next to the Program to Run field.
- Select All files and choose the Microsoft Defender Disable.bat file that you downloaded.
- Lastly, click the Run button to run the script.

To revert the changes, repeat the steps but use the Microsoft Defender Enable.bat script instead.
5. Use Command Prompt
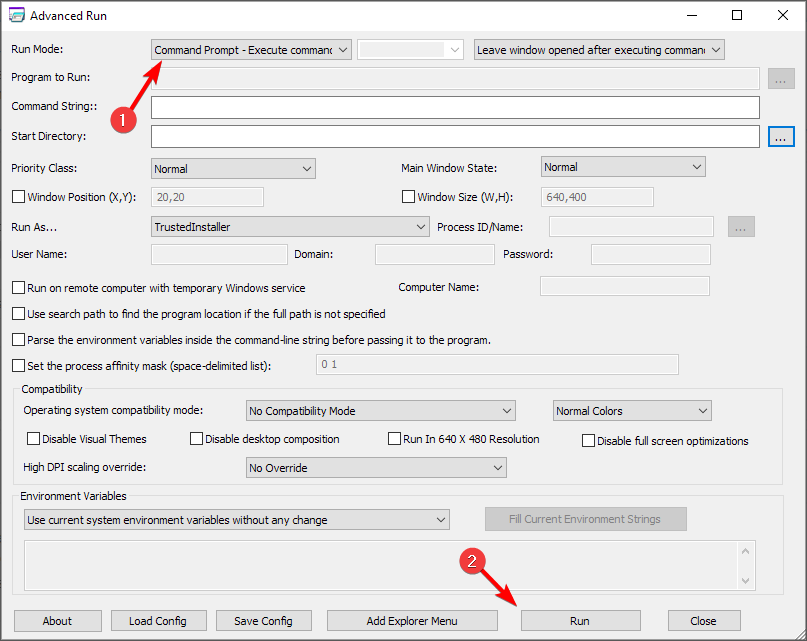
- Start Advanced Run and set it to run as TrustedInstaller.
- Set Run Mode to Command Prompt and click Run.

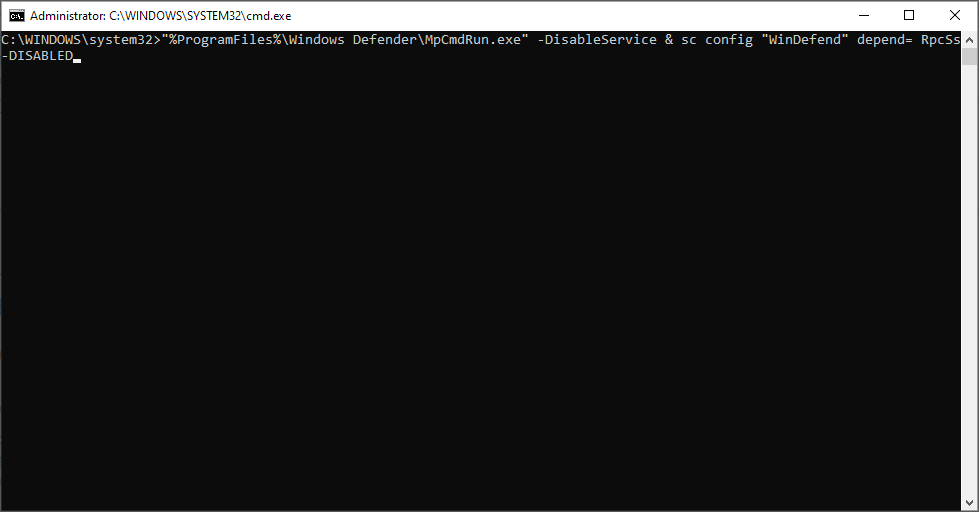
- Run the following command:
"%ProgramFiles%\Windows Defender\MpCmdRun.exe" -DisableService & sc config "WinDefend" depend= RpcSs-DISABLED
- Restart your PC.
- Optional: To revert the changes, use this command:
sc config "WinDefend" depend= RpcSs & "%ProgramFiles%\Windows Defender\MpCmdRun.exe" -EnableService
If the previous commands didn’t work, use these commands instead:
- To disable Windows Defender:
REG ADD "HKEY_LOCAL_MACHINE\SYSTEM\CurrentControlSet\Services\WinDefend" /v "DependOnService" /t REG_MULTI_SZ /d "RpcSs-DISABLED" /f - To enable Windows Defender:
REG ADD "HKEY_LOCAL_MACHINE\SYSTEM\CurrentControlSet\Services\WinDefend" /v "DependOnService" /t REG_MULTI_SZ /d "RpcSs" /f
6. Install a third-party antivirus
Antimalware Service Executable is a process closely related to Microsoft Defender.
However, Microsoft Defender won’t run side by side with a third-party antivirus, so if you’re having problems with Antimalware Service Executable, you might want to install a third-party antivirus.
After fixing the issue with the Defender process, you can safely use ESET antivirus software to provide high-end protection against online cyberattacks. Not only that, this valuable tool comes with the best low-resource usage.
You can also secure your Windows PC against new emerging malware, ransomware attacks, or financial-related threats while performing sensitive activities such as banking operations.
After you install a third-party antivirus, Microsoft Defender will automatically turn itself off, and your problem should be resolved.

ESET HOME Security Essential
Forget about the issues caused by Microsoft Defender and install this top-notch light antivirus.We hope our solutions helped you learn how to stop the Antimalware Service Executable and fix this problem for good.
Disabling this service is one of the necessary steps to fix the can’t turn off real-time protection on Windows 11 issue.
Even if you turn off Antimalware Service Executable, don’t leave your system unprotected. You can use any antivirus software option from the best antivirus with an unlimited license list.
Before you go, don’t miss our guide on Msmpeng.exe high memory usage since it covers a similar subject.
For more suggestions or questions, don’t hesitate to leave them in the comments section below, and we’ll be sure to check them out.