Fix a Memory Leak on Windows 10 with These 7 Methods
You should start with a simple device reboot
![]() 5 min. read
5 min. read
![]() Updated on
Updated on
Share this article

Improve this guide
Read our disclosure page to find out how can you help Windows Report sustain the editorial team Read more
Key notes
- This issue is a result of apps using more memory than is required and can be corrected in a few clicks.
- You should scan for malware to make sure the leaks are not a product of viruses on your device.
The biggest foe of every PC’s memory is a memory leak. There are many reasons for leaking memory, but the most common one is a programming oversight.
We’ve prepared a high variety of solutions that will help you to prevent memory leaks from occurring again. There could be various factors involved, and we’re going to address most of them.
What causes memory leaks in Windows 10?
Memory leaks simply mean more memory is being used up than is necessary. Unlike many computer programs that have many triggers, these leaks are primarily caused by one of the following:
- Specific apps or programs – In almost all cases, memory leaks can be traced to an app or a program. that have taken more RAM than they should.
- Malware – Malware is a source of many computer issues, including memory loss, and using proper antivirus apps will help.
We will address how these can be resolved below. You should know that programs store data in RAM temporarily, only while running. So, when you restart your PC, RAM is emptied. Each program stores its information about running in RAM.
As programs are different, the more-demanding ones and the programs that actually do more complex action store more data in RAM, requiring more memory, while the simpler programs use less memory.
How can I fix a memory leak in Windows 10?
Before you go into any of these solutions:
- Simply restart your computer. Rebooting resets many computer processes, and the memory leak problem may be solved after it starts up.
1. End specific processes
- Press CTRL + SHIFT + ESC keys to open Task Manager.
- Head over to the Processes tab, and see which program is using the most memory.
- Just click on it, then click the End process button to close that program.


2. Use the Windows 10 built-in tools
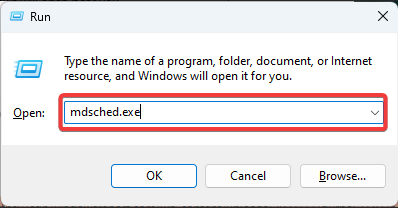
- Press the Windows key + R key to open the Run dialog box, then key in the following code and click on OK:
mdsched.exe
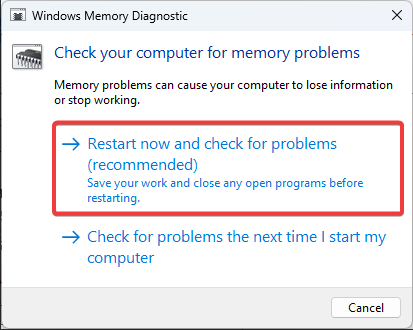
- Select Restart now and check for problems (recommended).

Windows 10 has built-in diagnostic tools that are often enough for providing accurate analysis that will help you determine the cause of your problem.
This type of tool scans your PC for potential memory issues, including memory leaks, and gives you precise diagnostics about all detected problems.
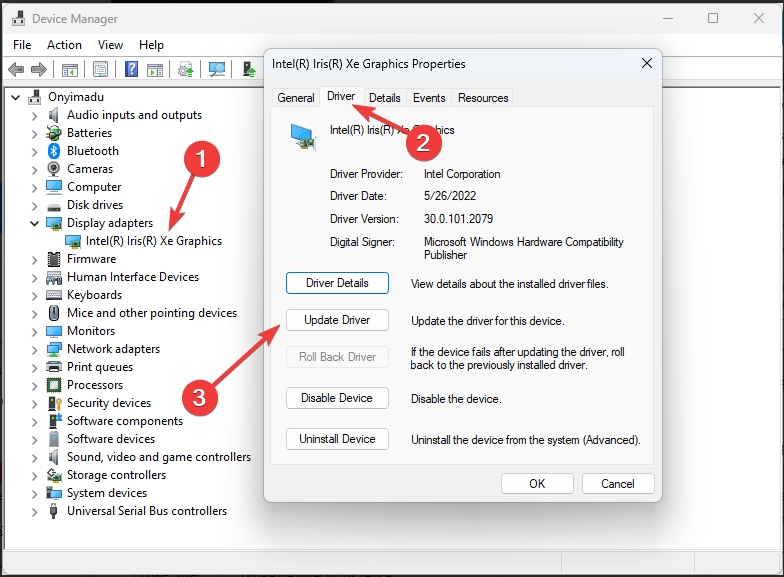
3. Check for driver updates
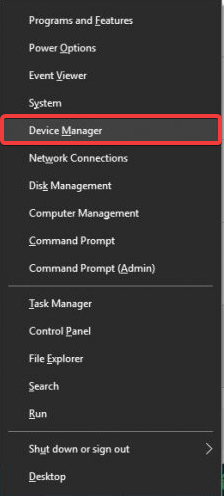
- Press Windows Key + X to open the Power User Menu. Select Device Manager from the list.

- Check any driver with the yellow exclamation mark sign next to it, double-click it, go to the Driver tab and click the Update Driver button.

- Click Search automatically for drivers.


Keep in mind that updating your drivers is an advanced procedure. If you’re not careful, you can cause permanent damage to your system by downloading the wrong driver versions.
However, we recommend you download this driver updater tool (100% safe and tested by us) to do it automatically. Thus, you will prevent memory leaks and even permanent damage to your PC.

Outbyte Driver Updater
Outbyte Driver Updater automatically installs the latest drivers for you to keep your PC up to date in the future.4. Remove malware
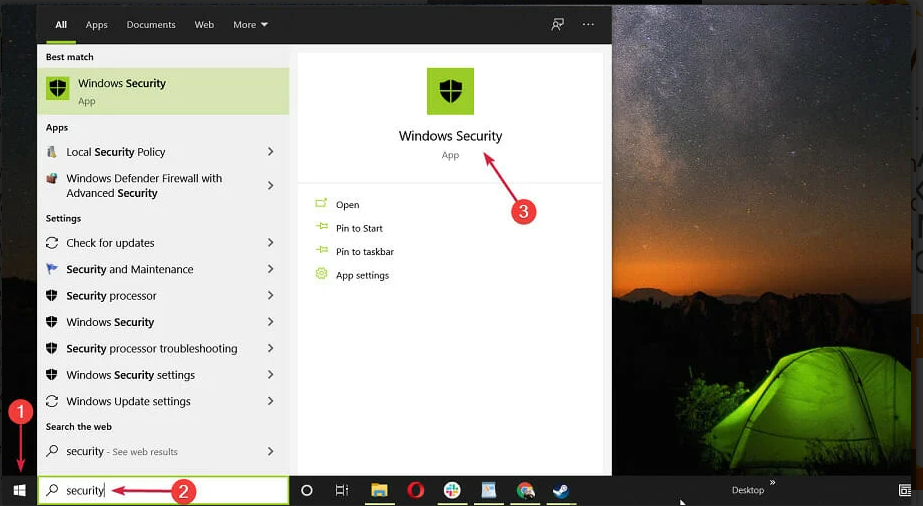
- Type windows security in the Search tab and click on the app from the results.

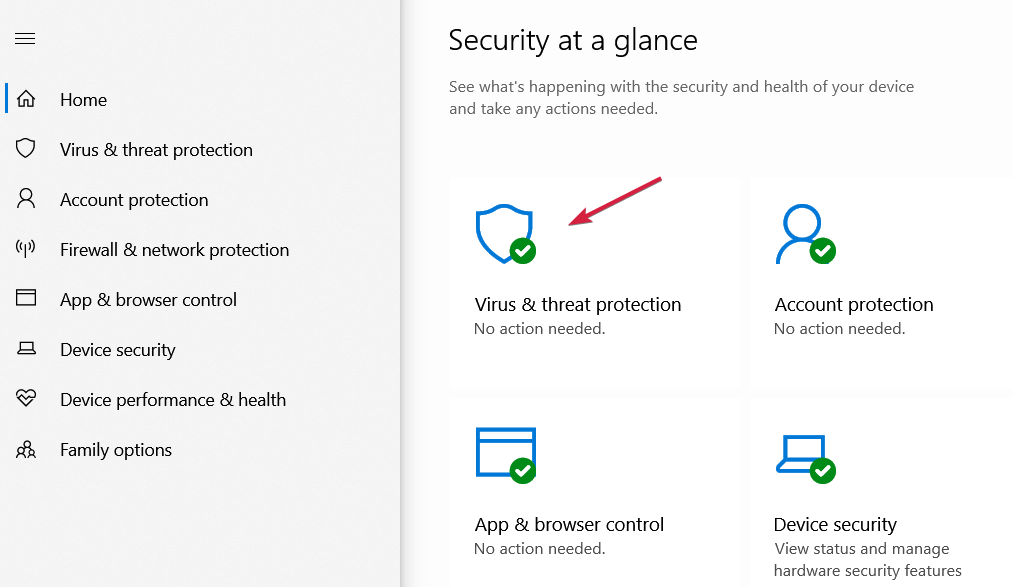
- Select Virus & threat protection.

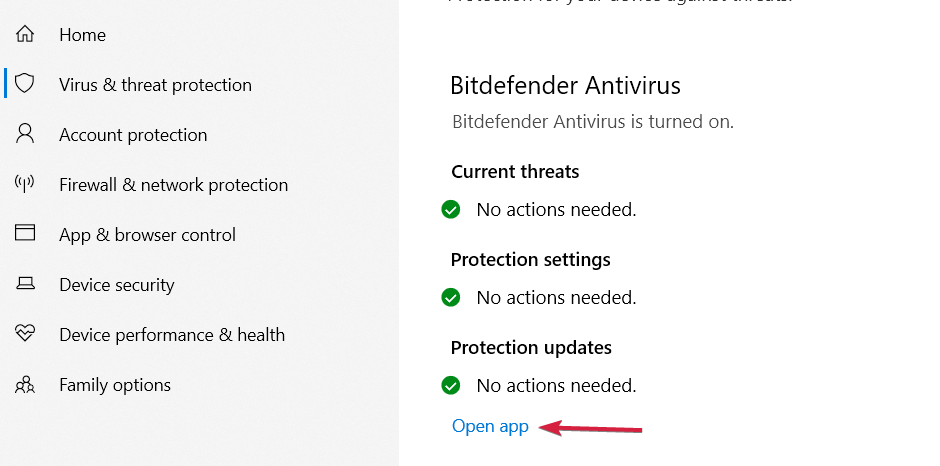
- Now, if you have a third-party antivirus installed, it will override the default Microsoft Defender protection, and you can click on the Open app option. That will take you to the main menu of the antivirus, and you will be able to perform the scan.

- Lastly, opt for the Microsoft Defender Full or Offline scan options if you don’t have one, and verify that the ethernet not working issue is fixed.
We recommend you use third-party antivirus software. Dedicated tools can typically detect a lot more threats and remove them before they get a chance to impact your system in any way.
Thankfully, many Windows 10 compatible antivirus software can fully protect your system without using too many system resources or placing unnecessary restrictions.
Most antivirus software has a quick scan feature, so after you install your tool, just run the quick scan and let the software remove any threat it detects.
5. Disable programs running at Startup
- Press CTRL + SHIFT + ESC keys to open Task Manager.
- Go to the Startup tab, then click on the program you want to disable and choose Disable.

- Restart your PC.

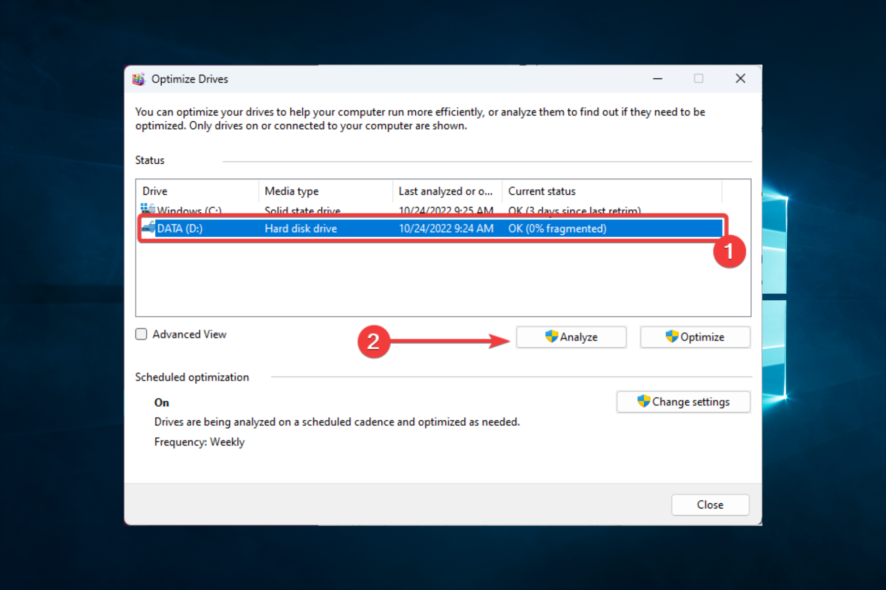
6. Defrag hard drives
 NOTE
NOTE
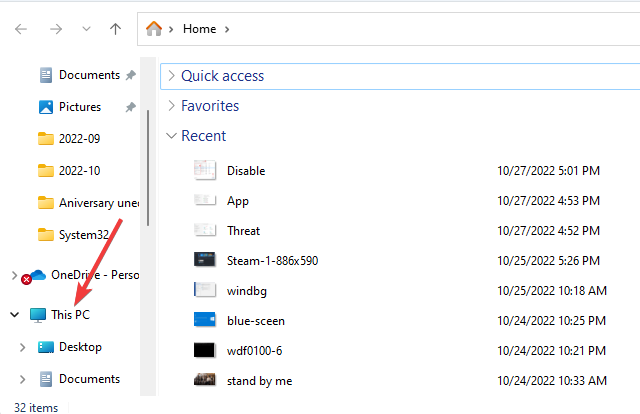
- Open File Explorer, then go to This PC.

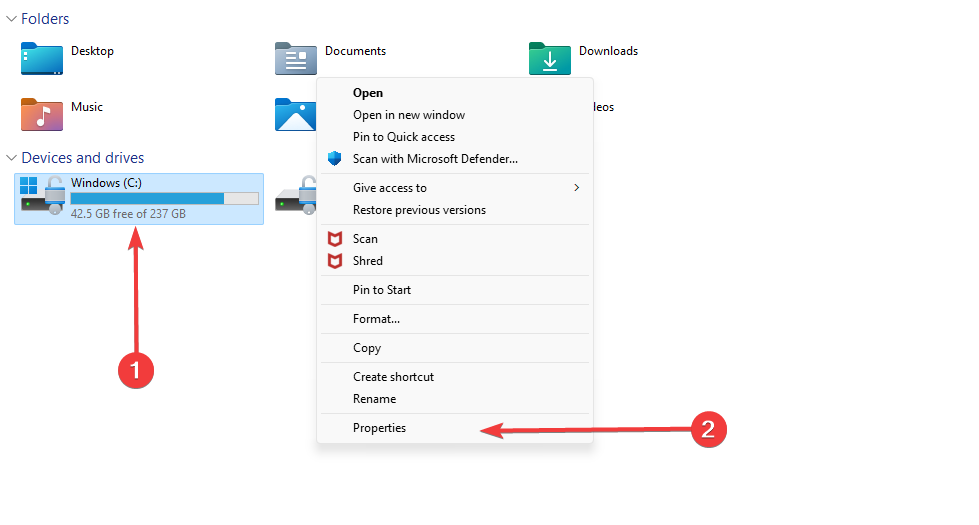
- Right-click your current system hard drive (most likely C:), and select Properties.

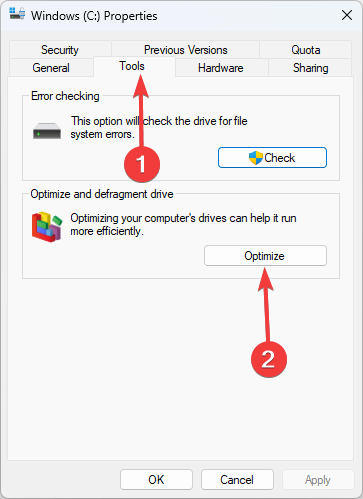
- Go to the Tools tab, and click Optimize.

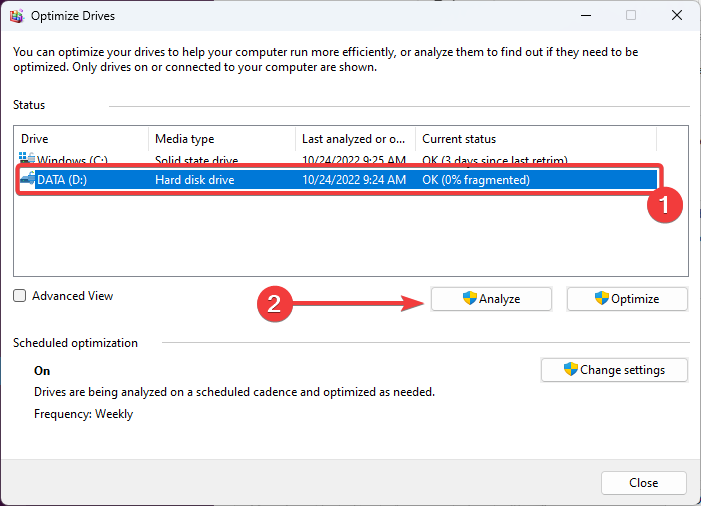
- Select the drive you want to defrag, and choose Analyze.

- Wait for the process to finish.
- Restart your PC.
It is recommended to defrag your hard drive now and then. Besides optimizing your hard disk, it could also benefit your PC, including better memory management.
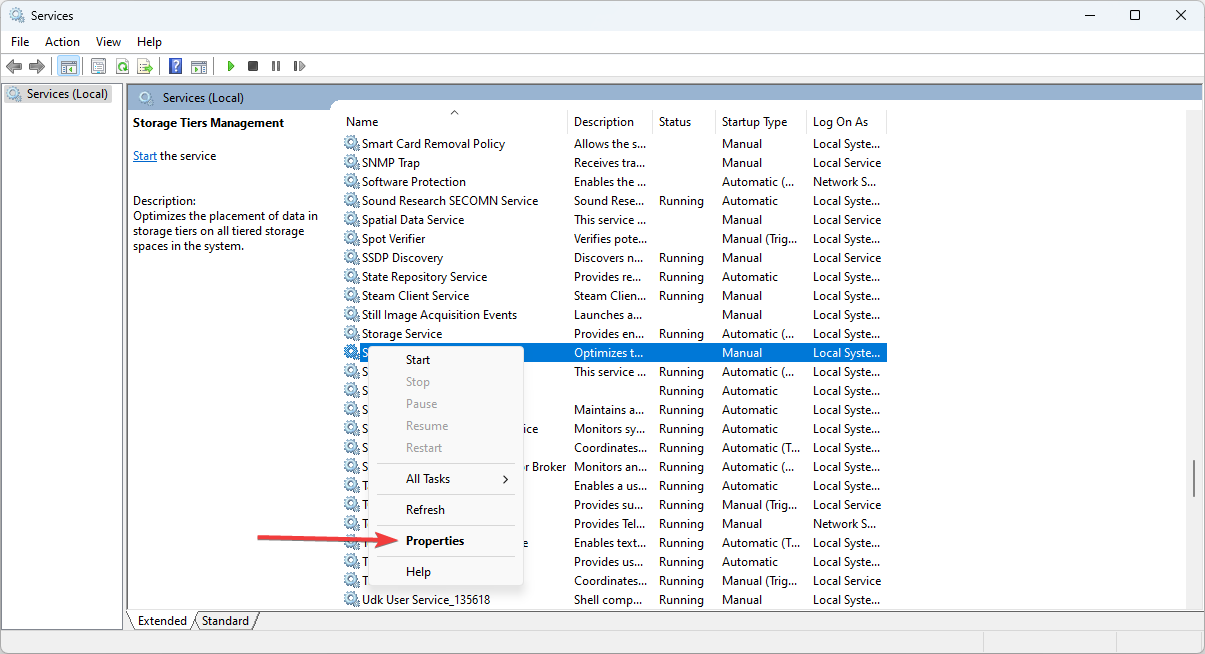
7. Disable Superfetch
- Use the following keyboard shortcut: Windows + R.
- Type in services.msc, then hit the Enter key.

- Find the process called Superfetch, right-click it, and choose Properties.

- Select Stop, and choose Disable from the Startup Type drop-down menu.

- Restart your PC.


Superfetch is another Windows service whose goal is to optimize the performance of the system. This process allows Windows to manage the amount of RAM, decrease boot time, and make application loading more efficient.
Disabling Superfetch is not recommended, but you can experiment with it to determine if it makes your PC slower.
That’s about it for our article about memory leaks in Windows 10. We hope that this info was helpful to you and that we managed to solve the problem.
In case you have some comments, questions, or suggestions, feel free to let us know in the comments section below.