Presentation Marker free download
Trial / Version 2.8.2
![]() 2 min. read
2 min. read
![]() Updated on
Updated on
Share this article

Improve this guide
Read our disclosure page to find out how can you help Windows Report sustain the editorial team Read more
Presentation Marker is a screen annotation software solution that lets you mark and annotate directly on your screen. This feature can be especially handy if your job involves creating presentations on a daily basis.
You can grasp your audience’s attention in a more effective manner by creating markings directly on your screen. That way, you don’t need to create additional content for clarification or spend time with extra explanations for your audience.
Presentation Marker’s system requirements
As you’d probably expect, there’s a list of prerequisites that your PC has to meet so it can run this tool. However, we took a look at the tool itself and we believe there’s little reason for concern if any. But let’s not jump to conclusions just yet, here’s Presentation Marker’s sys req:
Supported devices:
- Desktop PCs, laptops and tablet PCs
- Interactive whiteboards
- Digital pen input
- Graphics tablets
- Multiple screen support
Supported operating systems:
- Windows 10, all editions (32- and 64-bit)
- Windows 8, all editions (32- and 64-bit)
- Windows 7, all editions (32- and 64-bit), Windows 7 SP1, all editions (32- and 64-bit)
- Windows Vista, all editions (32-bit), Windows Vista SP1, Windows Vista SP2, all editions (32- and 64-bit)
- Windows XP Tablet PC Edition 2005
- Windows XP, all editions (32- and 64-bit), Windows XP SP2, Windows XP SP3
Therefore, the sys req list is not a conventional one as far as we can say. However, it sends a clear message. In conclusion, if your PC is within the limits of the supported devices and operating systems lists, it’s probably good to go.
Overview of Presentation Marker features
-
Presentation Marker's features:
- Perform screen markings freely
- Virtual whiteboard
- Full-screen zooming support
- Additional features
(Spotlight, curtains, hide output, etc)
-
Presentation Marker Pro's features:
- Draw freely on the screen but not lock it
- Live zoom in and out support
- Countdown timer, background music,
task shortcuts - Mouse click effect, pointer effect,
display keystrokes
Screenshots
Our Review
- Pros
- Perform various markings on your presentation
- Live marking support
- Additional features like spotlight and curtains
- Cons
- None
Presentation Marker portable and setup versions
When it comes to deploying this tool on your PC, you can either install it or not, depending on your needs. The developers are offering you an installer version of the tool, as well as a portable one.
The perks of any portable software solution include not creating additional files or folders on the target PC, as well as not tampering with any entry in that system’s registry.
More so, portable means no installation, but it also eliminates the need for uninstalling an app once you don’t need it anymore. Just remove the local files and you’re done.
However, note that you can install Presentation Marker on your PC with minimum efforts. You just need to accept the EULA, define the destination path on your PC and toggle shortcut creation. The wizard handles the rest of the process automatically, without any additional help.
How to use Presentation Marker
During your presentations, you can use Presentation Marker to create annotations straight on your screen. Furthermore, you can also zoom in on certain areas for effective and quick explanations. That way, your audience will benefit from a clearer understanding of your material.
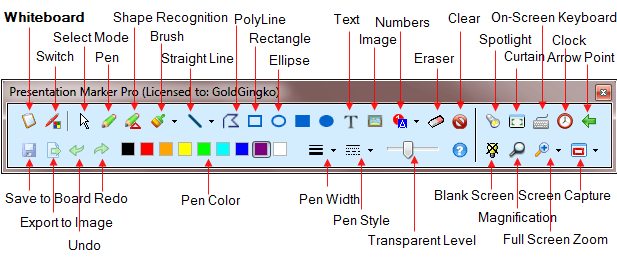
To create a new marking, select the tool you want to work with and start drawing. You can choose from a pen, a shape recognition tool, a brush, a line, a polygon tool, a rectangle, or an ellipse.
Enhance your presentations with Presentation Marker
Aside from letting you perform live markings on your screen, Presentation Marker can also help you do other things. For instance, you can use a text tool to type content on your presentations without having to modify it. The same goes for pictures. You just select the image tool, then choose your favorite picture to append to your live presentation.
If you want to highlight a certain part of your project, there’s a spotlight tool you can use. What this feature does is darken the area around your point of interest. As a matter of fact, it works similarly to an actual spotlight, so you might say it deserves its name.
You can also add virtual curtains, for when you want to perform a big reveal to your audience. Presentation Marker also allows you to display a clock on your presentations if you use to run them in full-screen and need to keep track of the time seamlessly.
FAQ: Learn more about Presentation Marker
- How do you write on your screen during a presentation?
First of all, make sure you’re running Presentation Marker. Move your mouse cursor to the center of the top part of your screen. From the newly-visible toolbar, select a suitable marking tool and perform your desired operation.
- How do I use the spotlight feature?
Make sure you’re running the app, then select the spotlight feature from its toolbar. You can change the spotlight’s shape by double-clicking its edge. More so, you can adjust its size by dragging its edges until you’re satisfied with the result.
- How to use the curtains feature?
If you want to draw attention to a certain area of your presentation, click the curtain tool. This feature lets you display only a certain horizontal slice of your screen, depending on your selection. Drag each “curtain” until you’re satisfied with the reveal area.
Full Specifications
- Software Version
- 2.8.2
- License
- Trial
- Keywords
- annotation, demonstration, presentation, mark, screen