Fix: Vpn.exe System Error on Windows: [Step-by-Step]
Every VPN error has a practical fix in this exhaustive guide
![]() 17 min. read
17 min. read
![]() Updated on
Updated on
Share this article

Improve this guide
Read our disclosure page to find out how can you help Windows Report sustain the editorial team Read more
Key notes
- Many users complained about various VPN program errors in Windows 10.
- To fix general errors on your VPN, you should make changes in the registry.
- You also need to diagnose and disable the network connection.
- Reinstall the VPN program and keep reading for more solutions!

Many users are concerned about their online privacy, and in order to protect it, they tend to use VPN tools that will change their IP addresses.
VPN software can be great, but sometimes you can encounter errors with your VPN program, and today we’re going to show you how to fix VPN errors on Windows 10.


How can I fix VPN errors on Windows 10?
- General guide to fix VPN errors
- VPN error 807 Windows 10
- VPN error 619 Windows 10
- VPN error 812 Windows 10
- VPN error 720 Windows 10
- VPN error 721 Windows 10
- VPN error 412 Windows 10
- VPN error 691 Windows 10
1. General guide to fix VPN errors
1.1. Make changes to your registry
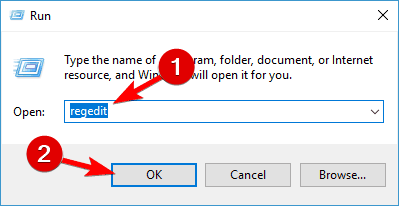
- Press Windows Key + R and enter regedit. Press Enter or click OK.

- When the Registry Editor opens, go to the following path:
HKEY_CURRENT_USER\Software\Microsoft\Windows\CurrentVersion\Internet Settings - Right-click the Internet Settings key and choose New > Key from the menu.

- Enter GlobalUserOffline as the name of the new key and select it.
- In the right pane, double click the (Default) DWORD to open its properties.
- Enter 1 in the Value data field and click OK to save changes.

- After doing that, close Registry Editor and check if the Cisco software is working properly.
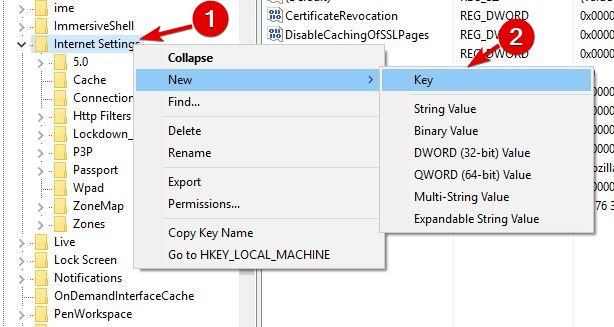

Users reported the Failed to initialize connection subsystem error on their PC while trying to use Cisco VPN software, but you can easily fix this problem simply by adding one value to your registry.
If you can’t edit your Windows 10’s registry, read this handy guide dedicated to fixing regedit and find the quickest solutions to the issue.
 NOTE
NOTE
1.2. Run Cisco AnyConnect in Compatibility mode
- Locate the Cisco AnyConnect shortcut, right-click it and choose Properties.
- Go to Compatibility tab.
- Check Run this program in compatibility mode for and select an older version of Windows.

- Click Apply and OK to fix the problem.
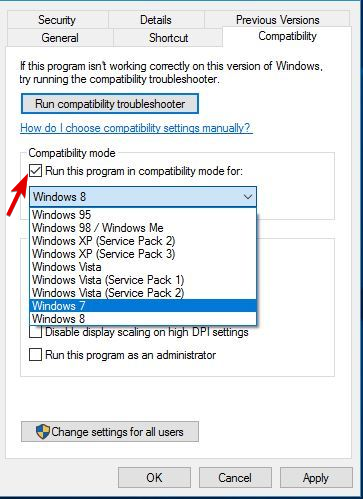
Compatibility mode is a great feature that allows you to run older software on Windows 10 without any problems. To do that, you need to follow these steps above.
Few users reported that this Cisco AnyConnect issue can also be solved by running the setup file in compatibility mode, so you might want to try that as well.
1.3. Delete the WAN Miniport (IP), WAN Miniport (IPv6) and WAN Miniport (PPTP) device
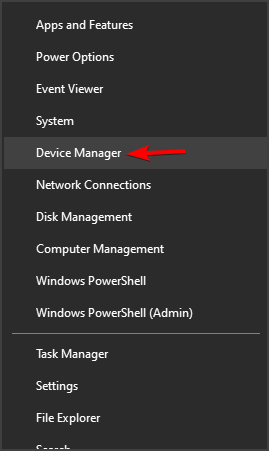
- Press Windows Key + X to open Win + X menu. Choose Device Manager from the list.

- When Device Manager opens, go to View > Show hidden devices.

- Locate all WAN Miniport devices and delete them.
- After deleting all Miniport devices your VPN connection should start working without any problems.

Certain devices, such as WAN Miniport, can interfere with the built-in Windows VPN feature and cause all sorts of problems to appear.
Users reported A Connection to the remote computer could not be established error while trying to use VPN on Windows 10, and one of the suggested solutions is to delete all WAN Miniport devices.
1.4. Install Cisco VPN tool properly
- Download the latest Cisco VPN software. Don’t run the setup file yet.
- Download DNE software from Cisco and install it. Make sure to download 32-bit or 64-bit version so it matches your operating system.
- Install the DNE software.
- After that, install Cisco VPN.
Others reported that they are getting the Cisco VPN error 27850 during the installation, and one way to fix this problem is to properly install the tool.
Users also reported the error 442 which means that the Virtual Adapter couldn’t be enabled. To fix this problem, simply open the Registry Editor and follow these steps:
- Go to the following path:
HKLM\SYSTEM\CurrentControl\Set\Services\CVirtA - Double click the DisplayName string in the right panel and change its value to Cisco Systems VPN Adapter for 64-bit Windows.
- Close Registry Editor and check if the problem is resolved.
Can’t access the Registry Editor? Things aren’t as scary as they seem. Check out this guide about accessing the Regedit and solve the issue quickly.
1.5. Use Microsoft CHAP Version 2
- Locate your VPN connection, right-click it and choose Properties from the menu.
- When the Properties window opens, go to the Security tab, select Allow these protocols, and check Microsoft CHAP Version 2 (MS-CHAP v2).
- After enabling Microsoft CHAP Version 2, your VPN should start working without any problems.
You can fix some errors with your VPN simply by allowing certain protocols. Users reported that they fixed the problem with the VPN connection by following the steps.
1.6. Diagnose and disable your connection
- Press Windows Key + X and select Network Connections from the menu.
- When the Network Connections window opens locate your VPN connection, right-click it and choose Diagnose from the menu.

- Wait for the scan to finish.
- If the problem still persists, right-click the VPN connection and choose Disable.

- Wait for a few seconds and enable your VPN connection by following the same steps.


One way to fix problems with VPN is to diagnose your connection. By diagnosing your connection Windows 10 will fix some of the common VPN errors.
This is a simple solution and few users reported that it worked for them, so you might want to try it out.
1.7. Uninstall Citrix DNE Updater
If you’re using the Cisco’s IPSEC VPN client, you can fix many errors simply by uninstalling Citrix DNE Updater.
After uninstalling this tool, download and install SonicWall VPN 64-bit Client from Dell. After doing that, the issue with the VPN should be completely resolved.
1.8. Make changes to the registry before installing Cisco VPN
- When Registry Editor opens, in the left pane navigate to the following path:
HKEY_LOCAL_MACHINE\SYSTEM\CurrentControl\Set\Control\Network - In the right panel, locate MaxNumFilters and double click it. Change the Value data from 8 to 14 and save changes.
- Close Registry Editor and restart your PC.
Sometimes you can fix the Error 27850 while installing Cisco VPN simply by making one small change to your registry. Before installing Cisco VPN, open Registry Editor and follow the steps above.
After changing this value in the Registry Editor, you should be able to install Cisco VPN without any errors.
1.9. Restart LogMeIn Hamachi tunneling engine service
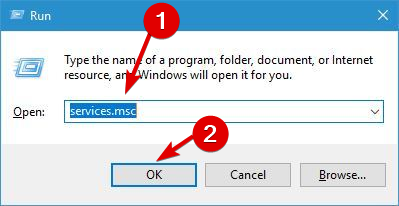
- Press Windows Key + R and enter services.msc. Click OK or press Enter.
- When Services window opens, locate LogMeIn Hamachi Tunnelling Engine service and double click it.
- If the service is running, click the Stop button.
- Wait for few seconds and click the Start button to start it again.
If you’re using LogMeIn as your VPN tool, you might encounter certain problems with it. The simplest way to fix most LogMeIn errors is to restart the LogMeIn Hamachi Tunneling Engine service.
1.10. Check if your clock is correct
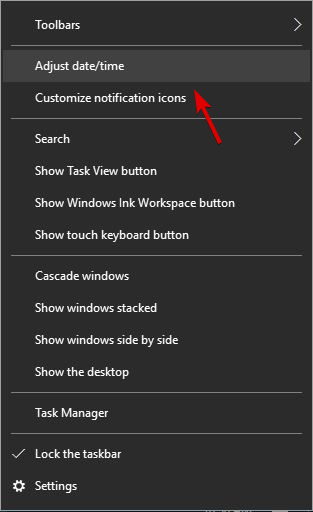
- In the bottom right corner right click your clock and choose to Adjust date/time.

- Check if your clock is correct. If it’s not, disable the Set time automatically option and turn it back on.


Users reported Error Code 1 while using SoftEther VPN client, and one of the fastest ways to fix this problem is to check your time and date. You can easily do that by following these steps:
After doing that, your clock should be correct and the VPN error will be resolved.
1.11. Enable Allow service to interact with the desktop option
- Open Services window.
- Locate Cisco AnyConnect Secure Mobility Agent and double-click it.
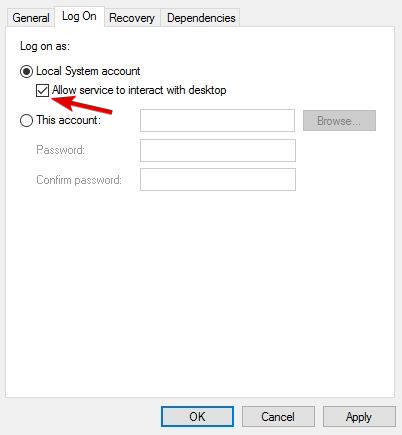
- Navigate to the Log On tab and check the Allow service to interact with the desktop option.

If you’re having a Cisco VPN Client Driver error, you should be able to solve it by enabling one option.
1.12. Use Command Prompt
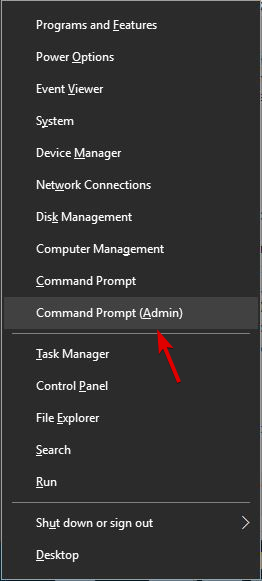
- Press Windows Key + X and select Command Prompt (Admin).

- When Command Prompt opens, enter the following commands:
net stop CryptSvcesentutl /p %systemroot%System32catroot2{F750E6C3-38EE-11D1-85E5-00C04FC295EE}catdb - When asked, be sure to select OK to attempt the repair.
- After the repair process is finished, exit Command Prompt and restart your PC.
Another way to fix Cisco VPN Client Driver error is to use Command Prompt. If you’re having trouble accessing Command Prompt as an admin, take a look at this guide dedicated to using CMD with admin rights.
1.13. Configure Hamachi properly
- Open Hamachi and write down your Hamachi IP address.
- Open Network Connections window.
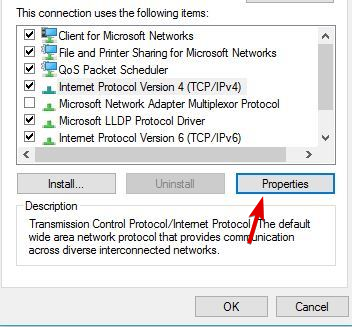
- Locate your Hamachi adapter, right-click it and choose Properties.
- Select Internet Protocol (TCP/IP) and click the Properties button.

- In the General tab make sure that Obtain an IP address automatically and Obtain DNS server address automatically options are selected.
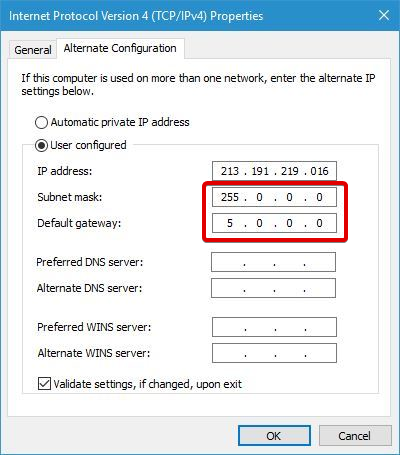
- Go to Alternate Configuration tab.
- Select User configured option.
- In the IP address field enter the Hamachi IP address that you got in Step 1.
- Enter 255.0.0.0 as the Subnet mask and 5.0.0.0 as Default Gateway.

- Click OK to save changes and restart your PC.
Problems with LogMeIn VPN can occur if you don’t configure it properly, but fortunately, you can fix this error by following these aforementioned steps.
1.14. Stop AviraPhantomVPN service
- Open Command Prompt as administrator.
- When Command Prompt opens, enter the following lines:
net stop AviraPhantomVPNnet start AviraPhantomVPN - After that, try to start Avira Phantom VPN again.
If you’re using Avira Phantom VPN, you should be able to fix some of its problems simply by restarting the AviraPhantomVPN service.
1.15. Reinstall your VPN software (suggested)
If you’re using third-party VPN software, you might be able to fix its errors simply by performing a reinstall, so be sure to try that. Keep in mind that this solution applies to all third-party VPN tools.
2. VPN error 807 Windows 10
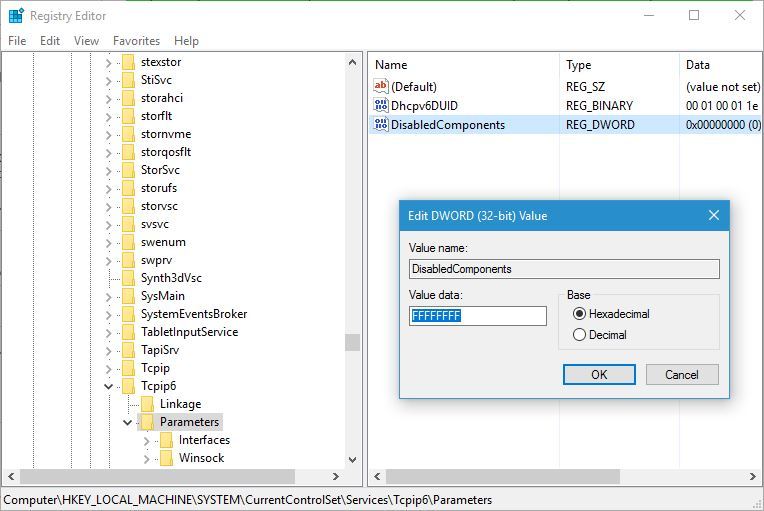
2.1. Disable IPv6
- Open Registry Editor.
- When Registry Editor opens, navigate to the following path:
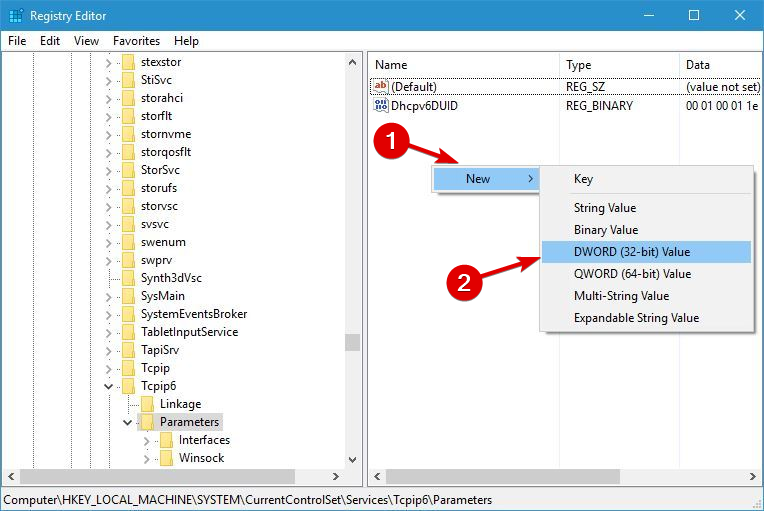
HKEY_LOCAL_MACHINE\SYSTEM\CurrentControl\Set\Services\Tcpip6\Parameters - In the right panel, look for DisabledComponents DWORD.
- If this DWORD isn’t available, create it by clicking the empty space and choosing New > DWORD (32-bit) Value.
- Enter DisabledComponents as the name of the new DWORD.
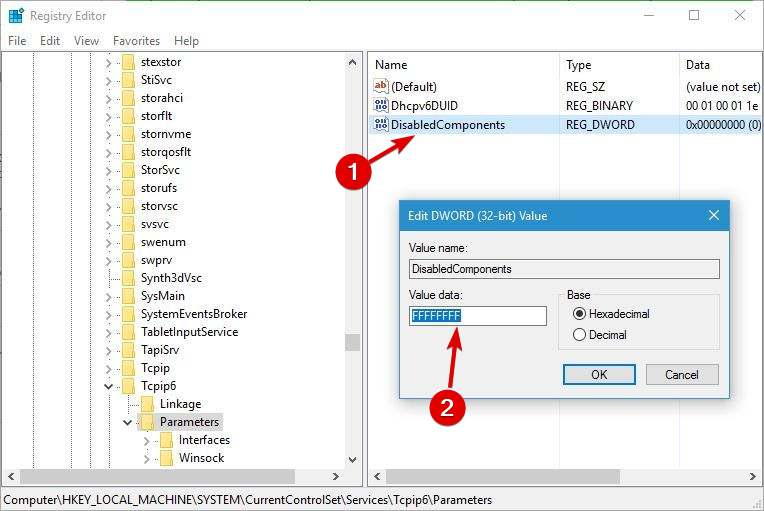
- Double click the DisabledComponents DWORD and enter FFFFFFFF as Value data.
- Click OK to save changes.
- Close Registry Editor and restart your PC.
- After disabling IPv6 completely, VPN error 807 should be fixed.
There are two types of IP addresses: IPv4 and IPv6. According to some users, IPv6 can cause VPN error 807 to appear. One way to fix this problem is to disable IPv6 by following these steps:
2.2. Use flushdns command
- Open Command Prompt as administrator.
- When Command Prompt opens, enter the following command:
ipconfig /flushdns - After the command is executed, close Command Prompt and check if the problem is resolved.
Users reported that they fixed the VPN error 807 simply by running the ipconfig /flushdns command in Command Prompt. To do that, follow these simple steps:
2.3. Disable the wireless connection
Few users reported that they fixed error 807 simply by disabling the wireless connection. For some unknown reason, the wireless connection would interfere with the VPN and cause this error to appear.
One way to fix this error is to turn off your wireless connection completely. Users reported that they solved the problem by disabling the wireless connection on their router completely, so you might want to try that.
2.4. Change VPN connection properties
- Open Network Connections window.
- Locate your VPN connection. Right-click it and choose Properties.
- Navigate to the Security tab.
- Set the Type of VPN to Automatic.
Few users reported that they fixed the problem simply by changing their VPN connection properties. The type of VPN was set to PPTP, but after setting it to Automatic, the issue was completely resolved.
2.5. Edit your hosts file
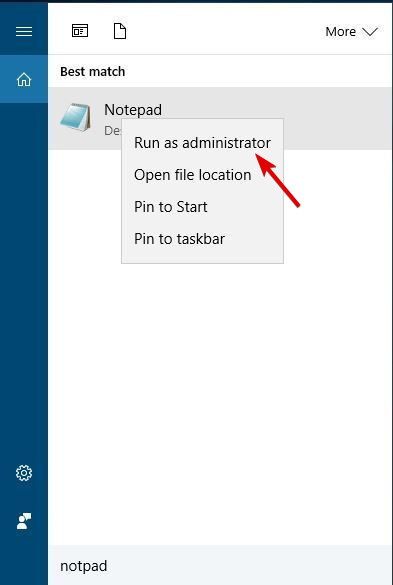
- Press Windows Key + S, enter notepad, right-click it and choose Run as administrator.

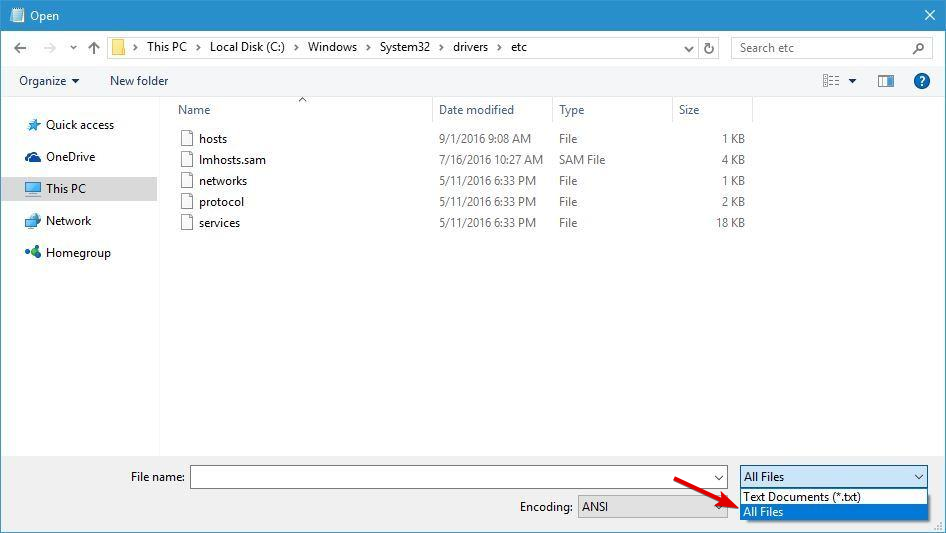
- Choose File > Open.
- Go to the following path:
C:\Windows\System32\driversetc - Change Text Documents to All files in the bottom right corner and select the host’s file.

- When the host file opens, at the end of the file add your VPN’s server IP address and the address that you want to use.
- Save changes to the host’s file and try accessing the VPN by using the assigned name.
Users reported that they fixed error 807 after editing the host’s file. According to users, they were trying to access the VPN server by using the server’s IP address, and that was causing this error to appear.
2.6. Check your VPN configuration
This error can occur if your VPN configuration isn’t correct, and you should be able to fix this problem by making the proper adjustments.
Users reported that they fixed this problem by removing http:// from the beginning of server address.
In addition, you can also remove / at the end of the server address. Users also suggested to change the connection type to Point to Point Tunneling Protocol in the Security tab.
Want to know how to properly create a VPN connection on Windows 10? Find out more in this dedicated article.
2.7. Check your firewall and antivirus
This error can occur due to your firewall settings, and many users are suggesting to enable GRE protocol 47 and open port 1723 in the firewall configuration.
After doing that, your VPN connection should work without any problems. In addition to your firewall, you might want to temporarily disable your antivirus software while you’re configuring the VPN connection.
3. VPN error 619 Windows 10
Change your router startup commands
- Open your router configuration, navigate to Administration, then Commands.
- Add the following commands:
/sbin/insmod xt_mark/sbin/insmod nf_conntrack_proto_gre/sbin/insmod nf_conntrack_pptp/sbin/insmod nf_nat_proto_gre/sbin/insmod nf_nat_pptp
It seems that DD-WRT isn’t forwarding GRE PPTP packets, and that can sometimes cause error 619 to appear.
Bear in mind that this is an advanced solution, therefore be extra cautious while performing it. Check this article dedicated to accessing your router’s configuration to learn more.
4. VPN error 812 Windows 10
4.1. Change your DNS settings
- Open Network Connections, locate your VPN connection, and open its properties.
- Select Internet Protocol (TCP/IP) and click the Properties button.
- Check the Use the following DNS server address option and change the Primary DNS to domain controller address and the Alternate DNS server to an external server, for example, 8.8.8.8.
- Save changes and check if the problem is resolved.
According to users, you should be able to fix error 812 simply by changing the DNS settings. Take a closer look at this useful guide dedicated to fixing DNS issues to learn more about it.
4.2. Check your username
Users reported this issue while creating a VPN server, and the cause for this problem was the user name. According to users, they used their Microsoft account username while creating a server, but that caused error 812 to appear.
To fix this problem you need to enter your username in the following format: Domain nameusername. After doing that, the issue should be resolved.
4.3. Add users to the Windows SBS Virtual Private Network Users group
According to users, VPN error 812 can occur if your users aren’t in the proper group. To fix this problem, just add users to the Windows SBS Virtual Private Network Users group and the problem should be resolved.
5. VPN error 720 Windows 10
5.1. Check the DHCP server address
- On the VPN server go to Administrative Tools and select Routing and Remote Access.
- Select DHCP Relay Agent and check the DHCP server IP address.
Sometimes this error can occur if the DHCP server address isn’t correct. To fix this problem, you need to do the following:
Some users are also suggesting not to use DHCP at all. Instead of using DHCP, they are suggesting specifying the IP range manually on the RAS server.
5.2. Change the user account properties
According to users, you can fix the VPN error 720 by opening the Active Directory, opening user’s account properties and checking the Control access through NPS Network Policy option.
5.3. Delete the Miniports and your VPN connection
Miniports can be the cause for this problem, therefore we suggest that you delete them all. We already explained how to do this in one of our previous solutions, so be sure to check it out.
In addition to deleting Miniports, you can also try deleting your VPN connection and recreating it again.
5.4. Set the range of IP addresses
- Locate your VPN connection in the Network Connections window, right-click it and choose Properties.
- Select Internet Protocol Version 4 (TCP/IPv4) and click Properties.
- Click Specify IP addresses and change the IP range so that it matches the range defined by your router.
- Click OK and check if the problem was resolved.
If there is a problem with assigning the IP addresses to the VPN users, one way to fix this problem was to set the IP address range that matches the IP address range assigned by your router.
6. VPN error 721 Windows 10
6.1. Change the router settings
According to users, you can fix error 721 by changing your router settings. Users reported that they fixed this error by enabling PPTP passthrough option, so you might want to try that.
Another potential solution might be to change the LAN-to-LAN to L2TP over IPSEC. After that, turn off PPTP as the endpoint on the router and the problem should be fixed.
6.2. Update router firmware
If you want to fix error 721, one suggested solution is to update your router firmware.
This is an advanced process and in order to avoid causing any damage to your router, we strongly suggest that you check your router manual for detailed instructions.
If you need more useful info about the subject, take a closer look at this article dedicated to updating your firmware.
6.3. Replace your router
Few users reported that this problem couldn’t be resolved, and the only solution was to replace the router.
It seems that certain ISPs and routers can’t fully support certain VPN settings, therefore, you might want to consider replacing your router.
7. VPN error 412 Windows 10
7.1. Don’t use Run as administrator option
According to users, 412 error can occur if you’re using Cisco VPN software. To fix this problem, you have to disable Run as Administrator option.
After that, save changes and check if the problem is resolved.
7.2. Change your router configuration
Users reported that they managed to fix this problem on their Linksys router simply by adding a few lines to the pcf file. To do that, simply add UseLegacyIKEPort=1 line to the pcf file and save the changes.
7.3. Check your firewall settings
This error can be caused by your firewall settings, but you should be able to fix it by unblocking certain ports. According to users, port 500, port 4500, and ESP protocol need to be enabled.
In addition, enable NAT-T/TCP protocol and open port 10000. If you’re using a Cisco VPN client, enable UDP ports 500 and 62515 ports. Follow this simple guide about checking blocked firewall ports to learn more.
8. VPN error 691 Windows 10
8.1. Change your username
Error 691 can occur if your username isn’t correct, therefore be sure to enter your username in the Username@DomainName format. After doing that, the issue with error VPN error 691 should be resolved.
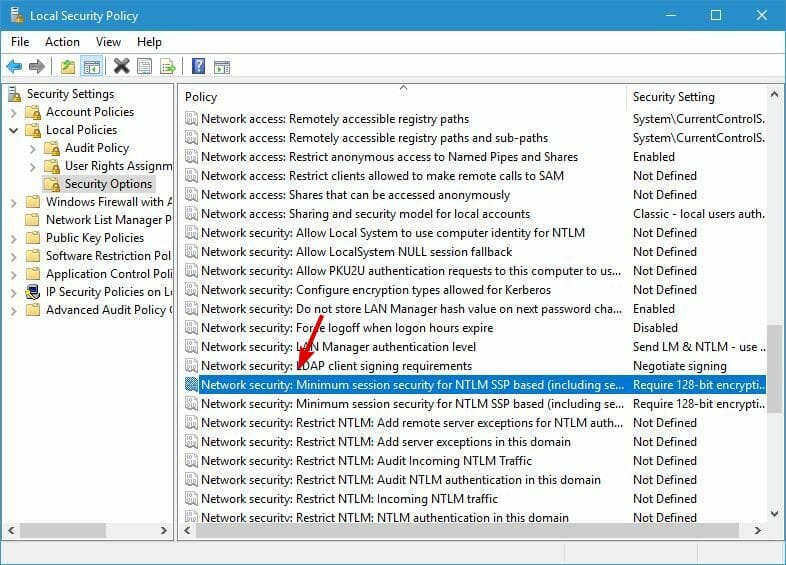
8.2. Change LAN Manager authentication level
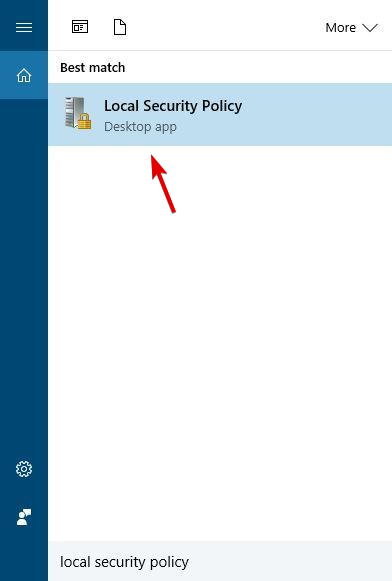
- Press Windows Key + S and enter local security policy.
- Select Local Security Policy from the menu.

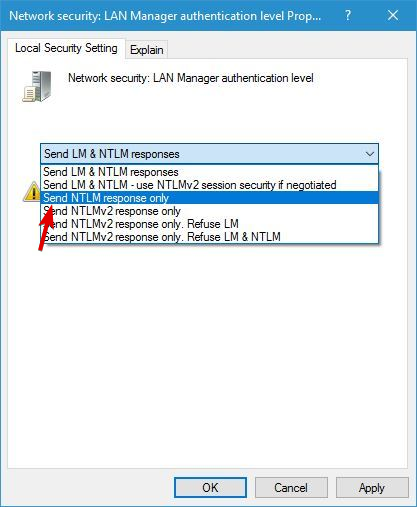
- In the left pane, navigate to the Local Policies > Security Options.
- In the right pane, double click the LAN Manager authentication level.

- From the menu select Send LM & NTLM responses. Click Apply and OK to save changes.

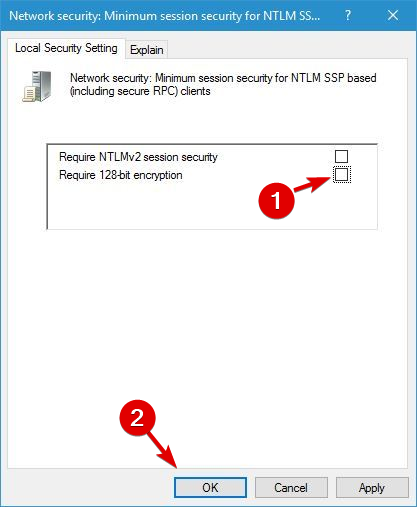
- Locate Minimum Minimum session security for NTLM SSP option and double click it.
- Disable Require 128-bit encryption and click Apply and OK.

- Restart your PC and check if the problem was resolved.

8.3. Disable CHAP security protocol
Sometimes this error can appear if both CHAP and MS-CHAPv2 are enabled, but you can easily fix this problem. To do that, simply disable CHAP and the error 691 will be fixed completely.
VPN is useful if you want to protect your privacy online, but many errors with VPN can occur. If you experience any VPN errors be sure to check some of our solutions.
IF you have any other questions, suggestions, or experience with some of our methods, don’t hesitate to leave them in the comments section below.