0x8007001 Error Code: How to Fix This Install Issue
Run an SFC scan to repair the system files
Key notes
- This error could occur if you have corrupted system files, faulty hardware, or a damaged Windows registry.
- To fix it, you can run an SFC scan, check for driver updates, run a disk check, or perform a system restore.
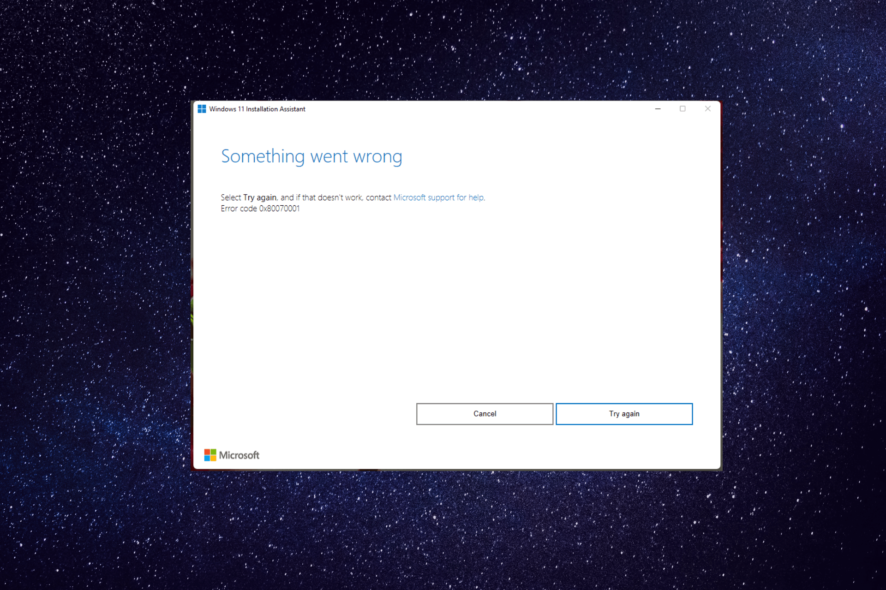
If you encountered the 0x8007001 error code while upgrading your computer to Windows 11 22H2 update, this guide could help!
We will cover all the expert-recommended solutions to fix the solutions right after discussing the causes.
What causes the Windows error code 0x8007001?
There could be various reasons for this installation error; some of the common ones are mentioned here:
- Corrupted system files – If the system files related to the update are corrupted or damaged, it could lead to a 0x8007001 error code. Try repairing the system files using an SFC scan.
- Volume is listed as Dynamic – Windows doesn’t recommend using Dynamic disks. If one or more volumes on your disk are listed as Dynamic, you could see this install error.
- Damaged Windows registry – If any software installation or uninstallation has been interrupted or not done correctly on your computer, you might see this error. Try registry cleaner to fix it.
- Malware or virus infection – Malware infection could damage important files on your PC, leading to this error. Run a malware scan to fix the issue.
So, these are the causes of the installation error; let us move to the solutions.
How can I fix the Windows error code 0x8007001?
Before engaging in advanced troubleshooting steps, you should consider performing the following checks:
- Restart your computer and router.
- Use the Disk Cleanup tool to retrieve space.
- Disconnect all external devices except the mouse or keyboard.
- Temporarily disable any 3rd party Antivirus you may have installed.
- Run a deep scan using an antivirus tool.
If these fixes don’t for you, go through the detailed methods mentioned below.
1. Change the disk to Basic
 NOTE
NOTE
- Press Windows + R to open the Run dialog box.
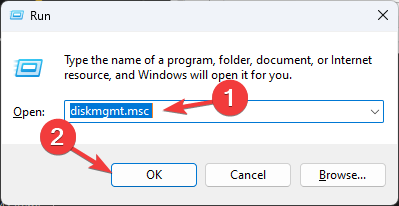
- Type diskmgmt.msc and click OK to open the Disk Management tool.
- Select and right-click each volume on the dynamic disk you want to convert to basic. Click Delete Volume.
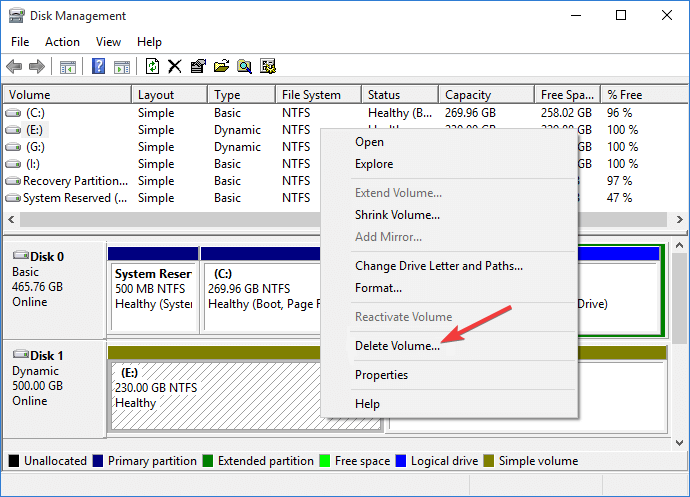
- Click Yes to confirm the change.
- Once the volumes on the disk are deleted, the disk might automatically turn into a Basic disk. If not, right-click the disk and click Convert to Basic Disk.
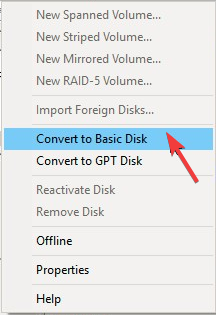
Dynamic disks are no longer recommended and have been deprecated from Windows. It is recommended to use basic disks or newer Storage Spaces. If you have one or more Dynamic disks, Windows updates may not go through.
2. Clean the Windows Update cache
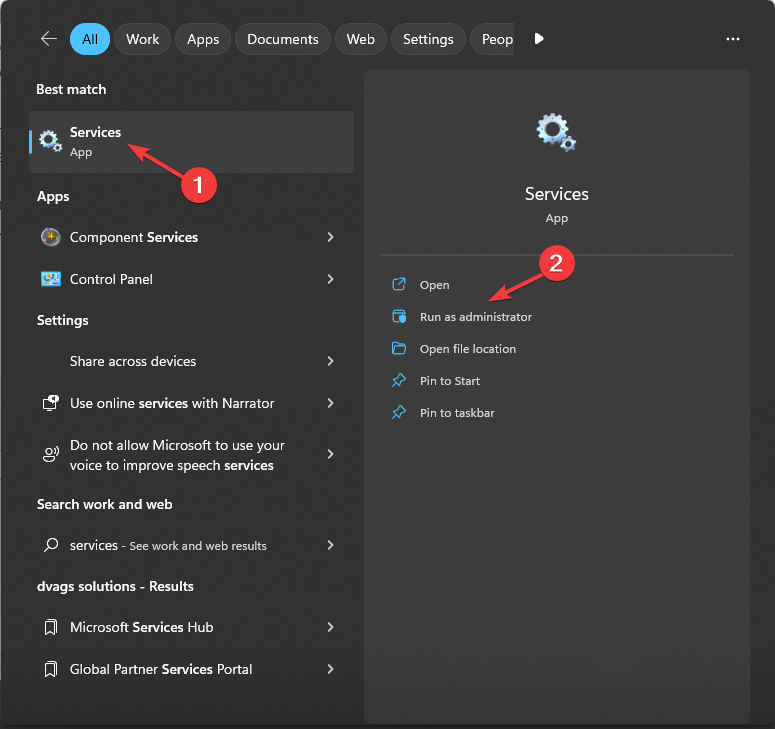
- Press the Windows key, type services, and click Run as administrator.
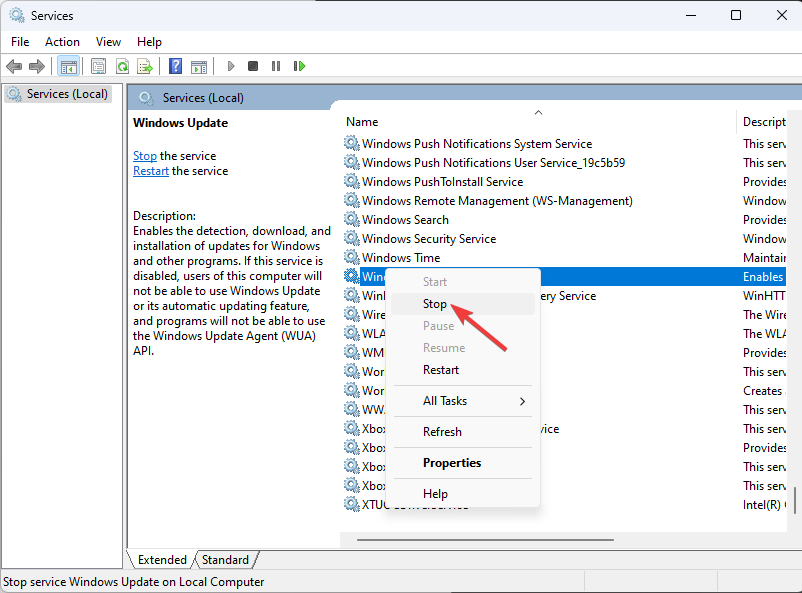
- Locate & right-click Windows Update and click Stop.
- Press Windows + R to open the Run dialog box.
- Type the following command to open Windows Update’s download folder and hit Enter:
%windir%\SoftwareDistribution\DataStore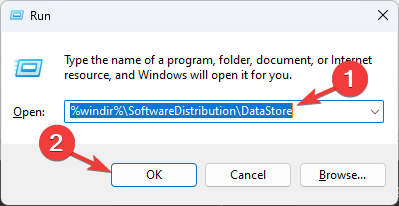
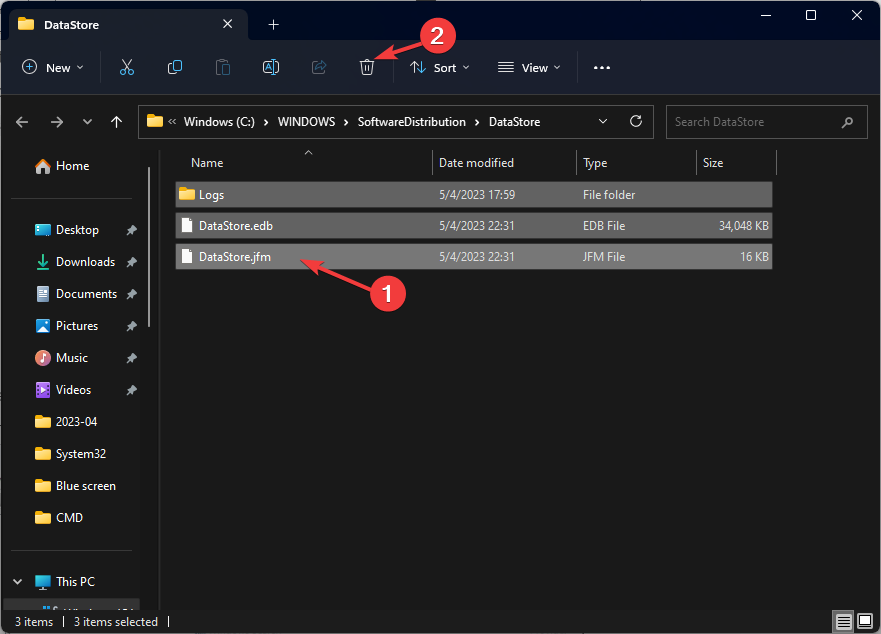
- Press Ctrl + A to select the folder’s content and click the Delete button.
- Go to Services again, right-click Windows Update, and click Start.

- Reboot your computer to save the changes.
3. Clean the download path
- Press Windows + R to open the Run window.

- Type regedit and click OK to open Registry Editor.
- Navigate to this path:
Computer\HKEY_LOCAL_MACHINE\SOFTWARE\Policies\Microsoft\Windows\WindowsUpdate - Locate WUServer and WIStatusServer, right-click them, and select Delete.
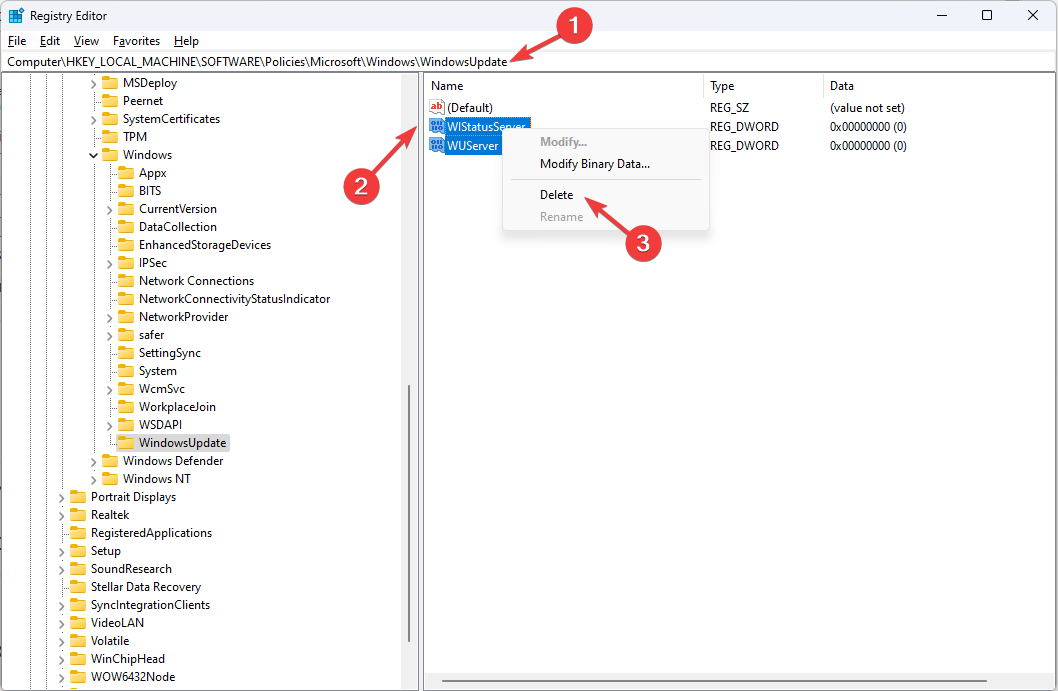
- Restart your computer to confirm the changes.
4. Run DISM & SFC scans
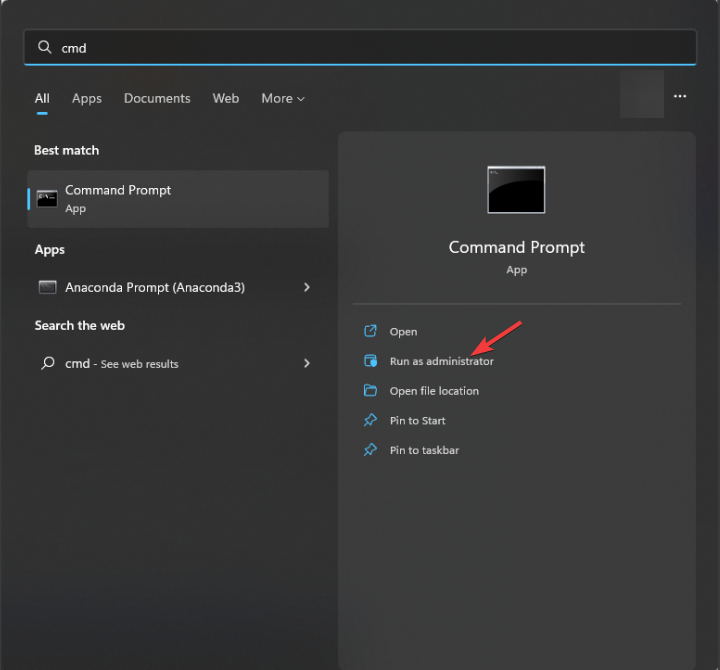
- Press the Windows key, type cmd, and click Run as administrator.
- Type the following command to repair system files and press Enter:
sfc/scannow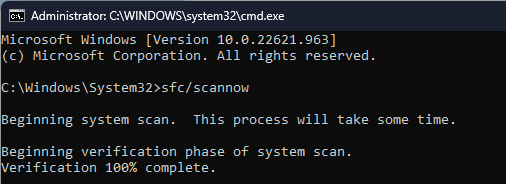
- Wait for the scan complete, then copy & paste the following command to restore the Windows OS image and hit Enter:
Dism /Online /Cleanup-Image /RestoreHealth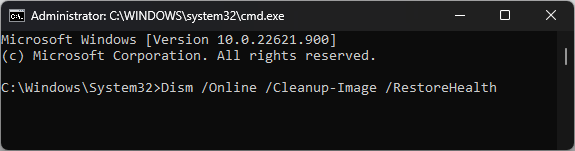
- Once the scan is complete, your PC will automatically connect to the Windows Update service to download and replace the corrupt files.
5. Reset the Windows Update Components
- Press the Windows key, type cmd, and click Run as administrator.
- Type the following commands to stop Windows Update, BITS & Cryptographic services, and hit Enter after every command:
net stop bits
net stop wuauserv
net stop appidsvc
net stop cryptsvc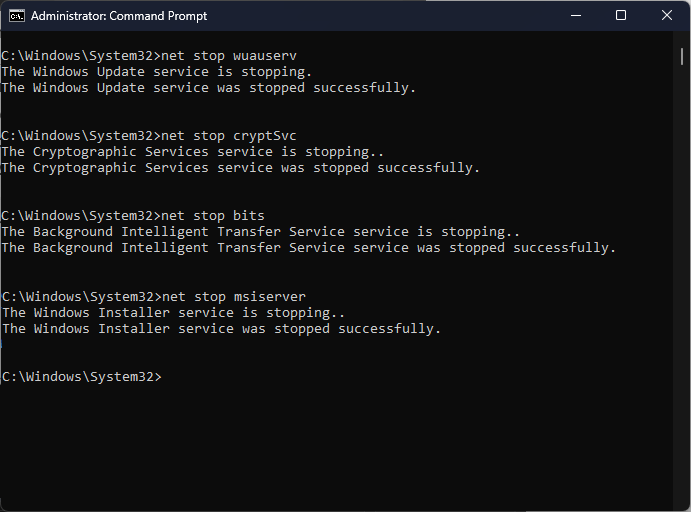
- To delete the qmgr*.dat files, copy & paste the following command and press Enter:
Del "%ALLUSERSPROFILE%\Application Data\Microsoft\Network\Downloader\qmgr*.dat" - To clear the Windows Update cache to allow Windows 10 to re-download the updates, type the following commands one by one and hit Enter after every command:
rmdir %systemroot%\SoftwareDistribution /S /Q
rmdir %systemroot%\system32\catroot2 /S /Q
- Copy & paste the following commands to reset the BITS and Windows Update service to the default security descriptor and press Enter:
sc.exe sdset bits D:(A;;CCLCSWRPWPDTLOCRRC;;;SY)(A;;CCDCLCSWRPWPDTLOCRSDRCWDWO;;;BA)(A;;CCLCSWLOCRRC;;;AU)(A;;CCLCSWRPWPDTLOCRRC;;;PU)
sc.exe sdset wuauserv D:(A;;CCLCSWRPWPDTLOCRRC;;;SY)(A;;CCDCLCSWRPWPDTLOCRSDRCWDWO;;;BA)(A;;CCLCSWLOCRRC;;;AU)(A;;CCLCSWRPWPDTLOCRRC;;;PU)
- Type the following command and hit Enter:
cd /d %windir%\system32 - To re-register the BITS files & the Windows Update-related DLL files, copy & paste the following commands one after the other and press Enter after every command:
regsvr32.exe /s atl.dll
regsvr32.exe /s urlmon.dll
regsvr32.exe /s mshtml.dll
regsvr32.exe /s shdocvw.dll
regsvr32.exe /s browseui.dll
regsvr32.exe /s jscript.dll
regsvr32.exe /s vbscript.dll
regsvr32.exe /s scrrun.dll
regsvr32.exe /s msxml.dll
regsvr32.exe /s msxml3.dll
regsvr32.exe /s msxml6.dll
regsvr32.exe /s actxprxy.dll
regsvr32.exe /s softpub.dll
regsvr32.exe /s wintrust.dll
regsvr32.exe /s dssenh.dll
regsvr32.exe /s rsaenh.dll
regsvr32.exe /s gpkcsp.dll
regsvr32.exe /s sccbase.dll
regsvr32.exe /s slbcsp.dll
regsvr32.exe /s cryptdlg.dll
regsvr32.exe /s oleaut32.dll
regsvr32.exe /s ole32.dll
regsvr32.exe /s shell32.dll
regsvr32.exe /s initpki.dll
regsvr32.exe /s wuapi.dll
regsvr32.exe /s wuaueng.dll
regsvr32.exe /s wuaueng1.dll
regsvr32.exe /s wucltui.dll
regsvr32.exe /s wups.dll
regsvr32.exe /s wups2.dll
regsvr32.exe /s wuweb.dll
regsvr32.exe /s qmgr.dll
regsvr32.exe /s qmgrprxy.dll
regsvr32.exe /s wucltux.dll
regsvr32.exe /s muweb.dll
regsvr32.exe /s wuwebv.dll
- Type the following command to reset winsock and hit Enter:
netsh winsock reset
netsh winsock reset proxy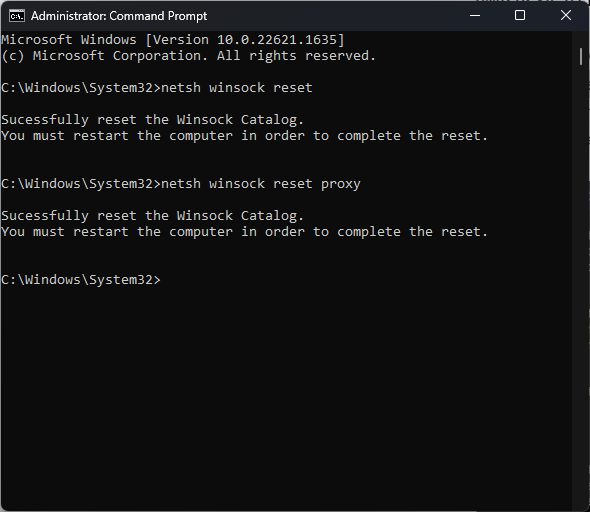
- Copy & paste the following commands to start Windows Update, BITS & Cryptographic services, and press Enter after every command:
net start bits
net start wuauserv
net start appidsvc
net start cryptsvc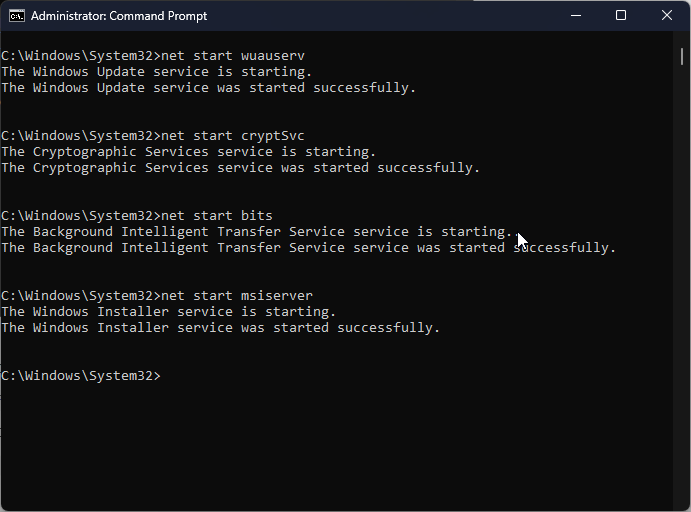
- Reboot your PC to confirm the changes.
So, these are the methods you can use to fix the Windows error code 0x8007001. If you have questions or suggestions, feel free to mention them in the comments section below.
Read our disclosure page to find out how can you help Windows Report sustain the editorial team. Read more


Improve this guide


User forum
0 messages