How to move old apps to a new Windows 11 computer


World-class 24/7 support with 82% for a 2 years plan and 2 months free
70% of our readers choose Private Internet Access
70% of our readers choose ExpressVPN
Amazing connection speed with 61% off and 4 months free for the 2-years plan.
Best security protocols with 83% off and 2 months free for a 2-year plan.
Thinking of moving to a new Windows computer? Or maybe you’d like to switch to a new Windows 11 version on the same PC. Whatever options you choose, if you decide to go the simple copy-and-paste route, you’ll have a fair amount of heavy lifting here.
For one, you’ll have to install all the system files and then reconfigure your settings. Now, if that was all you’d to do, you could still have pulled through, however grudgingly. But when you go with the default way of moving things around on Windows (which means reinstalling everything from zero), you’ll also have to install all your third-party apps individually; a nasty, long-winded way to go about things, for sure.
Don’t worry, though, because we’ve got your back. So let’s jump in and look at how to move your old apps to the new Windows 11 in as simple manner as possible.
How to move old apps to a new Windows 11 computer
As I’ve said repeatedly over the years, there’s more than one right way to do things in tech—whether that’s the larger tech scene or even your daily Windows things.
If you’re a long-term Windows user, you know precisely what I’m talking about. Broke something? Here, try out these twenty-four different ways to fix your PC backup! Can’t restart your Windows? Here are ten other ways to do it!
So, it’s no surprise that the same holds for moving your old apps to a new Windows 11. Now, don’t worry—you won’t have to jump through any unnecessary hoops here; just two methods are enough to move your old apps to your new Windows 11.
You can use your Microsoft account or a third-party tool, and you’ll be done in no time. Let’s start with the Microsoft account first.
1. Move your old apps to a new Windows 11 through Microsoft account
It goes without saying that to take your old apps and settings to a new Windows 11 system through your Microsoft account, you’ll have to have your files backed up in the first place. Basically, you need to have your files stored in the cloud—OneDrive in this case—and you can then download your apps and settings to your new Windows 11.
If you have backed up your apps or settings already, here’s how you can do it:
- Launch the Windows Settings app by pressing the Windows key + I shortcut.
- Head to the Accounts > Windows backup section from there.
- Move to the Remember my apps option and toggle on the Windows settings.
- Click on Remember my preferences option to back up your settings.
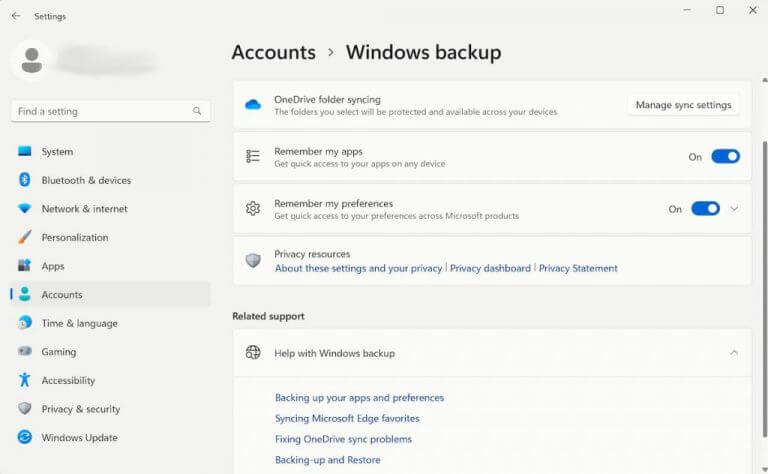
You can confirm your backup by checking the Preferences section from the top; it should now have “backed up” there.
When you have cloud backup in place
If you have a cloud backup in place from beforehand, or if you created one just now, you’re ready to move your old apps to a new Windows 11 machine.
When you’re done installing your Windows 11, sign in with your user account (where you’d earlier backed up the files) whenever you’re asked.
You’ll then get a dialog box asking you to confirm your restoration. Click Next to go ahead, and your old apps will be transferred to the new Windows 11 system in no time.
When your PC boots up, you’ll be taken to the Microsoft Store, where you can then restore your additional apps on your PC. From there, click on the Restore my apps button.
In the Store, click on Restore all, and you will get all your Microsoft Store apps back.
2. Use a third-party app
The above method is enough for almost all your Windows apps. But if you want to move your third-party apps as well, you need additional help. You’re looking for a third-party app to help you in that case.
For example’s sake, we’ll be using Ninite. You are, of course, free to use any app you find better suited. Ninite works by helping you install or update multiple apps in a single go, without having to resort to installing the apps one at a time. So, while you won’t be able to carry your apps to the new Windows 11 with you, you can install them through a custom installer created by Ninite. Here’s how:
- Head to official Ninite website.
- Pick the apps you’d like to install simultaneously from the Pick the apps you want section.
- Finally, click on Get Your Ninite button to create a custom installer.
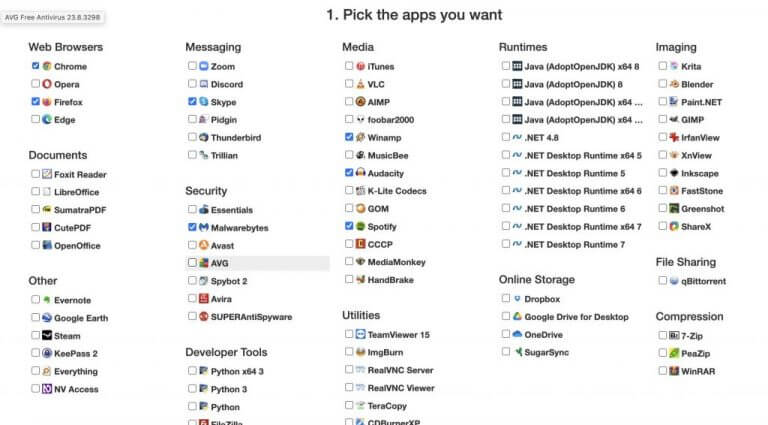
After you have followed above the above steps, the Ninite website will create and download the custom installer for you. All you have to from here is to launch the .exe setup and the app will take care of the installation.
Moving old apps to new Windows 11 PC
Moving to a new computer system setup can be overwhelming in itself. You might have to get used to new hardware and software (if you’re changing the OS), and you might have to adjust yourself. Add in moving your old apps to the new Windows 11 on top of this, you will unnecessarily complicate the things.
If you follow the above methods, though, you can easily transfer your apps from one Windows to another without any hassles. So try them out and let us know if you have any tricks in mind.
Read our disclosure page to find out how can you help Windows Report sustain the editorial team. Read more


Improve this guide


User forum
0 messages