Did you know that Windows 11 is encrypting your disks during installation?
Relax, there are two workarounds to avoid it
3 min. read
Updated on
Read our disclosure page to find out how can you help Windows Report sustain the editorial team. Read more

As you clean install Windows 11, it may automatically encrypt all drives without your consent or awareness. This notable change might catch you off guard. Encryption can enhance security, but it also poses risks.
This shift has been implemented since build 25905 came out in July 2023, and Microsoft announced the same at the same time:
Starting with this build, we have adjusted the prerequisites (removal of Modern Standby/HSTI validation and untrusted DMA ports check) for enabling device encryption so that it is automatically enabled when doing clean installs of Windows 11.
The main concern is the lack of transparency during the installation process, as users may not notice their drives are encrypted until they face difficulties accessing their data at a later date.
Without clear notification or explicit consent, users may now lose their data during reinstallation or system resets, as they might not have the decryption keys handy.
Furthermore, there is no option to opt-out, which means users have limited control over their encryption preferences, raising usability and privacy concerns.
However, you can prevent it during the installation process in two ways: either you can tweak the registry entry during the onboarding experience or modify the install image, so let’s check them out.
Preventing automatic encryption: Two approaches
Method 1 Disable encryption via Windows Registry
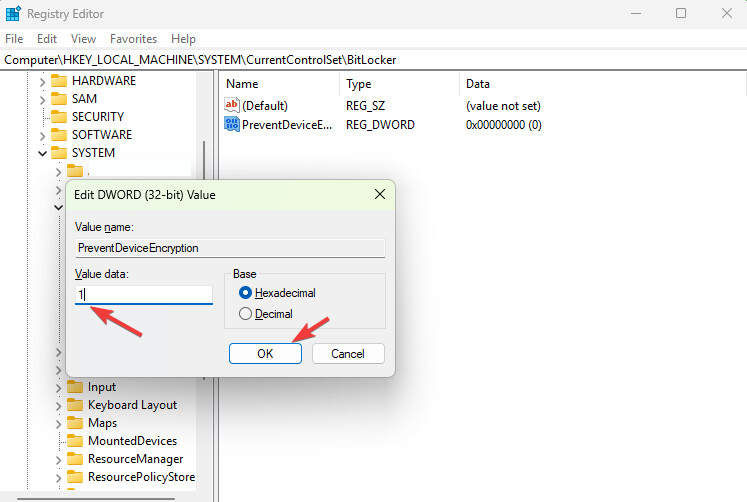
When you are in the initial setup stage, press Shift + F10 or Shift + Fn + F10 to invoke Command Prompt. Type regedit, and press Enter to launch the Registry Editor. Now navigate to this path: Computer\HKEY_LOCAL_MACHINE\SYSTEM\CurrentControlSet\BitLocker. Here, right-click BitLocker and select New>DWORD (32-bit Value). Now, name it PreventDeviceEncryption. Once created, double-click it, set its Value data to 1, and click OK to save. Close Command Prompt and Registry Editor.
Now proceed with the installation process as usual. Once you have installed Windows, let us check if the drives are encrypted. Type the command prompt in the search bar and select Run as administrator to run it with admin privileges. Type manage-bde -status, and you will get the list of your drives. Go through the list and check the Conversion Status; it should be Fully Decrypted.
Method 2 Modify a Windows 11 Image using Rufus
First, download Rufus from its official website, then download the Windows 11 image from the official website.
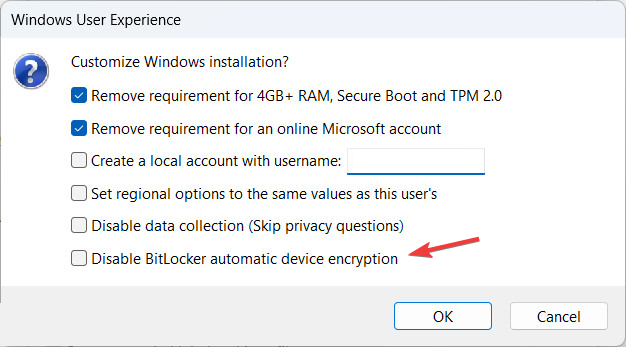
Next, connect a USB drive, choose Windows 11 image, and click Start. You will get a pop-up box with a few options to enhance user experience during the process. Look for Disable BitLocker automatic device encryption and make sure it is unchecked. Click OK.
Once the process is complete, install Windows 11 on your computer in the normal way.
So, these are ways that you can use to control the disk encryption preferences on your device while installing Windows 11.
We understand that Microsoft thinks the user’s device security is paramount, but automatic encryption implementation is a little far-fetched. Also, the absence of an option to opt-out is annoying and risky, as the user’s data could be at stake.
We believe that the Redmond tech giant should keep these settings optional and let the users decide whether they want the drives to be encrypted, thereby fostering a secure and transparent environment.
What are your thoughts on this matter? Share your opinions with our readers in the comments section below.


User forum
0 messages