Fix: Antivirus blocking iTunes on Windows 10/11
6 min. read
Updated on
Read our disclosure page to find out how can you help Windows Report sustain the editorial team Read more
Key notes
- When a software conflict appears, this leads to the antivirus blocking iTunes music app.
- There are simple solutions that solve the case to allow iTunes through Firewall for ESET software.
- Some users had to follow certain guides to unblock their iTunes app from Avast and Avira programs.
- You might have your music app iTunes blocked by Bitdefender, but we have a solution for that.

Securing your Windows 10 system with a specialized third-party antivirus solution is more than recommended, but when these security programs are interfering with the built-in functionality of your personal apps, you must find the best way in which to resolve software conflict.
The goal is to fix the issues caused by the security features without disabling the actual security engine.
In that matter, we can bring into our debate the iTunes example. Apparently, users reported that certain antivirus programs are blocking iTunes, which means that the Apple software is perceived as a potential security breach.
Well, we all know that we can safely use iTunes on our Windows 10 devices, so we are dealing with a Firewall false positive, or with a Firewall misinterpretation.
Antivirus blocking iTunes: what to do first
Anyway, before rushing to conclusions, you need to make sure that iTunes is indeed blocked by your antivirus, as there might be other problems in the middle of this situation.
Thus, the first thing you should do is to temporarily disable the Firewall protection (also, you can temporarily turn off the antivirus protection).
Then, initiate a system reboot and run iTunes. If the software is now running without problems it means that it was previously blocked by your security solution; otherwise, you should look for answers somewhere else.
Turn your security protection back on. Afterward, follow the next troubleshooting steps and learn how to add a Firewall exception for iTunes. That’s how you can manage to enable iTunes full functionality while still using your antivirus software.
Note: the steps from below are explained for the most common antivirus platforms that are currently available for the Windows 10 system.

Secure your devices with award-winning cybersecurity technology.

Maximize your PC's security and performance with top-notch digital threat detection.

Keep secure with groundbreaking AI detection and prevention technology.

Browse the web securely for up to 3 devices across Windows, Mac, iOS or Android systems.

Best security tool for intense browsing activity.
How can I fix antivirus is blocking iTunes?
1. ESET HOME Security Essential
- Open ESET HOME Security Essential.
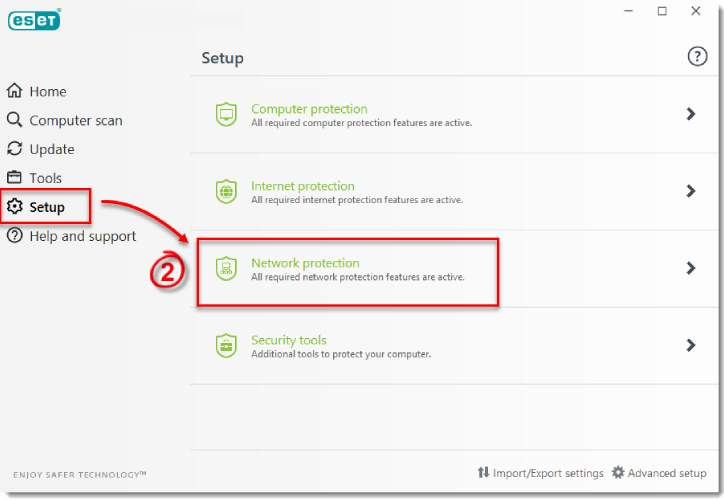
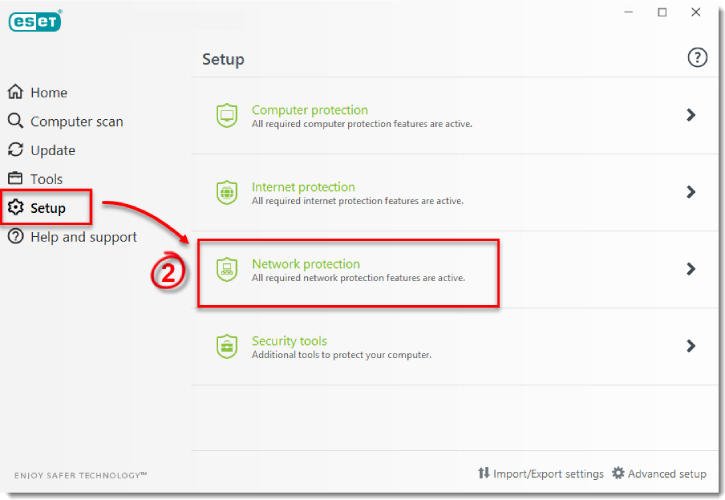
- Click Setup and navigate to Network Protection.
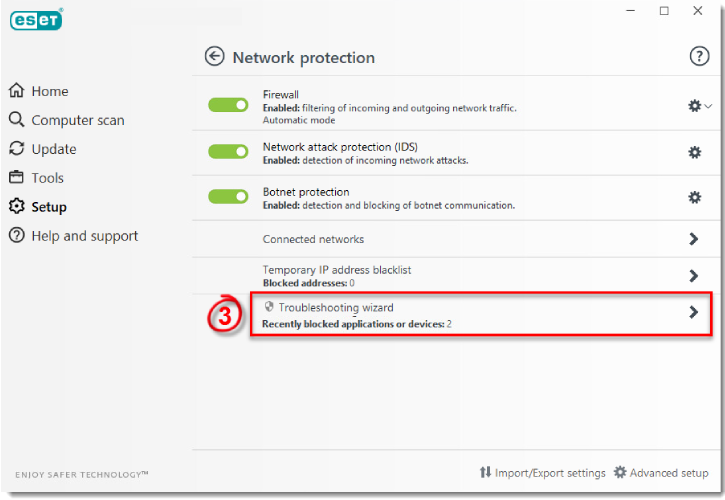
- Click on the Troubleshooting wizard option.
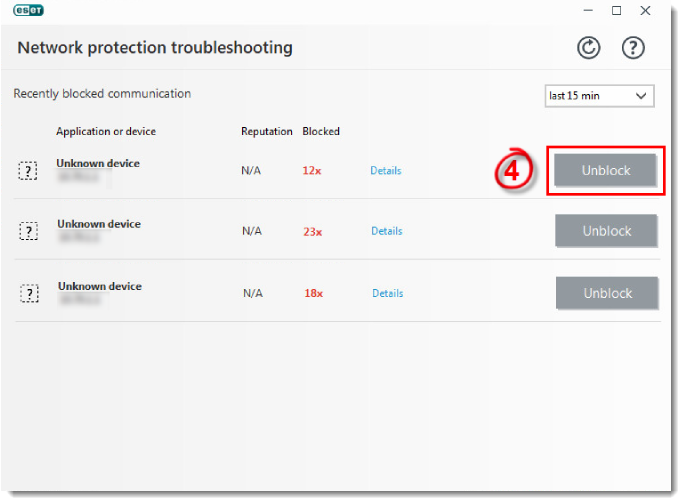
- Locate iTunes in the list and click Unblock.
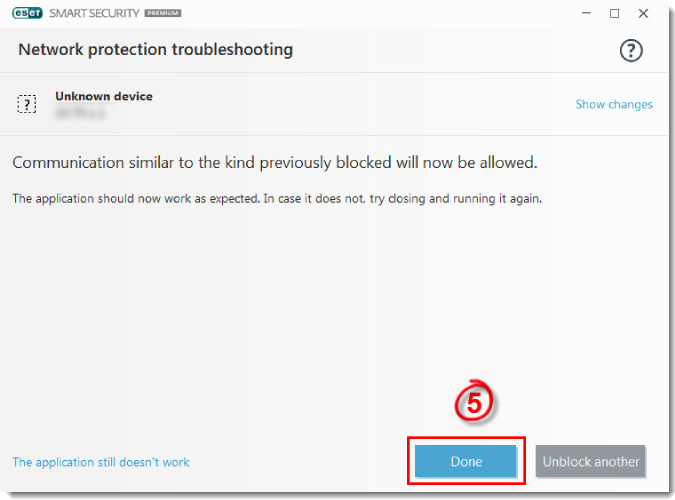
- Click Done.
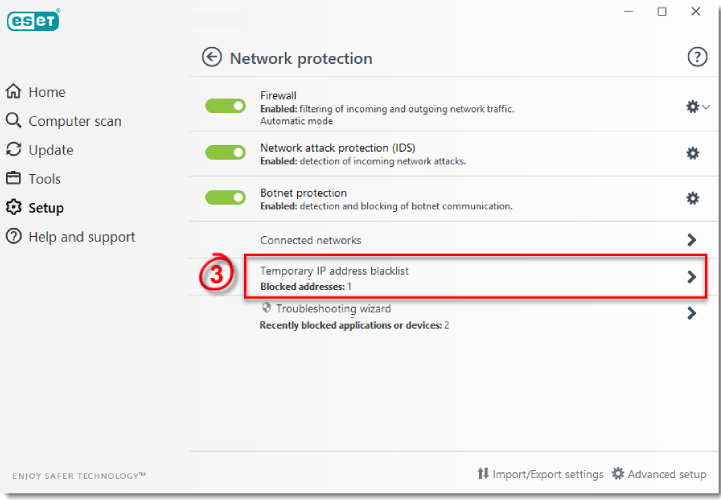
If you notice iTunes missing from that list, then you must verify the temporary IP address blacklist. If the IP address of iTunes was blacklisted, you must allow the communication directly from that list.
Verify the temporary IP address blacklist:
- Open ESET HOME Security Essential .
- Click Setup and choose Network Protection.
- Select and click Temporary IP address blacklist.
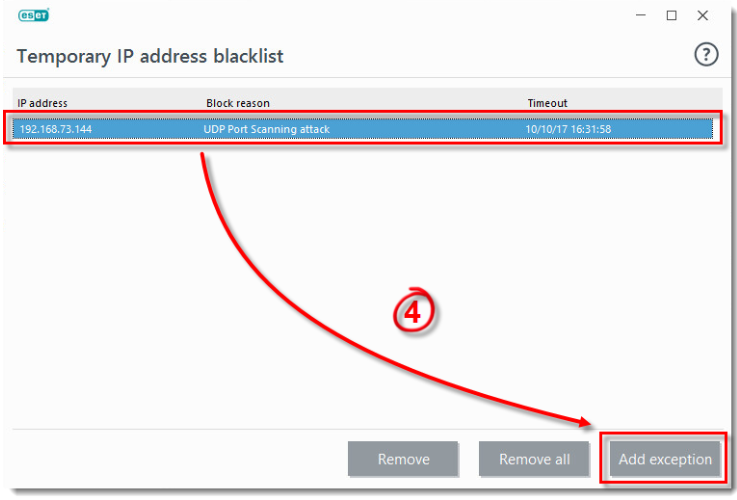
- Choose the IP address of the iTunes app that you will allow and then click on Add exception.
- The iTunes IP address is removed from the Temporary IP address blacklist and able to connect to the home network.
⇒ Get ESET HOME Security Essential
2. Avast Free Antivirus

- You need to run Avast on your computer.
- Access general Settings.
- From the left pane click on the General tab.
- In the main pane scroll down until you find the Exclusions field.
- There add the iTunes executable file within the ‘File paths’ section.
- Now, Avast will be excluded from future antivirus scans so it should successfully run without other problems.
3. Avira Antivirus

- From your task bar click on the Avira icon.
- Next, from the Avira main window click on Extras and then go to Configuration.
- From the left pane double-click on Internet Protection.
- Extend Windows Firewall and then Network profiles.
- Pick up Application rules and set up a new rule for the iTunes client.
- Save your changes and reboot your Windows 10 system.
- Now you should be able to successfully use iTunes on your device.
4. Bitdefender
- Run the Bitdefender main user interface on your computer.
- Access the Protection field from the left sidebar.
- Click on the View Features link.
- The Firewall feature can be accessed from settings – so from the upper-right corner click on the Settings icon.
- From Firewall switch to Rules tab.
- The programs that have rules already created will be displayed there.
- For adding a new rule for iTunes or for any other Apple-associated software you need to click on Add Rule.
- Enter the .exe executable file when asked and save your changes.
- That should be all; now iTunes should work without further issues.
5. Kaspersky Standard
- Right-click on the Kaspersky icon located in the system tray.
- From the list that will be displayed, click on Settings.
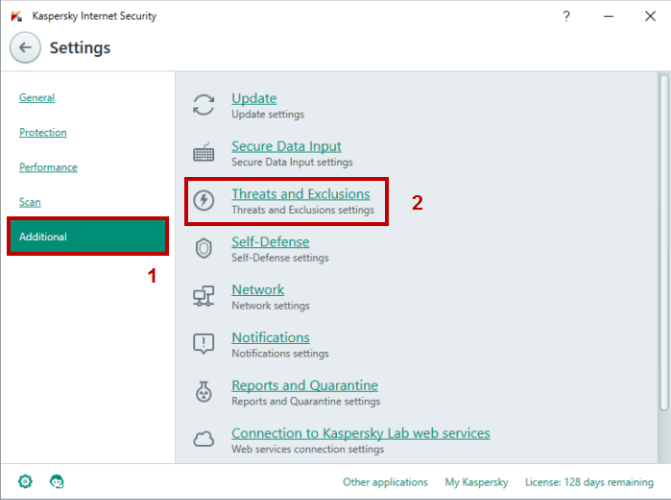
- The Kaspersky Settings window will be displayed.
- From there access Threats and exclusions.
- Under the Exclusions field click on Settings.
- Select the Add button and follow on-screen prompts for picking up and settings iTunes as a new Firewall rule.
6. Norton AntiVirus Plus
- Open the Norton antivirus engine on your Windows 10 device.
- From the upper-right corner of that window click on Settings.
- From the Settings window go to the Smart Firewall field.
- Under Smart Firewall access Program Control – click on Configure.
- A list of options will be displayed; choose Add.
- Search for the iTunes executable file.
- Add this file to the exclusion list.
- Save your changes and that’s it.
7. AVG Antivirus
- Double-click on the AVG icon located on desktop.
- From the AVG main window click on Menu and access Settings.
- From Settings, click on Components – this field is located in the left pane of the main window.
- Locate the File shield entry (it should be the first one) and click on Customize.
- Next, select the Exceptions tab and browse the iTunes executable file.
- Click Add in the end and save everything.
- Reboot your computer and verify the iTunes functionality.
8. Windows Defender
- Open Windows Defender: click on the Windows Search icon (its Cortana icon) and in the search field enter Windows Defender.
- From your antivirus user interface select the Virus & threat protection field.
- Then, navigate towards Virus & threat protection settings.
- Select Add or remove exclusions.
- Pick up Add an exclusion and follow on-screen prompts for including the iTunes apps in the exclusion list.
Additionally, allow iTunes access from built-in Firewall:
- Right-click on the Windows Start icon.
- From the list that shows up click on Control Panel.
- In Control Panel switch to category and then click on System and Security.
- From the left pane choose Windows Firewall.
- Click the Allow an app or feature through Windows Firewall link.
- Pick up Change Settings and follow other on-screen prompts for adding iTunes within your Firewall exclusion list.
So, this is how you can add a Firewall rule for iTunes for several antivirus programs that are used on a daily basis on the Windows 10 system.
If your device is running on a different security platform try to find similar settings in order to re-enable the iTunes functionality.
If you cannot manage to fix this security malfunction, try to describe your issue in detail in the comments field available below. Based on these details, we will then try to find the perfect troubleshooting solutions for you.
Enjoy and stay close for further tutorials and Windows 10 tips and tricks.

