How to Change CPU Fan Speed Without BIOS
Easy ways to bring down CPU temperature
Key notes
- While the BIOS seems to be the most common way of modifying the CPU fan speed, there are a few other options.
- You should, however, be careful not to cause heating up of the CPU when you change the fan speed.

Are you trying to change your CPU fan speed without BIOS? Here is everything you should know.
The CPU fan is an essential component of a computer that helps to keep the processor cool and prevent overheating.
However, sometimes the fan speed may need to be adjusted to better suit the system’s specific needs.
While most motherboards allow for fan speed control through the BIOS, there may be instances where access to the BIOS is impossible.
This guide explores changing the CPU fan speed without using the BIOS.
Can you manually control the fan speed?
Yes, it is possible to control the fan speed manually. There are many ways to do this, depending on the type of fan and the computer’s hardware and software.
There are several benefits to manually controlling the fan speed. A few of these include:
- Improved cooling – By increasing the fan speed, you can improve the cooling of the CPU and prevent overheating. This is especially useful when you are running demanding applications or when you are overclocking the CPU.
- Reduced noise – Lowering the fan speed can reduce the fan’s noise level, which can be beneficial if you use your computer in a quiet environment.
- Power efficiency – By adjusting the fan speed, you can optimize the power consumption of your computer. Lowering the fan speed can reduce the power consumption of your computer, which can be beneficial if you are using a laptop or running your computer on battery power.
- Increased lifespan of the components – By keeping the temperature of the CPU and other components in check, you can increase the lifespan of the parts.
So, let us now explore how to modify your fan speed on Windows PCs.
How can I modify my fan speed without accessing the BIOS?
1. Using third-party Software
- Download and install SpeedFan on your computer.
- Open SpeedFan and go to the Configure tab.

- Under the Fan Control section, you will see a list of all the fans connected to your computer. You can select the fan you want to control in the drop-down menus.

- Select the fan that corresponds to your CPU fan and use the Minimum and Maximum sliders to adjust the fan speed.
- Click on the Apply button to save the changes.
2. Using the Control Panel
- Install third-party software that allows you to control the fan speed, such as SpeedFan or Argus Monitor.
- Press Windows + X and select Command Prompt (Admin).

- Use the cd command to navigate the folder where the third-party software is installed. For example, if you have installed SpeedFan in the C:\Program Files\SpeedFan folder, you would type the script below and hit Enter:
cd C:\Program Files\SpeedFan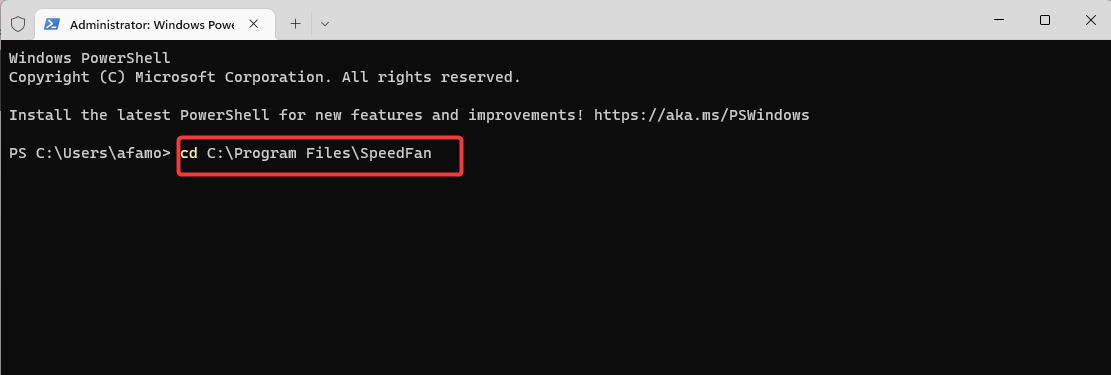
- Once in the correct folder, you can use the software’s command-line options to control the fan speed. For example, in SpeedFan, you can use the following command to set the fan speed to 50%:
SpeedFan.exe /fan:1 50
In the last script above, 1 is the fan number, and 50 is the fan speed in percentage.
Changing the CPU fan speed without using the BIOS is a straightforward process that can be accomplished using software-based fan control tools.
Following the steps outlined in this guide, you can easily adjust the fan speed to keep your computer running at optimal temperatures.
It’s important to remember that keeping your computer cool is crucial for maintaining the longevity of the internal components.
Read our disclosure page to find out how can you help Windows Report sustain the editorial team. Read more


Improve this guide


User forum
0 messages