3 Ways to Fix Temporary Profile in Windows 10
Windows creates temp profile every login? Tweak registry settings & preferences!
5 min. read
Updated on
Read our disclosure page to find out how can you help Windows Report sustain the editorial team. Read more

Sometimes Windows 10 will sign you on with a temporary profile, showing a message that says You’ve been signed in with a temporary profile. Luckily, you can easily fix this.
Whether you want to repair the temporary profile issue using regedit, accessing safe mode or by creating a new user account, you can find all the info you need about all of these methods below.
How do I fix Windows 10 with a temporary profile error?
1. Correct the Registry Entry
- Press the Windows key from the account with the temporary profile, type cmd, and select Command Prompt.
- Copy and paste the command below and hit Enter.
whoami/user - Note the Security Identifier (SID) for the current account.
- Press the Windows key + R, type regedit, and click OK. Note that you need to have administrative privileges to do this.
- Navigate to the location below in the left pane:
HKEY_LOCAL_MACHINE\SOFTWARE\Microsoft\WindowsNT\CurrentVersion\ProfileList - After expanding the ProfileList key, check if the SID from Step 3 ends with .bak or without it or has the two variations.
- If the SID key is without .bak do the following:
- Double-click ProfileImagePath in the right pane to edit it.
- Enter your correct user path in the Value data box and click the OK button. You can check this from File Explorer e.g., C:/USER/<username>.
- Now, check if the State DWORD of the SID is set to 0 (zero) in the right pane and close the registry editor.
- Double-click ProfileImagePath in the right pane to edit it.
- Should the SID key has .bak at the back, do the following:
- Right-click the SID key, select the Rename option, and remove the .bak from the name.
- Double-click the ProfileImagePath in the right pane, change the Value data to your correct profile path, and click OK.
- Check that the State DWORD for the SID key is set to 0 in the right pane and close the Registry Editor.
- Right-click the SID key, select the Rename option, and remove the .bak from the name.
- If two SID keys are listed with one having .bak and the other without it, do the following:
- Right-click the SID key without .bak, select Delete and click the Yes button to confirm the action.
- Now, right-click the SID key with .bak, select Rename, and remove the .bak from the name.
- Double-click the ProfileImagePath option in the right pane, change the Value data to your correct profile path, and click OK.
- Check if the State DWORD is set to 0 and close the registry editor.
- Right-click the SID key without .bak, select Delete and click the Yes button to confirm the action.
- Finally, restart your computer and log in with the affected user profile.
2. Go to Safe Mode
- Press the Windows key to show the Start Menu.
- Press and hold the Shift key, and click the Power option followed by Restart.
- When your PC restarts, choose Troubleshoot > Advanced options > Startup Settings. Click the Restart button.
- Once your PC restarts, select Safe Mode’s version by pressing the appropriate key on your keyboard and log in with your original account.
- If this does not work, restart your PC in normal mode more than once, sign in with your original account, and see if the issue persists.
- If you still can’t access your files, press the Windows key + R, type services.msc, and click OK.
- Double-click the Windows Defender Advanced Threat Protection option to open its properties.
- Set the Startup type to Disabled and click the OK button.
- Now, go back to the Registry Editor and double-click the Microsoft Defender Antivirus service.
- Click the dropdown before the Startup type, select Disable and click OK.
- Finally, disable any third-party antivirus you have to and restart your PC again.
3. Create a new user account
- Click the Start icon in the Taskbar and select the Settings option.
- Choose Accounts in the left pane and select Family & other users in the right pane.
- Now, click Add account before Add other user.
- Choose I don’t have this person’s sign-in information.
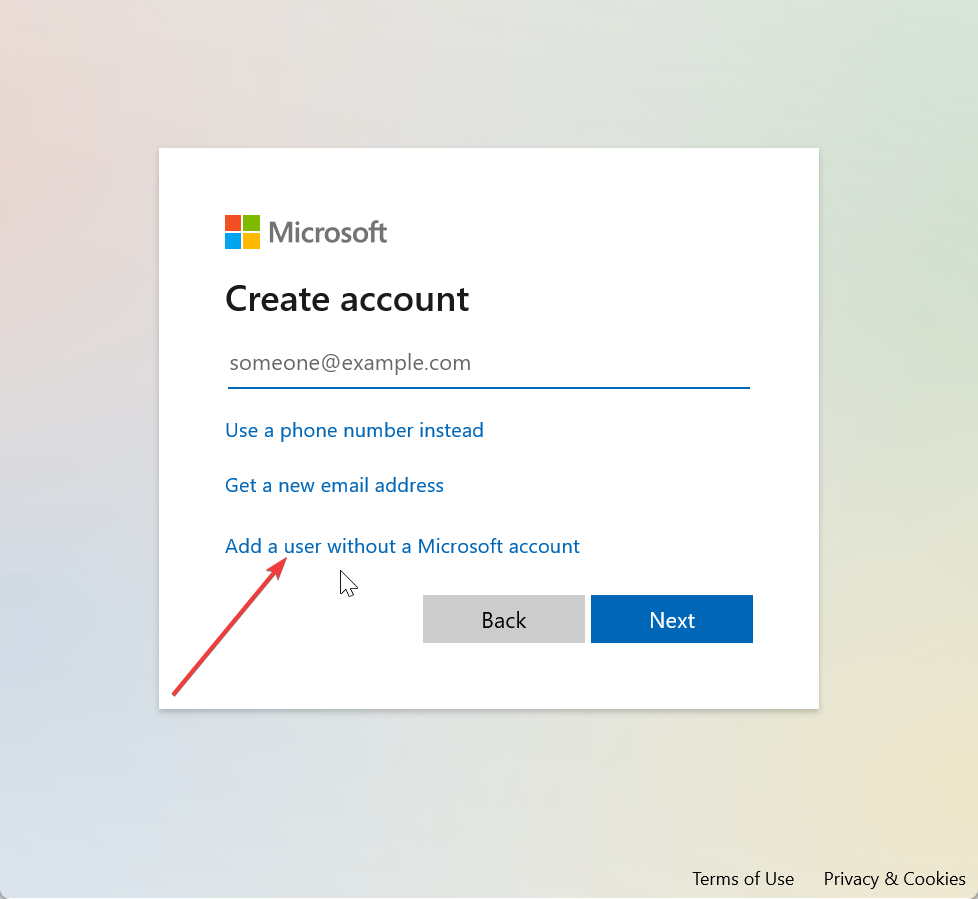
- From here, select Add a user without a Microsoft account.
- Enter a username, password, and password hint, and click the Next button.
- Go to Start > Settings > Accounts > Family & other users again.
- Choose the account name of the new account (There should be a Local account under the name) and click the Change account type button.
- Select the Administrator option under Account type and click OK.
- Log into the new Microsoft account and launch File Explorer.
- Click the C: drive, select USERS, and choose the old account.
- Finally, copy the contents into your folder of the new account.
You can also try restarting your computer a few times and see if the problem is fixed.
This is another workaround allowing you to access your files and settings. Note that this will only work if your profile folder is still available on your PC.
For more information, check out our guide on how to fix a corrupted user profile in Windows 10.
We hope one of these solutions works for you. If you’ve encountered a workaround we didn’t list in this article, tell us more about your experience in the comment section below.


User forum
10 messages