How to Check Mouse DPI in Windows 11
Key notes
- The DPI of your mouse determines how fast or slow the cursor moves on your screen.
- You can adjust these settings in order to increase or decrease the size of items.
- Gamers tend to go for mice with high DPI because of the intensity involved in playing games.
- Checking your DPI is easy and in this article, we will show you different ways to do so.

If you are one of the people who are tired of seeing tiny text in Windows 11 and want to change the display scaling in Windows, you can easily check DPI and adjust the settings to your preference.
When you have a high-DPI display, you might find that some desktop apps are blurry when you compare them with newer Universal apps.
This makes it difficult to use older applications on Windows 11 because the text is hard to read and images are blurry.
If you are in the market for a good monitor, we have a generous selection you can choose from and finally make the upgrade.
The default display scaling may not always be ideal for what you’re viewing. Some things will appear too small and others are tough to read.
While Windows 11 does its best to adjust DPI scaling automatically, it doesn’t always get it right. Luckily, it’s easy to manually adjust DPI scaling in Windows 11.
Why is DPI important?
If you’re a gamer, the DPI of your mouse can be crucial to your success. A higher-DPI mouse will allow you to move the cursor on the screen further per inch of movement than a lower-DPI mouse. This is why gamers often go for a mouse with a higher DPI.
To know exactly how far your mouse moves on the screen compared to how far you move your hand, you can calculate the DPI of your mouse.
DPI and sensitivity are closely related but not identical. For example, you can have a high-quality gaming mouse set to a low DPI, and it will still be able to track movement with high accuracy.
However, using a low DPI can make it harder to keep your cursor on the screen when moving quickly.

A mouse with a higher DPI setting detects and reacts to smaller movements. A lower DPI setting on a mouse means that you’ll need to physically move it more in order to make the cursor move across the screen.
Choosing the best mouse DPI setting is all about finding that sweet spot between control and speed.
If you play on a high-resolution desktop monitor, consider using a mouse with high DPI so you can take advantage of the extra space. If you have smaller monitors or play on laptops, stick with low to medium DPI.
How can I check DPI on Windows 11?
1. Check the manufacturer specifications
- Navigate to your browser and search for your manufacturer’s website (in this case HP).
- Locate your mouse on the website.

- Under Specs, locate the DPI settings.

2. Use the Paint app
- Press the Windows key, type Mouse settings, and click Open.

- Click on Additional mouse settings.

- Under the Pointer Options tab, uncheck Enhance pointer precision then press OK.

- Press the Windows key, search for Paint and click to open.

- Set the zoom level to 100%.

- Draw three horizontal lines and average to get your approximate DPI.

3. Use an online DPI calculator
- Navigate to your browser and open DPI Analyzer.

- Under Target distance, enter the value 1.

- Place your mouse at the zero mark on the ruler.

- Click and hold the mouse until you reach the 1 inch mark.
- The value you get is your DPI.

Can I change DPI scaling on Windows 11?
Your screen resolution is the number of pixels on your screen. If you have a low resolution, as many users do, and you try to use applications designed for a higher resolution, they won’t be designed properly to fit on your screen.
Instead of showing everything at a size that’s easy to read and use, they’ll either be very small or you’ll have to scroll around too much to see the content.
Windows uses scale factors to compensate for this mismatch between application design and monitor size.
When scaling is 100% (the default setting), the dots in an image are displayed at their native size onscreen – one dot per pixel. In other words, images will appear with the same clarity on all screens (but not necessarily the same size).
To change DPI scaling, follow the steps below:
- Press the Windows + I keys simultaneously to open Settings.
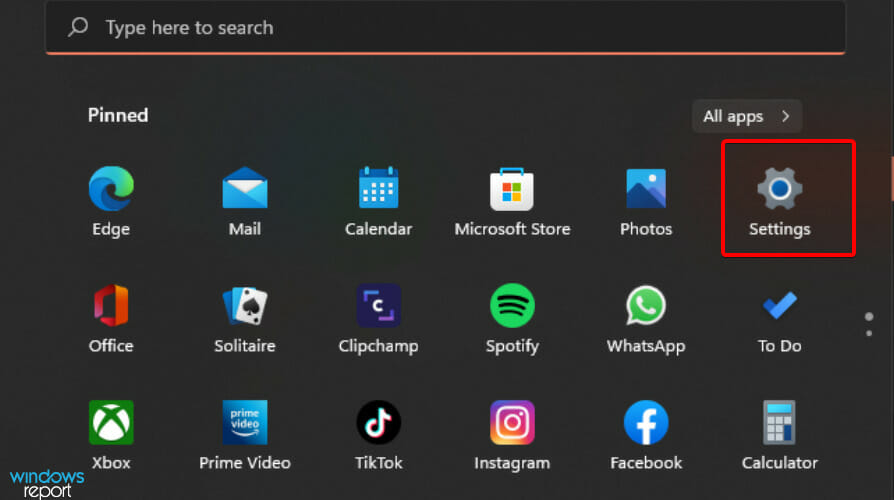
- Tap on System and select Display on the right pane.

- Under Scale & layout, open the drop-down and select your preferred scaling.

What can I do to fix Windows 11’s DPI scaling issues?
If you are using a higher resolution for Windows 11 4L scaling, make sure that you have the recommended display resolution. If you’re not, your DPI scaling may be off, which can cause blurry text, apps, and other items.
While using two or more monitors is a great way to get more work done, it’s not without its problems.
One issue that you may run into involves scaling. Windows will attempt to adjust your programs and apps automatically so that they look good on the monitor that you’re currently using.
For instance, if your main monitor is 4K and the second one is 1080p, set the first to 200% scaling and the second to 100%.
This will improve your experience when working with apps that span across two or more monitors, but it may also cause some apps to stop responding or appear blurry on one of your displays.
Also, if you are using an old monitor, you may run into problems. Older monitors tend to have a limit on their display capacity. You can log out and log back in to resolve the issue.
Can I disable display scaling on high DPI settings in Windows 11?
While using Remote Desktop, you may also face Windows 11 RDP scaling issues because the device cannot be detected. To work around this issue, check and verify that you are connected to the Internet.
If this doesn’t work, visit our guide on how to fix Remote Desktop not working and attempt the solutions to bypass the RDP scaling issues.
You can also disable DPI settings for a program if it appears blurry. To disable, follow the steps below:
- Right-click on the program and select Properties.

- Click the Compatibility tab and press OK.

- Select Change high DPI settings.

- Under Program DPI, check Use this setting to fix scaling problems for this program instead of the one in Settings and under High DPI scaling override, check Override high DPI scaling behavior then press OK.

You may also face high DPI issues but worry not as our expert guide will take you through simple steps on how to fix the issue.
In addition, DPI settings are not the only ones that can be tweaked. You can refer to our guide on how to adjust your mouse sensitivity settings.
We hope you were able to check your DPI and found some useful information from this article. If you have any suggestions, please leave a comment down below.
Read our disclosure page to find out how can you help Windows Report sustain the editorial team. Read more


Improve this guide


User forum
0 messages