How to easily resize images using PowerToys on Windows 10 to save time
4 min. read
Published on
Read our disclosure page to find out how can you help Windows Report sustain the editorial team. Read more

If you are already using PowerToys, you may already know of all of the helpful utilities available to make your life easier, including Keyboard Manager. Another bonus of PowerToys is the Image Resizer utility, which allows you to ability to resize images in bulk without the need to open an image editor.
Once the Image Resizer utility is set up, you can resize images directly from File Explorer or the desktop on Windows 10. In just a few short steps you will have Image Resizer set up and running. Here’s what you need to do.
Install Power Toys and turn on Image Resizer
If you don’t already have it installed, you need to download and install PowerToys from GitHub. After the installation process is complete, launch PowerToys from your desktop or Start menu and toggle on “Enable Image Resizer.”
Close the PowerToys window and try resizing images in File Explorer or desktop on Windows 10 using right-click.
Resize images in File Explorer or desktop
Once Image Resizer is enabled, locate the images you want to resize in File Explorer or on your desktop. Select the images individually or in bulk (as shown) with your mouse and right-click them. In the menu that pops up, select Resize pictures.
The Image Resizer menu will appear, requiring you to choose a size from the list (or enter a custom size), select the options you want and then click Resize to resize your pictures.
Once completed, your resized images will save in the same folder as the source images. Image Resizer will definitely save you a lot of time if you need to resize images in bulk.
Additional Image Resizer Settings in PowerToys
If you want to change the default small, medium, and large sizes, you can adjust the dimensions of the default sizes in the Image Resizer settings in PowerToys. Here’s what you need to do.
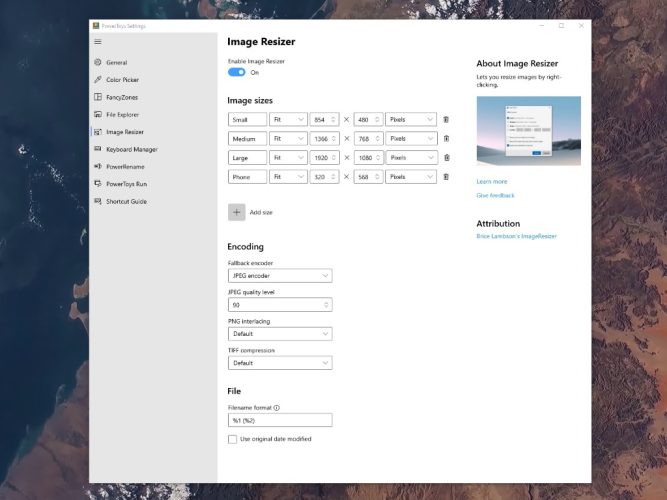
Open PowerToys and on the Image Resizer options page, there are three sections available; Images sizes, Encoding, and File.
Image sizes
In Image Resizer options, Image sizes defines the small, medium, large, and Phone (as seen on mobile devices) default sizes available. You can rename and change any of the sizes to your own preferences and add an infinite or finite number of custom sizes. Each image size can also be configured as Fill, Fit or Stretch. The dimensions that you use for resizing can also be changed as Centimeters, Inches, Percent and Pixels. Keep in mind, the width and height of the specified size may be swapped to match the portrait or landscape orientation of the resized image. In order to always use the width and height as specified, be sure to un-check Ignore the orientation of pictures.
Encoding
There is also an Encoding section to provide even more customization settings for your images. By default, Image Resizer will save the resized image in the source image file format. However, in the instances that Image Resizer is unable to resize the image in the source image format, Image Resizer will use the Fallback encoder option available here. You can also configure the JPEG percentage quality level, PNG interfacing, or TIFF compression.
File
The File section is allows you to indicate the resized images’ file name format. The default file format includes the original file name with the size you select. You also have several other options that you can add to the File section to change how your resized images are saved. Here are the file parameters available as provided by Microsoft.
%1: Original filename
%2: Size name (as configured in the PowerToys Image Resizer settings)
%3: Selected width
%4: Selected height
%5: Actual height
%6: Actual width
Bear in mind, you don’t need to use any of these additional Image Resizer Settings in PowerToys, but it is helpful to know what these settings do just in case you find a need to use them later.
What program do you use to resize your images in Windows 10? Let us know in the comments!


User forum
0 messages