Touchpad Cursor Has Disappeared on Windows 11 [Fix]
Outdated touchpad driver can trigger this cursor disappearance

Many users reported that touchpad cursor disappears on Windows 11 and this can prevent them from using their laptop. Luckily, this issue can be easily fixed with these steps.
Why is my mouse not showing a cursor on Windows 11?
This usually happens due to glitches with the touchpad or driver issues. Sometimes Windows updates can cause this issue.
What can I do if my touchpad cursor suddenly disappears on Windows 11?
Before we try anything else, turn off your laptop by pressing and holding the Power button. On your laptop, press the key that has a rectangle with a slash on it to enable the touchpad. Usually that’s F4, F7, F8 or F10 key.
1. Update the touchpad driver
- Press the Windows key + X, use the down-arrow key to select Device Manager, and hit Enter.
- In the Device Manager window, use the Tab key to focus on the window and use the down arrow key to navigate to Mice and other pointing devices.
- Press the right-arrow key to expand the menu, and use the down-arrow key to select your mouse.
- Press Shift + F10 or Menu key (next to right Ctrl) to open a drop-down menu. Hit the down arrow key to select Update driver and hit Enter.

- In the next popup window, select Search automatically for drivers.

- Restart your PC after the drivers are successfully updated.
- Alternatively, in step 4, you may also select Uninstall device. After restarting your PC, the system will install a new driver for the touchpad.
If the cursor still keeps disappearing on Windows 11, download the driver from the official manufacturer’s website and try installing manually.
Sometimes, your PC’s generic drivers aren’t updated properly. To get the right driver easily, use a specialized tool like Outbyte Driver Updater to find and update outdated drivers automatically.
2. Disable the touchpad and enable it again
- Open the Device Manager again.
- Use the keyboard keys to navigate to your touchpad driver.
- Open the context menu by using the Menu key on the keyboard and choose Disable.
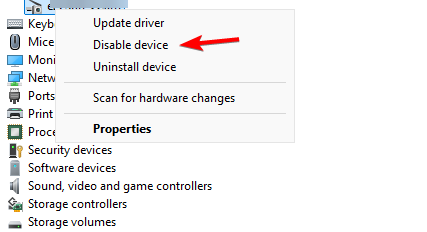
- Wait for a few moments and open the context menu again. This time, select Enable.

3. Disable VSYNC and Variable Refresh Rate
- Open your graphic card control panel software and disable VSYNC feature.

- Next, press the Windows key + I to open the Settings app.
- Go to System and choose Display.
- Next, go to Graphics.

- Expand Advanced graphics settings and disable Variable refresh rate.
4. Uninstall recent updates
- Open the Settings app.
- Navigate to Windows Update and choose Update history.

- Next, select Uninstall updates.

- Locate a recent update and uninstall it.
If your touchpad pointer has disappeared on Windows 11, you might want to try removing any recent updates.
If you’ve got other solutions to help when the touchpad cursor disappears on Windows 11, you can let us know in the comments section. We also covered how to get your laptop cursor back in a previous guide, so don’t miss it.
This isn’t the only issue, and many reported that their laptop touchpad isn’t working on Windows 11, but we have an entire guide dedicated to this issue. Also take time to compare the Synaptic touchpad driver and Windows precision and see whether your preference changes.
Others reported that the touchpad clicks but can’t move on Windows 11, however, we covered this in an earlier guide as well.
Read our disclosure page to find out how can you help Windows Report sustain the editorial team. Read more


Improve this guide


User forum
0 messages