How to Safely Uninstall Nvidia Drivers From Your PC
Uninstalling graphics card drivers can be a little complicated
3 min. read
Updated on
Read our disclosure page to find out how can you help Windows Report sustain the editorial team Read more
Key notes
- If you have changed your graphics card, here is how to safely uninstall Nvidia drivers and start fresh.
- You may do that manually, but we recommend using dedicated solutions just to stay on the safe side.
The power of your Nvidia GPU heavily depends on the associated software, namely, the drivers. Issues might arise, an update might go awry, and you would, occasionally, need to uninstall Nvidia drivers and install a different (newer) version manually.
Thus, we made sure to explain how to safely uninstall Nvidia drivers from your PC. Without risking any further issues and more critical ones, for that matter.
How do I uninstall Nvidia drivers on Windows 10?
1. Use DDU (Display Driver Uninstaller)
- Download DDU (Display Driver Uninstaller). Extract it to your desktop.
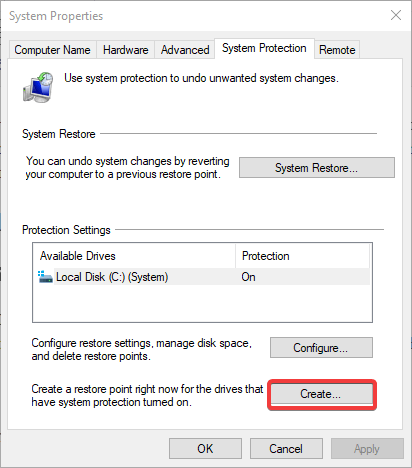
- We would highly suggest creating a system restore point now. Type restore point in the Windows Search bar and open Create a restore point.
- Click on the Create button and follow instructions to create a restore point.
- Run Display Driver Uninstaller.exe.
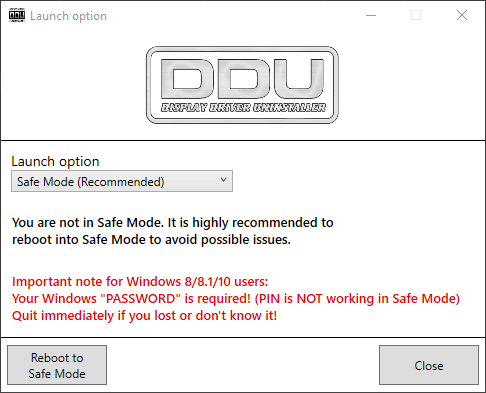
- We also suggest that you go for the recommended, Safe Mode launch option.
- Click Reboot to Safe mode and follow the instructions to uninstall Nvidia drivers completely.
2. Uninstall drivers from Control Panel
- In the Windows Search bar, type Control, and open Control Panel.
- Choose Uninstall a program.
- On the program list, locate all installed entries related to Nvidia. These include Nvidia Control Panel, Nvidia Experience, even Nvidia Audio.
- Uninstall all of them and reboot your PC.
- If you want to install a new driver, we suggest installing the Nvidia Experience, here. This official utility will provide you with up-to-date drivers at all times.
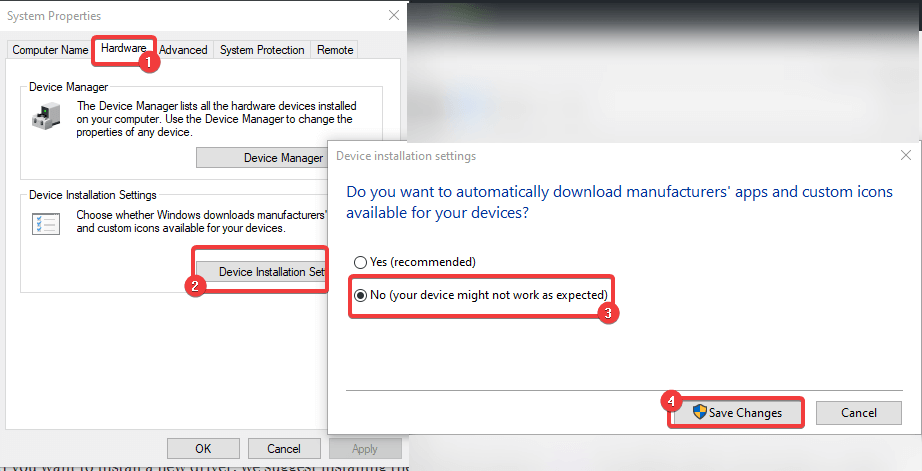
- Alternatively, you can prevent Windows 10 from updating drivers on its own. You can do so by navigating to Search > type Advanced system > open View advanced system settings. Select the Hardware tab and choose Device Installation Settings. In the dialog box, select No and save changes.
3. Use a third-party uninstaller
If you want to uninstall Nvidia drivers from your PC faster and more efficiently, we recommend using third-party software created specifically for this action.
A standard uninstall performed manually leaves behind unnecessary files and data that clog your system and affect the performance of your PC. This tool uninstalls software without leaving any traces behind and has other functionalities that keep your Windows OS clean and safe.
That’s it! We hope that by performing the solutions above, you managed to uninstall the Nvidia drivers safely on your PC.
We also recommend reading our guide on how to roll back Nvidia drivers in case you installed the wrong one.
If you know any other solutions, feel free to comment in the dedicated section below.

