Can't Extend the Drive in Windows 10/11? Here's What to Do
The solutions listed here are confirmed by our experts
4 min. read
Updated on
Read our disclosure page to find out how can you help Windows Report sustain the editorial team. Read more

Most users install their programs (games and applications) on the system (C:) drive by default. If you use too many applications, the drive will run out of free space. You can use the Disk Management tool to extend the volume to increase the C: drive size.
However, when users sometimes try to extend the volume using the Disk Management tool, some notice that the Extend Volume option is greyed out, and they cannot extend the drive. Here is how to fix the greyed-out Extend Volume option in Windows 10.
What to do if you’re unable to extend a drive in Windows 10?
1. Use AOMEI Partition Assistant to Merge Partition
AOMEI is a free partition assistant tool that allows you to extend and shrink the disk partition without deleting any other partition. This option is better than the second method, where you would have to delete the D: drive to extend the C: drive volume. Here is how to do it.
- Download and install the AOMEI Partition Assistant.
- After the installation is overrun AOMEI Partition Assistant
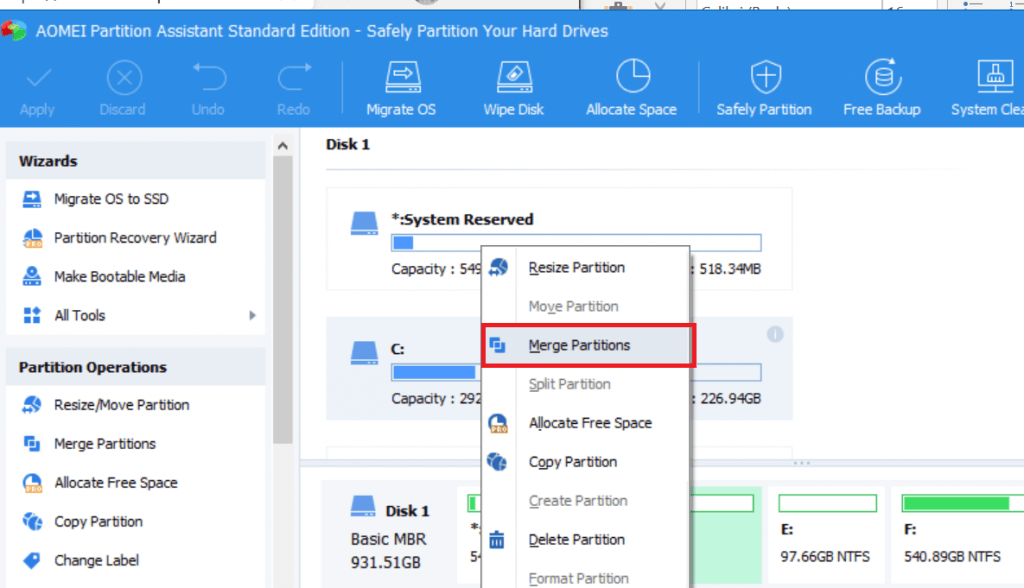
- Right-click on the C: Drive and select Merge Partitions.
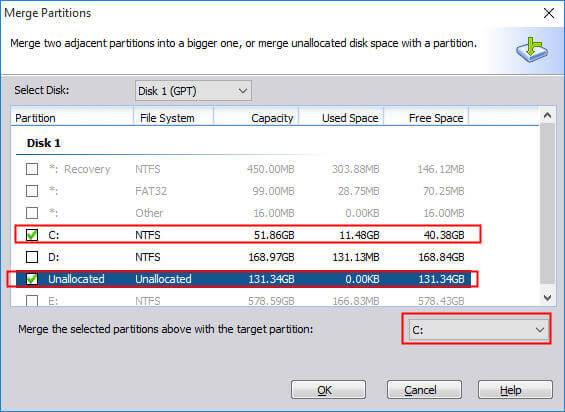
- In the Merger Partitions window, select the Unallocated space.
- Click OK to proceed.
- Next, preview the action. Click Apply and Proceed to save the changes.
What to do if you don’t have unallocated space to extend the volume?
AOMEI Partition Assistant allows you to allocate free space from the D: drive to C: drive without deleting the partition. Here is how to do it.
- Launch AOMEI Partition Assistant.
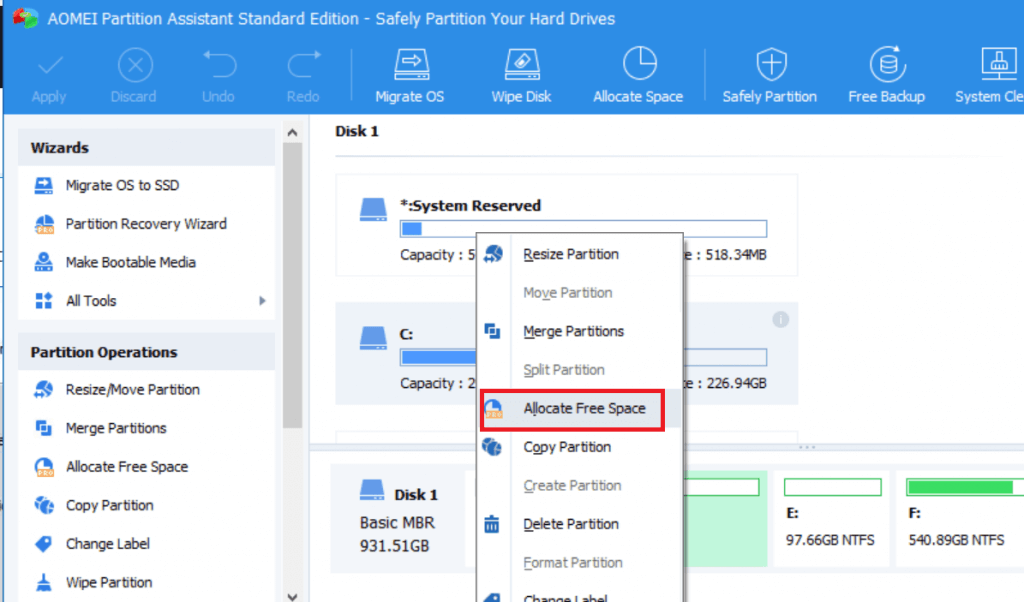
- Right-click on the D: > drive and select the “Allocate Free Space” option.
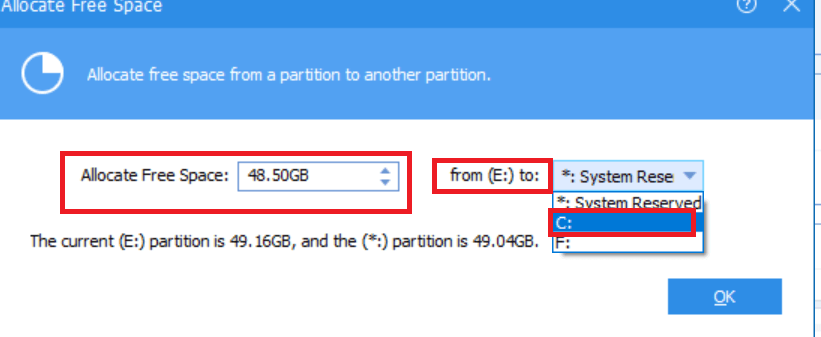
- In the Allocate Free Space interface, select amount of space you want to allocate to the C: drive.
- Make sure you select the C: drive as the target drive for allocating the space.
- Click OK to proceed.
- Preview the space allocation and click on Apply and Proceed to save the changes.

AOMEI Partition Assistant
Manage your partitions and make sure your system is in top shape with this professional software.2. Create Qualified Unallocated Space
The reason why the Extend Volume option is greyed out in the disk management tool is because of the unallocated space is not right contiguous to the C drive. To make it work, you need to put the unallocated space right next to the C drive and then extend the volume. Here is how to do it.
To do this, you need to delete the partition next to the C: drive that is D: drive in most of the cases. So, begin with taking the backup of your data in the D: > drive. Once the backup is ready, proceed with the following steps.
- In the Cortana/search bar, type Create and format and open Create and Format hard disk partitions.
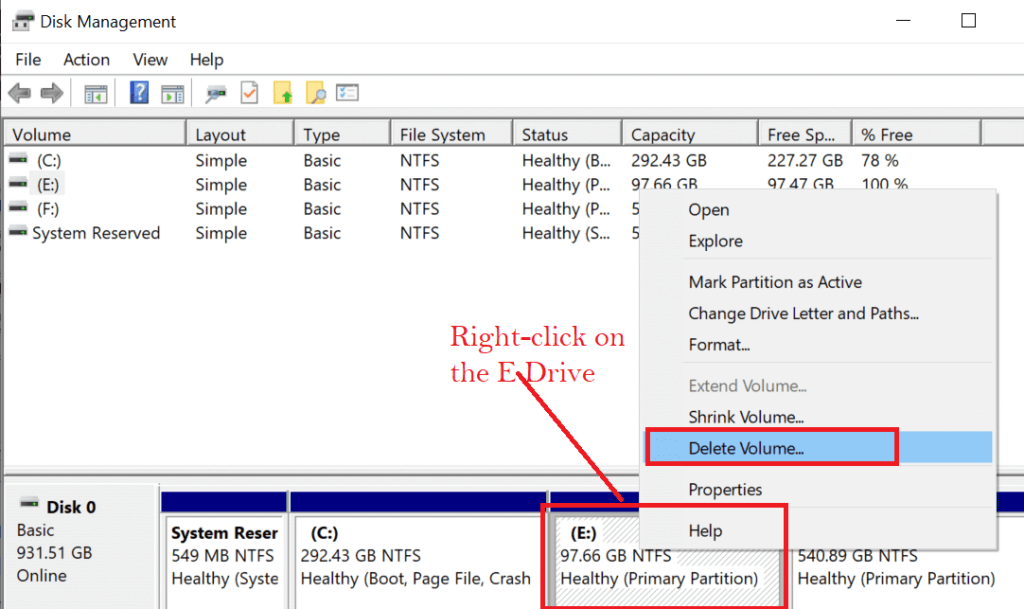
- Right-click on the D:> drive (E: in this case) and select Delete volume. (The D drive here is representational. If you have any other letter drive between the C drive and unallocated space, you need to delete that volume).
- A pop-up window will appear, asking you to confirm the Delete Volume action. Click on Yes.
Now, you will see the partition next to the C: drive is unallocated. You can easily extend the C: volume without any problem.
- Right-click on the C: > drive and select Extend Volume.
- Proceed with the on-screen instruction to increase the C: drive size.
You see how simple it is to merge unallocated space in Windows.
These are the two ways to extend the volume for C: drive and fix the Extend Volume greyed out in the disk management tool.
I prefer the first method as it is easier, offers more options, and it does not require deleting any partitions to extend the C: drive. However, if you don’t want to install third-party software to extend the drive, you can go with the second method to the same effect.


User forum
0 messages