Windows Server 2019 VPN Setup: How to Easily Install a VPN
Have a private connection on Windows Server 2019 using top VPN software
Key notes
- Windows Server 2019 supports VPN connections. But you have to go through a bit of trouble to set it up and allow VPN access.
- Discover three easy steps for setting up a VPN on Windows Server 2019 without too complicated processes.
- You don't have to install any software tools since you can use the server's built-in settings.
- In any case, you should rely on privacy software for more advanced technologies and security.


World-class 24/7 support with 82% for a 2 years plan and 2 months free
70% of our readers choose Private Internet Access
70% of our readers choose ExpressVPN
Amazing connection speed with 61% off and 4 months free for the 2-years plan.
Best security protocols with 83% off and 2 months free for a 2-year plan.
Using a VPN on a Windows Server has a lot of advantages.
It allows users in a small environment to access remote clients or firewalls to Windows Server.
If you’re here to discover the exact steps for installing a VPN on Windows Server 2019, here’s everything you need to know.
Does Windows Server have a built-in VPN?
Affirmative, you can set up a VPN on Windows Server using the right protocols. Plus, there are certain versions that allow this operation
More exactly, it’s possible to use a VPN connection on a Windows Server 2019 and get increased privacy for your server.
In order to set up a VPN connection on this Windows Server edition, you have to use L2TP or PPTP VPN protocols.
How can I set up a VPN on Windows Server 2019?
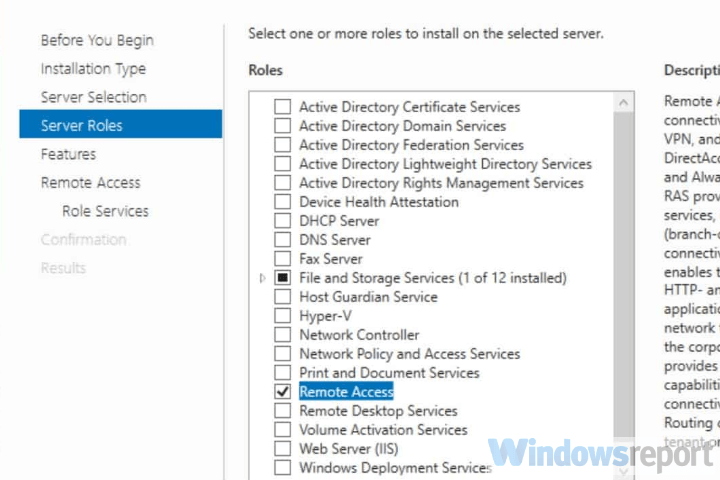
1. Install Remote Access using Server Manager
- Open Server Manager
- Go to Manage > Add Roles and Features Wizard
- Check the Remote Access box and click Next
- At Role Services, check the DirectAccess and VPN (RAS) box and click Next
- Click Install
- Once setup is over, you might have to restart the server
An alternative solution is to install and configure Remote Access using PowerShell.
2. Set up the VPN
- Click on the Open the Getting Started Wizard
- Choose Deploy VPN only
- In the Routing and Remote Access Management Console, right-click on the Server name
- Select Configure and Enable Routing and Remote Access from the context menu
- Choose Custom configuration and click Next
- Select VPN access
- Start the VPN service

You shouldn’t stumble upon any issues at this stage if you use the dedicated wizard.
3. Configure VPN access

Finally, the only thing remaining is to configure the VPN User and Network Access. You have to open and forward ports from the firewall to the Windows Server.
Depending on the protocol you use, here are the ports you should open:
- For PPTP: 1723 TCP and Protocol 47 GRE (also known as PPTP Pass-through)
- For L2TP over IPSEC: 1701 TCP and 500 UDP
- For SSTP: 443 TCP
If you don’t have a DHCP server, you can set a static IPv4 address pool. This can be done by following the steps below:
- Firstly, make sure all users have Remote access enabled
- Open the Properties panel of your VPN server
- Click on the IPv4 tab and enable Static address pool
- Click Add and add the same static IP address from the same Server subnet
How does VPN work on Windows Server?
Setting up a VPN on a Windows Server implies technical knowledge, so you have to learn how to configure it on your PC.
In a few words, you need to initially create a new VPN user and then set up routing and remote access features.
Here you have the required setup names and technologies you can use for securing your Windows Server:
- Windows Server 2019 VPN setup L2TP
- Windows Server 2019 VPN Ikev2 setup
- Windows Server 2019 SSTP VPN setup
- Windows Server 2019 PPTP VPN setup
- setup IPSec VPN Windows Server 2019
In conclusion, you can install a VPN on your Windows Server 2019 in three easy steps: setting up Remote Manager using Server Manager or PowerShell, installing the VPN, and managing VPN access permissions.
In case you need a fresh OS install, simply download Windows Server 2019 right away! Plus, join our VPN Troubleshooting Hub for additional guides.
If you experienced any technical difficulties, please let us know by dropping a comment in the section below.
Read our disclosure page to find out how can you help Windows Report sustain the editorial team. Read more


Improve this guide


User forum
1 messages