Windows 10/11 VPN not Working after Update [Full Guide]
Consider professional VPN to avoid Windows update errors
Key notes
- Usually, VPNs and Windows 10 running devices pair up smoothly.
- However, it seems that updates can throw this collaboration off the track.
- If your VPN went south after installing the latest Windows 10 updates, you need to take action.
- Check out our guide and learn how to restore your VPN functionality with ease.

World-class 24/7 support with 82% for a 2 years plan and 2 months free
70% of our readers choose Private Internet Access
70% of our readers choose ExpressVPN
Amazing connection speed with 61% off and 4 months free for the 2-years plan.
Best security protocols with 83% off and 2 months free for a 2-year plan.
The presence of VPN solutions in the current state of computing technologies reached its peak. And since Windows 10 is one of the most used operative systems, a large chunk of the Virtual Private Networks run on Microsoft’s Windows.
Although they mostly work well, reports say that VPN is not working after Windows 10 updates, especially after the major Windows Updates.
These issues are quite common after every new major release and we decided to provide you with a list of possible solutions that should help you address them.
If you’re suddenly stroke with a plethora of VPN issues after a Windows update, make sure to check them out below.
Can’t connect to any VPN after today’s Windows Updates Windows 10?
This occurring error on Windows 10 affects all users that install a specific Patch Tuesday update. This can interfere with the built-in VPN and prevent connecting to the network.
You may encounter this issue and it’s better to have the knowledge. This is how other similar users describe this VPN problem:
- Forticlient VPN not connecting Windows 10 (a network error prevented updates from being downloaded)
- Cisco VPN not working after the Windows 10 update
- Windows 10 update breaks L2TP VPN- the L2TP connection attempt failed because the security layer encountered a processing error
- The service profile is damaged. reinstall the service profile
- The remote access service IP configuration is unusable
- Windows 10 built-in VPN not connecting
- VPN connection not showing in Network Connections Windows 10
- Windows 10 VPN not working after sleep
- Windows 11 update breaks VPN
These are the most reported issues by users regarding this update error. Therefore, let’s tackle the subject and see how to resolve it.
How can I fix VPN issues on Windows 10 after updates?
1. Use a proper VPN client
In order to avoid issues and errors, we strongly recommend choosing a reliable and compatible VPN.
Our VPN of choice is ExpressVPN, a world-class VPN that brings all those professional privacy and security-oriented features to the table but without you having to break the bank to acquire a subscription. It’s actually very affordable.
Crafted for the Windows 10 architecture, it will seamlessly blend with your system and grant you the security you seek.
Kape Technologies-owned ExpressVPN has OpenVPN, PPTP, IPSEC/L2TP, and SOCKS5 (Proxy) technologies.
In fact, the industry-standard OpenVPN offers you the highest level of encryption via secure VPN tunnels.
Speaking about tunneling technology, the VPN uses a global VPN Tunnel Network powered by multiple gateways with worldwide access and unlimited bandwidth.
ExpressVPN
Install the latest Windows 10 updates without fearing privacy breaches. Team up with this authorized VPN!2. Update Windows 10
- Press Windows key + I to summon the Settings app.

- Select Updates & Security.
- Select Windows Update from the left pane.
- Click on the Check for updates button.

It seems that the Windows 10 Updates function, more or less, in the same sequence. Microsoft provides a major update in order to bring improvements, a large variety of bugs appear, and they then, overwhelmed by the large community backlash, end up pushing appropriate fixes as soon as possible.
That’s how it basically works. Since this is a widespread problem and it mostly occurred after some updates, they provided the resolution soon.
A lot of users who experienced issues with VPN after an update, get things sorted out after some time by updating Windows 10.
So, make sure that you have all available updates installed and try running the VPN again. In case you’re unable to make it work regardless, make sure to move to alternative steps.
Here’s how to check for available updates in Windows 10:
If you want to avoid VPN issues triggered by Windows Update, the obvious solution is to simply block the updates.
Keep in mind that not installing the latest security patches may pose a threat to your PC. Therefore, use this method only in extreme cases where you really need your VPN.
3. Reinstall drivers
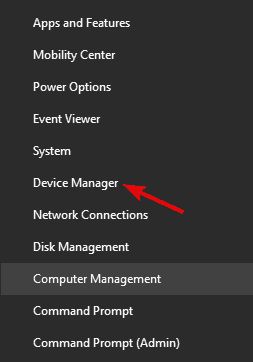
- Right-click on Start and select Device Manager from the PowerUser menu.
- Expand the Network adapters section.
- Right-click on every individual WAN Miniport driver and uninstall it.

- Restart your PC and open Device Manager again.
- Navigate to Network Adapters, right-click every individual Miniport, and install it.
- Try running the VPN again.
Certain users resolved the issue by completely uninstalling all Network adapters, but you can settle for reinstalling WAN Miniport drivers.
Either way, we all know how notoriously Windows 10 manages drivers and how the generic and mandatory drivers can have an illicit effect on system performance and stability.
In order to avoid this, you can reinstall drivers changed by the last update and let them reinstall on their own. Also, secondary drivers provided by a third-party VPN are better than the ones Windows Update provides.
So, you can also uninstall them and the VPN, and then just obtain them by reinstalling your VPN from scratch.
Here’s how to reinstall WAN Miniport network drivers in Windows 10:
Update drivers automatically (suggested)
After you have uninstalled your drivers, we recommend reinstalling/updating them automatically.
Downloading and installing drivers manually is a process that carries the risk of getting the wrong driver installed, which may lead to serious malfunctions in your system.
The safer and easier way to update drivers on a Windows computer is by using a professional tool.
It will automatically identify each device on your computer and matches it with the latest driver versions from an extensive online database.
4. Edit registry
- In the Windows Search bar, type regedit and open regedit from the list of the results.

- Backup your registry.
- Navigate to this location:
-
ComputerHKEY_LOCAL_MACHINESYSTEMCurrentControlSetServicesPolicyAgent
-
- Right-click on the blank area in the right window and select New > DWORD.
- Name the new DWORD input
AssumeUDPEncapsulationContextOnSendRule
- Change its value to 2 and save it.
- Close Registry Editor and restart your PC.
As some tech-savvy users noted, this error can have roots in the Policy Editor. This is the main part of the Windows platform and it regulates the security and access policy for all individual users on one machine.
In order to address this possible instigator of the problem with VPN, we’ll need to change the policy settings by inserting an exception for UDP. Now, the best way to do so is to use Registry Editor.
Of course, with this tool we’re roaming in the dangerous area, so make sure to act with caution and don’t delete anything while there.
Follow these instructions to access Registry Editor and create a new input which should re-enable VPN in Windows 10:
5. Reinstall VPN
- In the Windows Search bar, type Control and open Control Panel from the list of results.

- From the Category view, click Uninstall a program under Programs.

- Right-click on your VPN solution and Uninstall it.

- Use CCleaner or any other third-party uninstaller to clean all remaining files and registry entries the VPN has made.
- Restart your PC.
- Download the latest version of the VPN of your choice and install it.
Since the update-inflicted issues can affect both third-party VPNs and built-in Windows VPN, respectively, we decided to cover both.
Regarding the former, if you’re sure that everything was running smoothly before the update and then things suddenly went south, we advise you to reinstall the client you use.
Reinstallation is also the re-integration of the VPN into changed system surroundings, so this just might help. Also, while we’re at it, don’t forget to acquire the latest version of your VPN of choice.
We make sure to showcase the whole procedure, and decided to use TunnelBearVPN as the example, but this applies to all VPN solutions in general. Make sure to follow the instructions we provided below:
6. Disable antivirus
- In the Windows Search bar, type Allow and select Allow an app through Windows Firewall.

- Click on the Change settings button.
- Find your VPN on the list and check the box beside it. Also, make sure that both Public and Private networks are enabled.
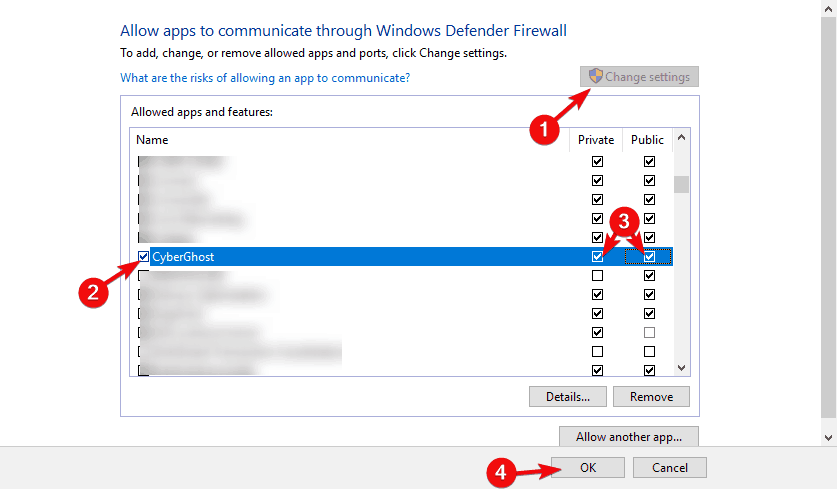
- Confirm changes and try connecting through a VPN again.
Another possible reason for this error can lie in the third-party antivirus or some of its subsidiaries. Contemporary antivirus solutions often come in suits that include third-party Firewall security measures.
They do come in handy, especially if you’re knowledgeable enough to customize them, but are, on the other hand, known for conflicting with Windows services.
If you run a VPN through a Windows 10 antivirus provided by Microsoft, make sure to disable the third-party firewall before doing so.
Or even better, for the sake of troubleshooting, disable the antivirus completely and move from there.
Also, make sure that your native Windows Firewall isn’t preventing VPN from accessing the remote servers. Here’s how to add an exception to Windows Firewall in a few simple steps:
7. Disable IPv6
- Type Control in the Windows Search bar and open Control Panel from the list of results.
- Open Network and Internet and then Network and Sharing Center.

- Select Change adapter settings from the left pane.

- Right-click on VPN network adapter and open Properties.

- Uncheck the box beside IPv6 and confirm changes.

- Try running a VPN afterward.
Connection issues, with or without VPN, are rather common after every new major update. Major updates tend to make certain changes to your adapter settings, making it unusable in the process.
Now, in step 7 we’ll try to address all-around connection settings, but this step concerns only IPv6. Namely, for users with the older configuration, the problem might occur due to conflict with the Internet Protocol.
Most users who found this step helpful disabled IPv6, but you can try disabling IPv4 and stick with IPv6, too.
If you’re not sure how to disable IPv6 (or IPv4, its older variation), follow the steps below:
If this method didn’t work, you should enable IPv6 back on. Check out this complete step-by-step guide to do that.
8. Troubleshoot your connection
We don’t want to point fingers at the VPN until we eliminate all possible connection issues.
In other words, make sure that you can connect without a VPN in the first place. If that’s not the case, we advise you to perform standard troubleshooting steps and move from there.
If you’re caught in the middle and unsure what to do, here are some actions that you should consider:
- Reset your router and/or modem.
- Flush DNS.
- Restart related services.
- Run dedicated Connection troubleshooter.
- Disable the router’s firewall.
- Update the router’s firmware.
- Reset router/modem to factory settings.
9. Reset your PC to factory settings
- In the Windows Search bar, type Recovery and open Recovery options.

- Under the Reset this PC section, click on the Get started button.

- Select whether you’ll preserve or delete your files from the system partition and click Next.
- Follow the instructions until the system is fully restored to factory values.

- Install VPN again and the update-inflicted problem should be gone.
Finally, if none of the solutions proved helpful, we recommend resetting your PC to its factory values.
If you’re not sure how to reset your Windows 10 machine to default values and refresh it in the process, follow the instructions we provided below:
Which Windows Update is causing VPN issues?
There are multiple Windows 10 updates that can affect your VPN, so you should be aware. More exactly, the specific updates that can break your VPN are KB5009543 and KB5009566.
Besides that, you can encounter other Windows update versions such as 1903, 20h2, 2004, 1909, 2022
How do I uninstall a Windows update?
- In the Start Menu, click on Settings.

- Now, click on the Windows Update section.
- Press the Update history button.

- Scroll down and click on Uninstall updates.

- Find the broken updates and uninstall them.
This should conclude it. In case you’re still unable to use your VPN on Windows 10 after an update, make sure to send a ticket to both Microsoft and your VPN provider.
Also, if you’re having issues with the business network, contact your network administrator. At least one should give you the helping hand, and chances are that the paid VPN service provider will be the one.
Either way, make sure to tell us if you have an alternative solution or a question regarding the ones we provided above.
Read our disclosure page to find out how can you help Windows Report sustain the editorial team. Read more


Improve this guide


User forum
2 messages