Windows 11 Has 2 Recovery Partitions: How to Safely Delete One
Check out the safe methods to delete the extra recovery partition
6 min. read
Updated on
Read our disclosure page to find out how can you help Windows Report sustain the editorial team Read more
Key notes
- A recovery partition lets you roll back your PC to the default settings in case things go south.
- However, several users have reported their Windows 11 PC showing 2 recovery partitions.
- In this guide, we have explained 5 methods that you can follow to remove the extra recovery partition from your PC.
A lot of users have noticed and complained that they are seeing multiple recovery partitions on their Windows 11 PCs when they open Disk Management.
Windows 11 2 recovery partition is not a new problem and has existed since the likes of Windows 10 and earlier versions of the OS.
But the question arises: Why do they have 2 recovery partitions on their Windows 11 PCs? Is it safe to delete one of the recovery partitions? How that can be removed safely without ruining your PC?
If you are also coming across Windows 11 2 recovery partitions issue on your PC, and are looking for solutions, then you have landed in the right place.
Because in this guide, we will give you 5 of the best solutions that you can apply to easily and safely delete recovery partitions.
The recovery partition is a system drive that stores important files that will help to restore the system to factory settings. So, when dealing with it, it requires you to be extra cautious and tweak it only when you know what you are doing.
In this guide, we will show you the safe methods that will help you get rid of Windows 11 2 recovery partitions issues, and keep your PC sorted. Let us get right into it.
What are recovery partitions in Windows 11?
The main purpose of a recovery partition on a Windows OS is to facilitate the computer system, and restore back to its original image if things go south.
In simple terms, the recovery partition saves the default state of your system and helps get back important files if they go missing or corrupt.
The Windows recovery partition is available as a WIM file. It can only be accessed or opened through the recovery interface.
Recovery partition also enables the service of recovering your PC back to the original state, because otherwise, you would need to reinstall the entire OS in order to bring it back to a working state if some important file goes missing.
How many partitions should Windows 11 have?
The answer to this question totally depends on the size of the hard disk you have installed on your Windows 11 PC.
However, if you were to take our advice, we would suggest you have at least 3 disk drive partitions on your hard drive.
This is because one would be reserved for your operating system, one would be available for saving your private files, and another one would be available for your documents, etc.
In case you have a 256GB hard drive, then you should avoid having multiple partitions. Because it is recommended to install the operating system on a drive that has at least 120GB of capacity.
Quick tip:
Aomei Partition Assistant’s intelligent migration process can effortlessly migrate operating systems to another hard drive, including SSD and HDD.
You also get all of the necessary information about the partition, its format, and which partition is the intruder here. Resize, merge, split and move partitions without losing data to maximize disk space use.

Aomei Partition Assistant
Recover lost or damaged partitions, rebuild the master boot record and run from a bootable CD.How do I delete multiple recovery partitions?
1. Delete using Diskpart
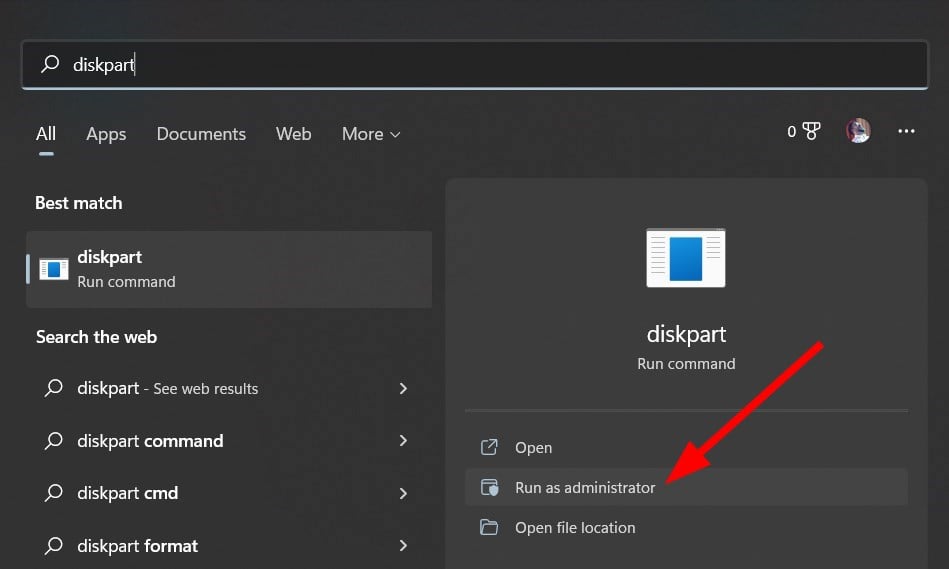
- Open the Start menu.
- Type diskpart and right-click on the Diskpart app.
- Select Run as administrator.
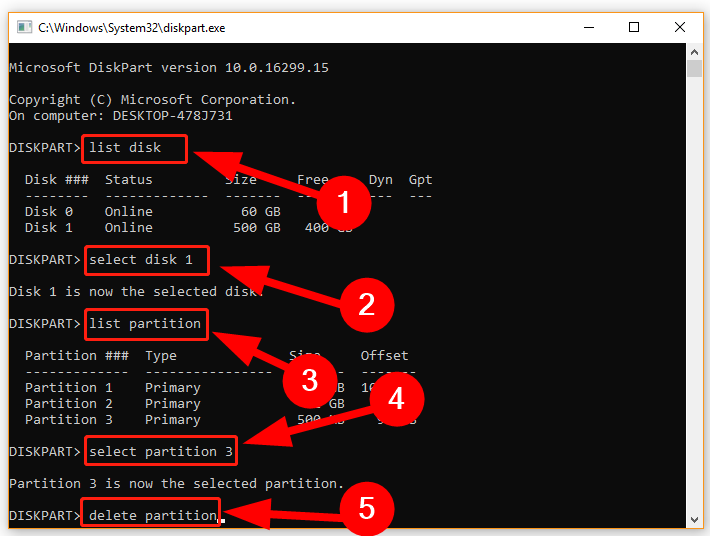
- Execute the below commands and press Enter, one by one.
list diskselect disk n(Here make sure to change the letter n with the disk number that contains 2 recovery partitions on your Windows 11 PC.)list partitionselect partition n(replace n with the partition number of the unused recovery partition)delete partition
After you have finished executing the above commands as mentioned, one by one, you should see that the extra partition on your Windows 11 PC is now gone.
2. Delete using Disk Management
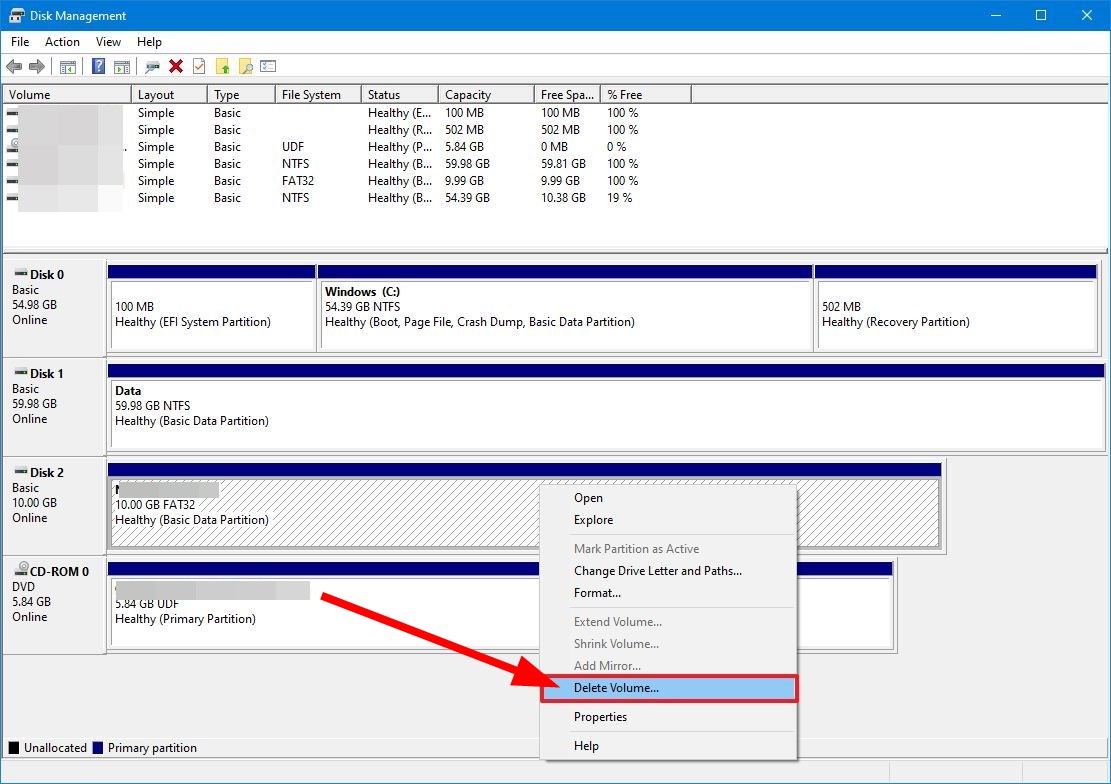
- Right-click on the Start menu.
- Click on Disk Management to open it.
- Select the drive with the recovery partition that you wish to remove.
- Right-click on the partition.
- Select the Delete Volume option.
- To confirm the process, click Yes.
- Restart your PC.
3. Delete using PowerShell
- Open the Start menu.
- Search for Windows PowerShell and open it as an administrator.
- Execute the below command and press Enter.
Get-Volume - Execute the following command and press Enter.
Remove-Partition -DriveLetter PARTITION-LETTERMake sure to change the PARTITION-LETTER with the drive letter of the recovery partition that you wish to remove. For example to remove the E drive the command will look likeRemove-Partition -DriveLetter E - Type Y to confirm the process and hit Enter.
4. Delete using MiniTool Partition Wizard
- Download the MiniTool Partition Wizard.
- Install the program on your PC.
- Launch MiniTool Partition Wizard.
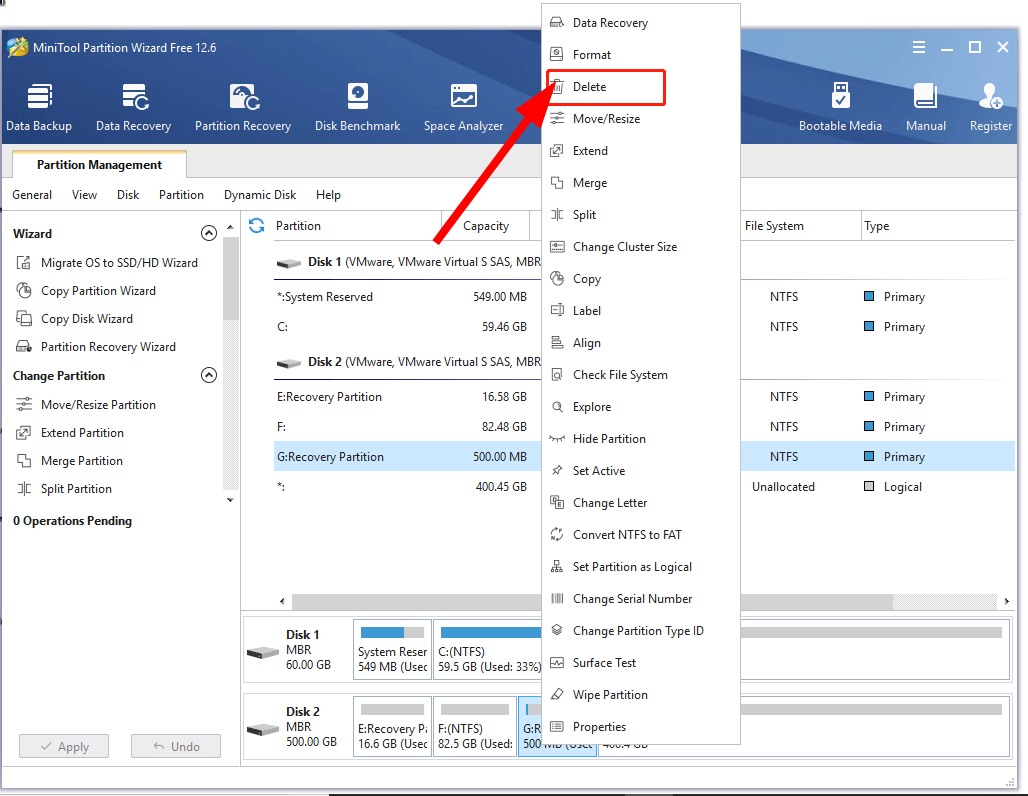
- In the interface, right-click on the partition that you wish to remove and select Delete.
- Allocate the free space to another partition by selecting Extend Partition option from the left action panel.
- Select the drive you want to extend.
- Click OK.
- Click on Apply to execute the process.
We have used the MiniTool Partition Wizard tool in order to delete the extra recovery partition and get rid of the Windows 11 2 recovery partition problem.
However, if you are interested in testing out other partition tools, then you can check out our dedicated guide that lists some of the best partition tools that you can use on your Windows 11 or 10 PC.
5. Delete using the volume command
- Open Start.
- Open the Command Prompt as an administrator.
- Execute the below command and press Enter.
diskpart - Type the below command and press Enter.
list volume - Run the below command.
select volume VOLUME-NUMBER(Make sure to replace the VOLUME-NUMBER with the number of the drive you wish to remove.) - Type the below command to delete the partition.
delete volume
Is it safe to delete recovery partitions in Windows 11?
Yes. It is totally safe to delete the recovery partition in Windows 11. They aren’t required by Windows to boot up, so they can be removed from your PC using the above methods safely.
However, do note that in doing so, you won’t be able to go back to factory settings. And the only alternative left would be to reinstall the entire OS again using a bootable disk or USB.
It is not recommended to remove a recovery partition because it only eats up a small amount of space. But you can delete the partition in case there are 2 partitions on your Windows 11 PC as in our case.
That is it from us in this guide. Let us know in the comments below which of the above methods you used to delete the extra Windows 11 recovery partition on your PC.

