Windows SSH Permission Denied: 5 Ways to Fix it
Follow our tested procedures to solve the issue right away
5 min. read
Updated on
Read our disclosure page to find out how can you help Windows Report sustain the editorial team. Read more
Key notes
- The SSH keys are used to enable a connection to the server in a very safe and secure method.
- Sometimes, you may receive the SSH Permission denied message when attempting to connect.
- This could possibly be resolved by checking if the server address is correct or by changing the permissions of the SSH key.

SSH, or Secure Socket Shell, is an encrypted protocol that enables secure access to any remote device or server over an unsecured network.
When some of our readers tried to authenticate using these keys, they received an SSH permission denied message on their Windows 11 PC.
The users can unaware of the causes of this type of error message on the system. This is impacting the productivity of their work.
Some users also faced the SSH exchange identification error on the system but the link will bring you to a helpful guide to fix it.
Why do I get SSH permission denied message in Windows 11?
There could be a number of factors responsible for this error message, which are listed below:
- Incorrect server – If you are trying to connect to some wrong server with its IP address, you might receive an access denied message on your system
- Wrong password – Some users try to access the server using the wrong credentials
- Too many SSH keys – When there are a large number of SSH keys present in the system, so the system may select the wrong one from among those accessible
- SSH key permissions are too open – If the SSH key’s permissions are wide open and accessible to the majority of users in the system, the security purpose of employing the key may be jeopardized
If you are encountering this problem on your Windows 11 PC, this article will walk you through the five best solutions available, which are detailed below.
How do I bypass the SSH permission denied in Windows 11?
1. Check if you are connecting to the right server
This might sound silly, but many users tend to make this mistake and wonder why they are facing such an error message on their system.
When you are trying to connect to a server using the SSH key and the server address, you need to recheck the server address two to three times before trying to access it.
There might be a possibility of missing a few numbers or misplacing the numbers in the server address. So always confirm the server address before continuing.
2. Try to log in with a password
You can always try logging in to the server using the password method. But for this to work, you need to enable the Password Authentication feature.
If it is already enabled, then you can access the server using the following command line:
ssh -o PreferredAuthentications=password -o PubkeyAuthentication=no user@server.ip
In the above command, you have to replace user@server.ip with the actual server address and password with the real password.
If the PasswordAuthentication is disabled, first you need to enable it and then generate a new ssh key using the following command: ssh-keygen -R server.IP.address
You have to replace the server.IP.address with the real IP address of the server.
3. Add your SSH key to the VPS server
In this method, you are trying to add the SSH key created on the system to the VPS server. This can be done by first generating a new SSH key on the system using the following command: ssh-keygen -t rsa
Now you might have to add this SSH key to the server by following this command: ssh-copy-id root@server.ip.address
Here, you have to change the server.ip.address to the actual server address value and execute the command.
Also, disable the Password authentication feature and edit the ssh_config file for changing the sole authentication method to SSH keys.
4. Manually select the key to use
When there are too many SSH keys available in the system, it can choose any random SSH key and create such issues.
So, you can execute the following command for making it choose the SSH key provided by you in the command: ssh -i /users/user_name/.shh/id_rsa user@server.ip.address
Before executing the command, you have to replace /users/user_name/.shh/id_rsa with the path of the SSH key you want to add and user@server.ip.address with the actual values.
5. Change the permissions of your SSH key
- Press the Windows key + F to launch File Explorer and open the folder where the SSH key is present.
- Right-click on the SSH key and click Properties from the context menu.
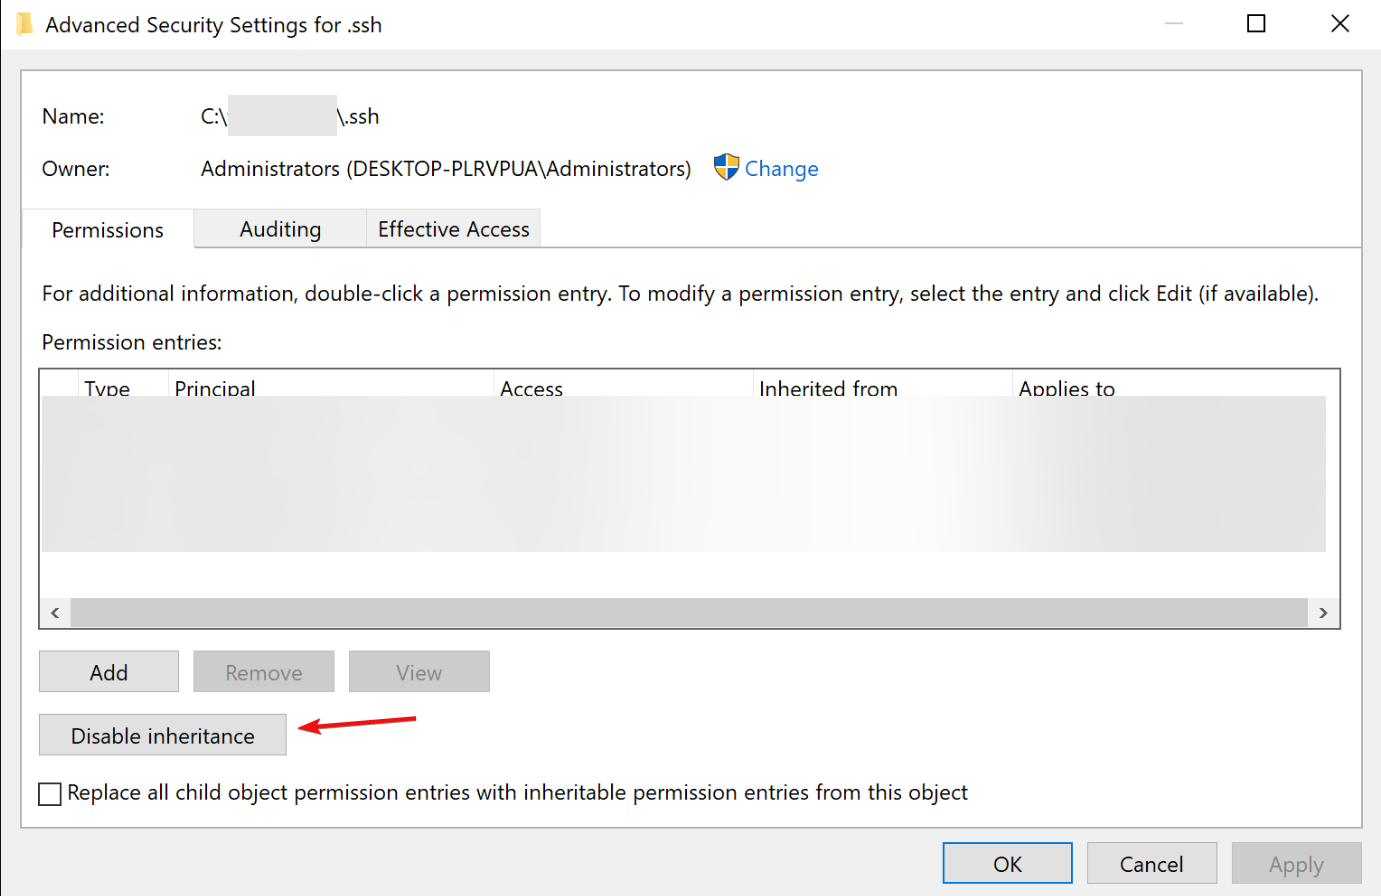
- Go to the Security tab and click Advanced at the bottom.
- Now click Disable inheritance at the bottom and make sure Owner is your username only.
- If the owner is somebody else, click Change and select your username.
- After this, choose any other users from the Permission entries section and click Remove.
- When done, click Apply and OK.
- This will change the permissions to the SSH key.
Where are SSH keys stored in Windows?
All the SSH keys are stored on the system drive in the following folder (replace username with the actual name): C:\Users\username\.ssh
Of course, if your system drive has another letter, you should replace the letter in the path above with your own.
Hope this article was worth reading and was able to resolve the SSH Permission denied issue.
You should also consult our guide on how to fix bad owner or permissions on SSH config because it might offer some additional information.
Our readers also complained that they encountered the Unable to establish host authenticity error. If you’re among them, read the highlighted guide for instructions to fix it.
If you know any other possible solutions for this problem or would like to ask something about this problem, use the comments section below.


User forum
0 messages