How to switch to cloud Windows 11 with Windows 365 Switch?
Switching from your local PC to your Cloud PC only takes a few clicks.
Key notes
- You need to enroll in the Windows Insider Program on both your local PC and your cloud PC.
- Make sure to have an active Windows 365 Cloud PC license.
- Download the Windows 365 app on both your Windows to get started.

Windows 365 Switch is finally released in the Windows Insider Program, along with the Windows 365 Cloud PC preview. For those of you who don’t know, earlier this year, Microsoft hinted at the Windows 11 having a cloud version, that you can access from any device, as long as it’s connected to the internet.
Now, it seems that the Redmond-based tech giant is keeping up to its promises. In this week’s Insider Program updates, you can actually preview the Windows 365 Switch feature, and we’ll show you how you can do it.
With it, you’ll be able to easily switch between your local, offline Windows 11, and your cloud-based Windows 11 with just a few clicks.
Windows 365 Switch provides the ability to easily move between a Windows 365 Cloud PC and the local desktop using the same familiar keyboard commands, as well as a mouse-click or a swipe gesture through Task View on the Windows 11 taskbar.
Microsoft
How to enable and use Windows 365 Switch?
First things first, you need to make sure both your local PC and your cloud PC are enrolled in the Windows Insider Program. After you’ve done it, enroll in the Beta Program and download the latest Windows Beta versions on both PCs.
Enrolling them there requires some time, especially downloading and installing these Windows versions, so make sure to take time to do it.
You’ll also need to have a Windows 365 Cloud PC license, and Microsoft prepared a guide for you on how to get one.
Downloading and installing the Windows 365 app
- Go to Microsoft Store and look up the Windows 365 app.
- Click on Get and install the app on your PC.
- After the installation is complete, open the app.
Switching up to your Cloud PC
- As with many other Microsoft products, Microsoft will walk you through Windows 365 the first time you open it.

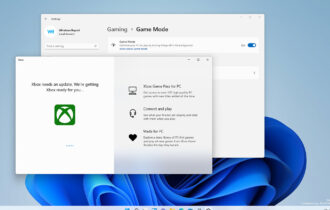
- When the mini-tutorial is done, you’ll notice a new icon on your Windows 11 taskbar.

- Click on the icon, and you’ll open Windows 365, where you can connect to your Cloud PC.

- Once it’s connected, select the three-dots icon, and choose the Add to task view option. This will enable Windows Switch.

- As you can see, you’ll be able to easily switch from your local PC to your Cloud PC with a few clicks.

- To get used to the switching experience, just hover over the Windows Task view icon in the taskbar.

- Windows 365 Cloud will automatically open, and you can now connect to your Cloud PC.

- Once you’re connected to your Cloud PC, you can go back to your local PC using the same way.
This is how you use Windows 365 Switch. However, you need to know that the feature is still rolling out so there might be issues with it every now and then. If so, don’t forget to send your feedback to Microsoft.
And let us know your experience with this new feature in the comments section below.
Read our disclosure page to find out how can you help Windows Report sustain the editorial team. Read more


Improve this guide

User forum
0 messages