How to enable Desktop Stickers in Windows 11 22H2
5 min. read
Published on
Read our disclosure page to find out how can you help Windows Report sustain the editorial team. Read more
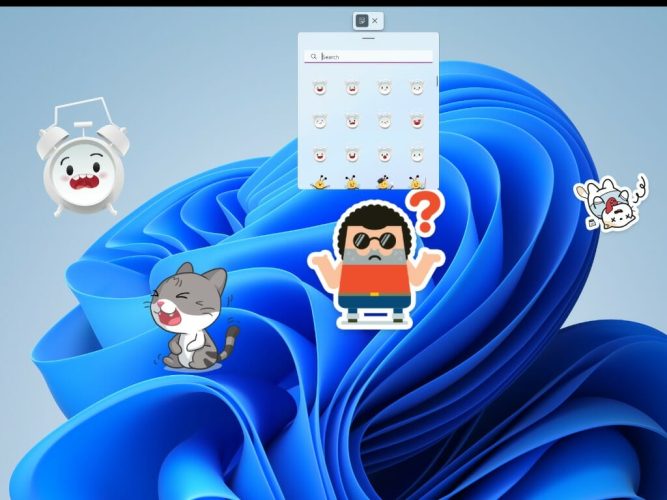
Desktop stickers are a fun and creative way to personalize your Windows 11 desktop and add a touch of personality to your workspace. In this guide, we will walk you through the step-by-step process of enabling desktop stickers in Windows 11 22H2 and give you some tips and tricks to make the most of this exciting feature.
At this time of this writing, Microsoft has yet to announce Desktop Stickers in Windows 11 22H2, so this guide may change, but you need to be running at least Windows 11 build 22621 (version 22H2 or newer) on your PC.
To check your Windows version, press the Windows key + R shortcut to bring up Run, type winver and press Enter to see what version of Windows 11 you have.
Once you verify that you have the correct Windows 11 version, you can continue to the next step to enable desktop stickers in Windows 11 22H2.
Enabling Desktop Stickers in Windows 11 22H2
Desktop Stickers are not enabled by default in Windows 11 22H2. To enable Desktop Stickers, follow these steps:
- Use the Windows key + R keyboard shortcut to bring up Run, type
regeditand press Enter. After you approve the User Account Control prompt, the Registry Editor will open. - Navigate to the following location:
HKEY_LOCAL_MACHINE\SOFTWARE\Microsoft\PolicyManager\current\device - Right-click the
devicekey and create a new key calledStickers. - In the
Stickerskey you just created, create a new DWORD (32-bit value) and rename the new value toEnableStickersand change its value data to1and click OK to save the changes. - Restart your computer for the new registry edit that you just made to be enabled.
Once you may the registry edits and restart your computer, you are now ready to use desktop stickers in Windows 11 22H2.
How to add, edit, or delete Desktop Stickers
Please note that the button to add or edit stickers will not work if you use the slideshows option to change the background of your desktop. Switch to using a single picture of Windows spotlight to enable desktop stickers in Windows 11 22H2. Once the feature is enabled, follow these steps to add, edit, or delete stickers on your desktop.
- Right-click anywhere on your screen and select Add or edit stickers.
- Another way you can access desktop stickers in Windows 11 22H2 is using the Settings app and navigating to Personalization > Background and click Add Stickers.
- Once you click Add or edit stickers or Add stickers the sticker menu will appear at the top of your screen giving you the option of browsing through the stickers or usinga keyword to find the stickers you want to use.
- Once you find the sticker that you want to use, click or tap on it to add the sticker to your desktop. Once added, you can click to resize it or reposition where you want to see it on your desktop. If you want to delete the sticker, you can always use the trash icon below the sticker when you want to delete it.
- You can add as many stickers as you want, just click the sticker menu at the top when you want to add more. If you want to exit the menu, just click the X button that appears to the right on the Desktop Stickers menu.
How to disable Desktop Stickers in Windows 11
If you want to disable Desktop Stickers in Windows 11 22H2, you will need to go back to the Registry Editor and make a few edits, just follow these steps:
- Use the Windows key + R keyboard shortcut to bring up Run, type
regeditand press Enter. After you approve the User Account Control prompt, the Registry Editor will open. - Navigate to the following location:
HKEY_LOCAL_MACHINE\SOFTWARE\Microsoft\PolicyManager\current\device\Stickers - In the
Stickers, change the value ofEnableStickersfrom1to 0 and click OK to save the changes. - Restart your computer for the changes to take effect.
You can also delete the Stickers key altogether, but you will have to repeat the steps in the beginning of this guide to re-enable Desktop Stickers in Windows 11 22H2.
Keep in mind that disabling Desktop Stickers in Windows 11 22H2 does not remove the existing stickers. You will need to remove the stickers BEFORE disabling this feature, or otherwise change the desktop background to something different to avoid displaying a background that already contains Desktop Stickers.
We hope that this guide has been helpful in enabling desktop stickers in Windows 11 22H2 and giving you some ideas for how to make the most of this fun and creative feature. By following the steps outlined in this guide and using our tips and tricks, you can add a touch of personality and style to your desktop and make your workday more enjoyable. Thank you for reading, and happy desktop-stickering!






User forum
0 messages