Unable to automatically step into the server: Get the best fixes here
4 min. read
Updated on
Read our disclosure page to find out how can you help Windows Report sustain the editorial team. Read more

When trying to debug WCF (Windows Communication Foundation) service, you may encounter different types of error. One such error is Unable to automatically step into the server.
The full error reads Unable to automatically step into the server. The remote procedure could not be debugged. This usually indicates that debugging has not been enabled on the server.
If you are trying to troubleshoot this error on your server, here are some valuable suggestions.
How do I fix ‘Unable to automatically step into the server’ errors?
- Add a Web.Config file to the Web Service
- Check for .NET Framework Compatibility
- Repair Visual Studio Installation
- Run Visual Studio with Administrative Privilege
- Troubleshoot Compatibility for Devenv.exe
1. Add a Web.Config file to the Web Service
While using Microsoft Visual Studio, this issue may occur due to a missing Web.Config file. Visual Studio does not create a Web.Config file automatically while creating a Web Application or Web Service. And when you try to debug the Web service, you may end up with this error.
To fix the issue, you need to add a Web.Config file to the Web service. Here is how to do it.
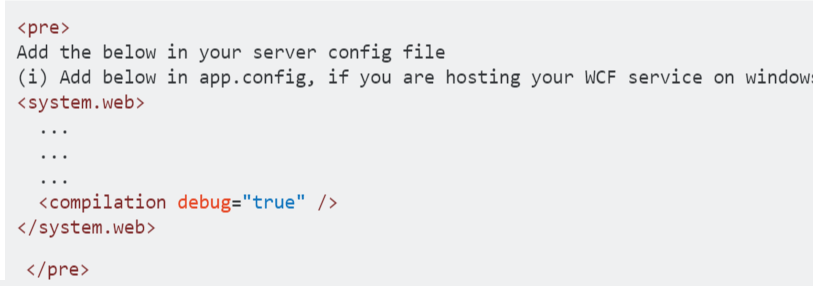
You need to create a Web.Config file and add <compilation debug=”true”> line between the <system.web> section.
If you already have a Web.Config file, you need to add the <compilation debug=”true”> line and save the file.
2. Check for .NET Framework Compatibility
If you have built the service project using a different version of .NET Framework than your client, it causes compatibility issues resulting in a server error.
To fix this make sure that you and your client projects are on the same .NET Framework. That is if you have built your project using Framework 4.5 and your client’s project was on .NET Framework 4.0 then you may need to change the project properties of service project to have .NET Framework 4.0.
3. Repair Visual Studio Installation
To enable debugging it is important that you install a version of ASP.NET framework before installing Visual Studio on your system. If you have installed Visual Studio first and then decided to install ASP.NET, you may see the “Unable to automatically step into the server” error.
You can fix this issue by repairing the Visual Studio installation from the Control Panel. Here is how to do it.
Steps for Visual Studio 2010 and Earlier
- Press Windows Key + R to open the Run dialog box.
- Type “control” and hit enter.
- In the Control Panel, click on Programs > Programs and Features.
- Located and select the Visual Studio program.
- On the top, click on the Repair/Change option and follow the on-screen instructions.
- After the repair is complete, reboot the system and check for any improvements.
Visual Studio 2019
If you have the latest version of Visual Studio installed, follow these steps instead.
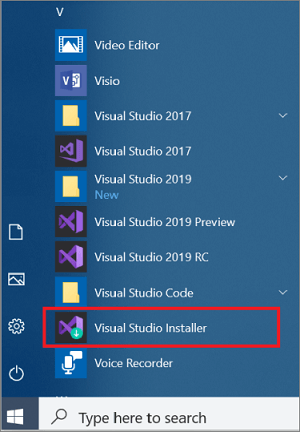
- Find Visual Studio Installer by clicking on Start > Visual Studio Installer (search in the letter V).
- Alternatively, you can also find the installer by visiting the following path:
- C:Program Files (x86)Microsoft Visual StudioInstallervs_installer.exe
- Run the Visual Studio Installer, and it will open the launcher.
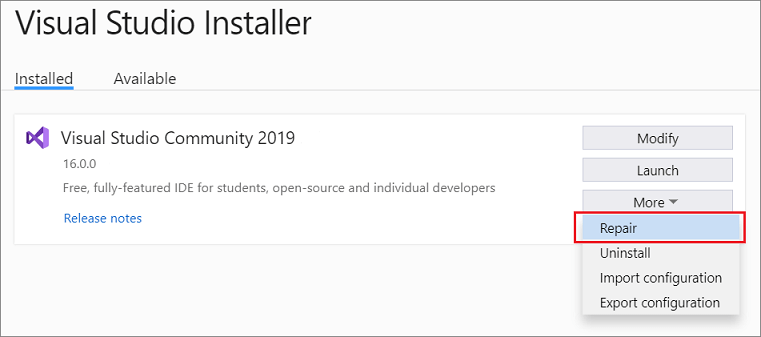
- Under the installed tab, click on the More button and select the Repair option.
- Follow the on-screen instructions (if any) and wait for the installer to Repair the Visual Studio framework.
Alternatively, if repairing the Visual Studio client doesn’t work, you can try to reinstall the Visual Studio application as well.
4. Run Visual Studio with Administrative Privilege
If the issue persists, you can try to run the Visual Studio launcher with the administrative privileges. Running the Visual Studio with the administrative access fixes any issues that occur due to inadequate permission.
- Click on Start, type Visual Studio.
- Right-click on your version of Visual Studio and select Run as Administrator.
5. Troubleshoot Compatibility for Devenv.exe
While we have discussed the compatibility issues earlier, you can try to fix any compatibility issue by using the built-in compatibility troubleshooter in Windows. Devenv.exe is a software component of Microsoft Visual Studio. Try to run the compatibility troubleshooter for it and see if that resolves the error.
- Open “File Explorer” and navigate to the following location:
- C:Program Files Microsoft Visual Studio version Common IDE
- Right-click on devenv.exe and select “Troubleshoot Compatibility”.



User forum
0 messages