An error occurred when accessing the Office Document Cache [FIX]
5 min. read
Updated on
Read our disclosure page to find out how can you help Windows Report sustain the editorial team. Read more

Microsoft Office uses the Office Document cache to make sure the changes made to the Office files are saved in the cloud. Sometime, the files may get corrupted or damaged due to abrupt closing of the application and show office document cache error.
The full error reads An error occurred while accessing the Office Document Cache. Close and reopen the Upload Center to try again. If the problem persists, move or delete the cache in the Upload Center settings dialog box. If you are facing this error, here is how to troubleshoot this problem on your Windows system.
Can’t access the Office Document Cache? Here’s what you need to do
- Delete Microsoft Office Document Cache
- Kill Microsoft Upload Center Task / Delete Registry Keys
- Uninstall Skydrive
- Use third-party software for Office errors
1. Delete Microsoft Office Document Cache
The first method to fix this error is to delete your Microsoft Office Document Cache manually. Deleting the cache does not affect your saved documents but helps you to fix the syncing issue. Here is a two-step guide to doing the same.
Perform a Clean Boot
Performing a Clean Boot is not necessary but recommended. This is to ensure that cache files don’t get loaded during startup and stop the user from deleting them. Here is how to do it.
- Press Windows Key + R, to open the Run dialog box.
- Type msconfig and hit enter to open System Configuration.
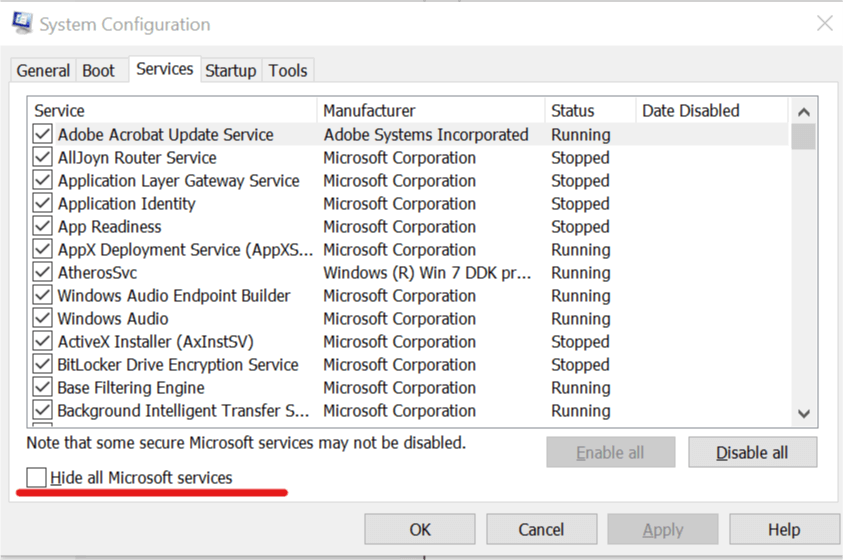
- In the System Configuration window, click on Services tab.
- Now, click on “Hide all the Microsoft Services” option. This will hide all the essential Microsoft Services.
- Now you need to disable all the remaining services. Click on the “Disable All” button.
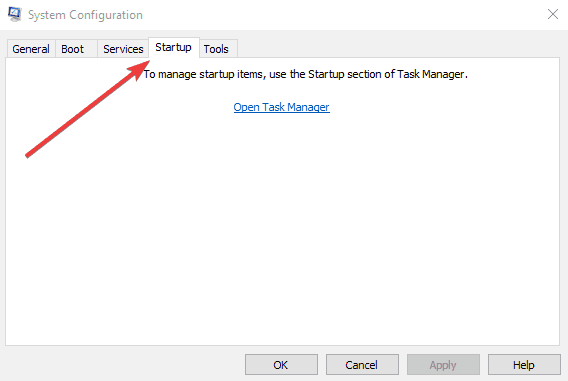
- Go to the Startup tab and click on the Open Task Manager.
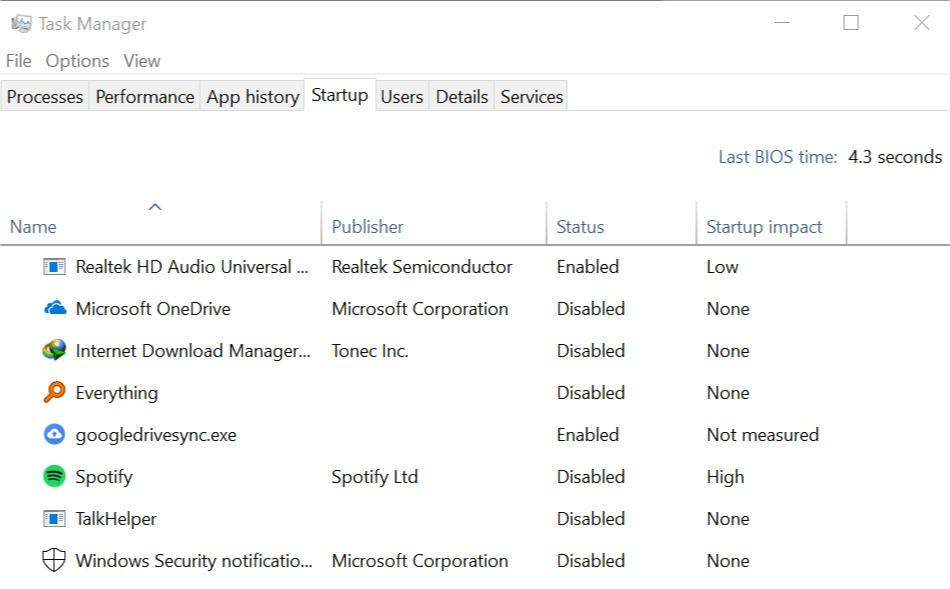
- In the Task Manager window, under the Startup tab, select all the startup apps and click on Disable. Disable all the apps one by one.
- Close the Task manager and go back to the System Configuration window.
- Click Apply and then click OK to save the changes.
- Close the System Configuration window and restart your system.
Delete Microsoft Office Document Cache
After the system restarts in Clean Boot state, do the following.
- Type Microsoft Upload Center in the Cortana/Search bar.
- Click on Microsoft Upload Center to open it.
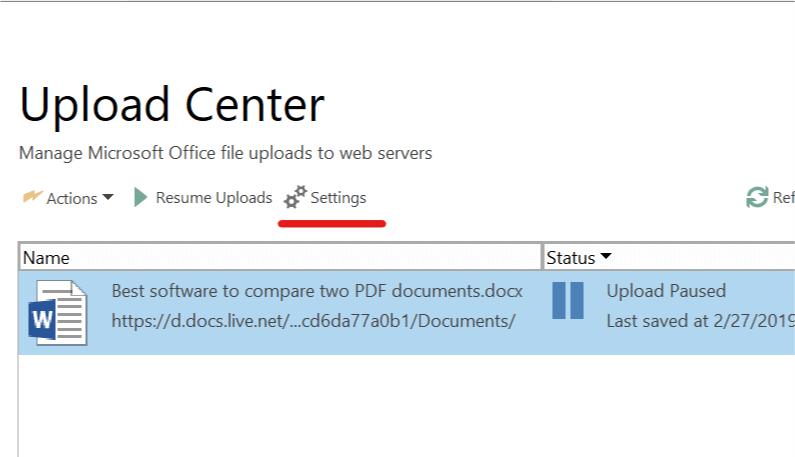
- Now, click on Settings.
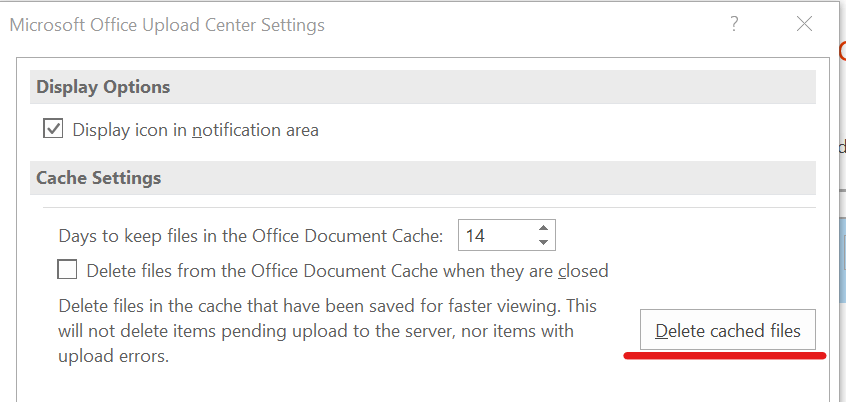
- Click on the Delete cached files button to delete the cache. Click OK.
- Close Microsoft Upload Center.
Open System Configuration and enable all the services that you disabled. After the restart, you should have resolved the Microsoft Office Document cache error.
2. Kill Microsoft Upload Center Task / Delete Registry Keys
If the issue persists, you can try to kill the Upload Center services and then delete the Cache files manually. We will also delete a few keys from the Registry editor. Here is a three-step guide to doing the same.
Kill the Upload Center Task
- Right-click on the Taskbar and select “Task Manager”.
- In the Process tab, click on the Name tab to sort using the name.
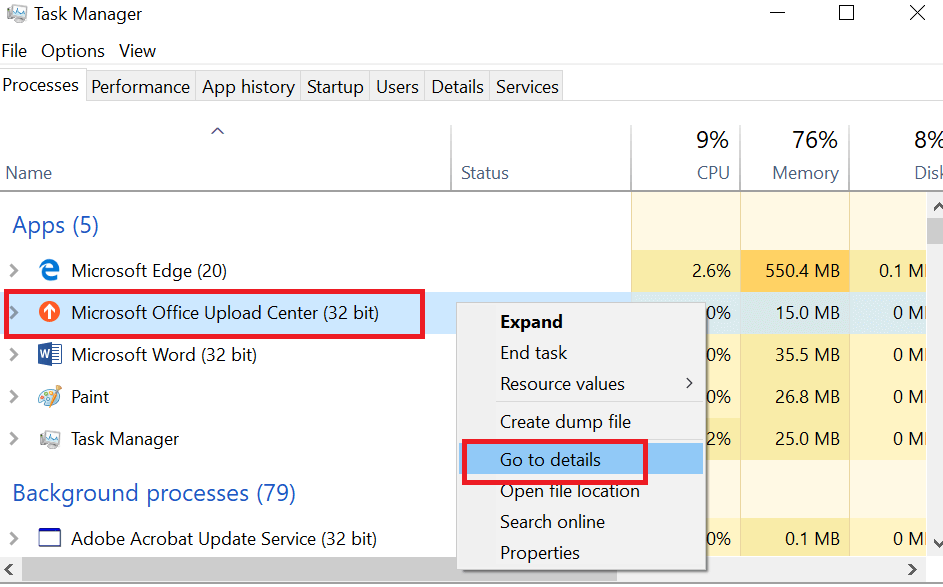
- Look for a process named “Microsoft Office Upload Center”.
- Right-click on Microsoft Office Upload Center and click on “Go to details”.
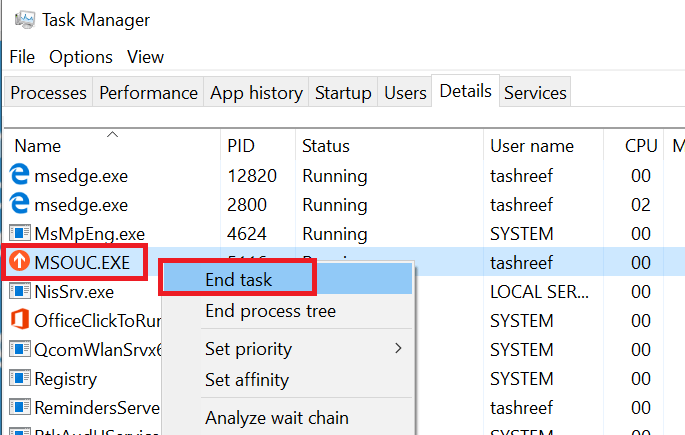
- Here you can see all the service that “Microsoft Upload Center” is using.
- Right-click on “NSOUC.EXE” and select End Task.
- See if any other Microsoft Upload Center related services are running. Select all the related services and click on End Task. If no more services found, close the Task Manager.
Delete FileIO Registry Keys
- Press Windows Key + R.
- Type regedit and hit Enter.
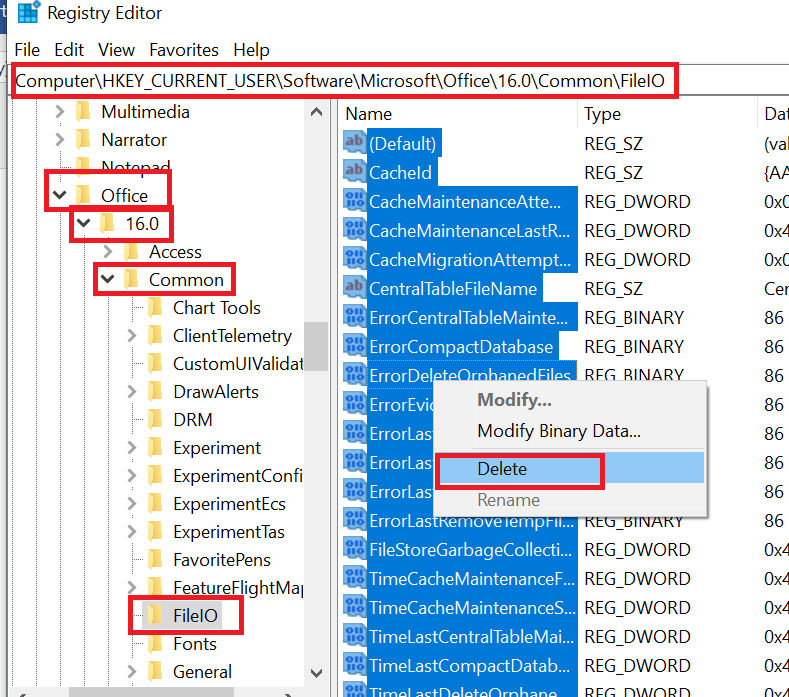
- In the Registry Editor, navigate to the following location:
ComputerHKEY_CURRENT_USERSoftwareMicrosoftOffice16.0CommonFileIO
- Delete all the keys inside the FileIO folder.
- Close the Registry Editor.
Want to block access to registry editing tools? Here’s how to do that properly!
Rename and Delete OfficeFileCache Folder
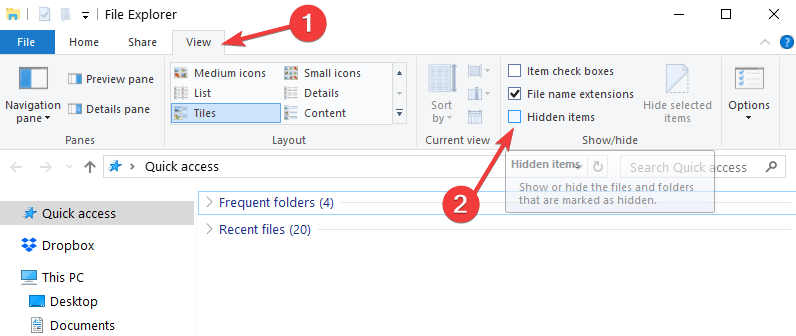
Note: First make sure to enable Hidden Items in the File Explorer to unhide any hidden items in the Office folder.
- Open “File Explorer”.
- Click on the View tab.
- Under the Show/Hide section “Hidden items” box is checked.
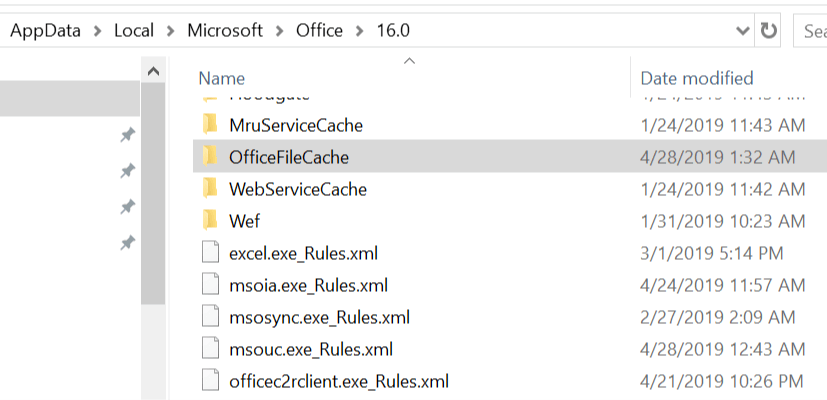
- In the File Explorer navigate to the following location.
%userprofile%AppDataLocalMicrosoftOffice- Open your Office version folder. In this case, it is office 2016/2019 so click on 16.0. If you are running Office 2013, click on 15.0 folder.
- Here you should see a folder named OfficeFileCache.
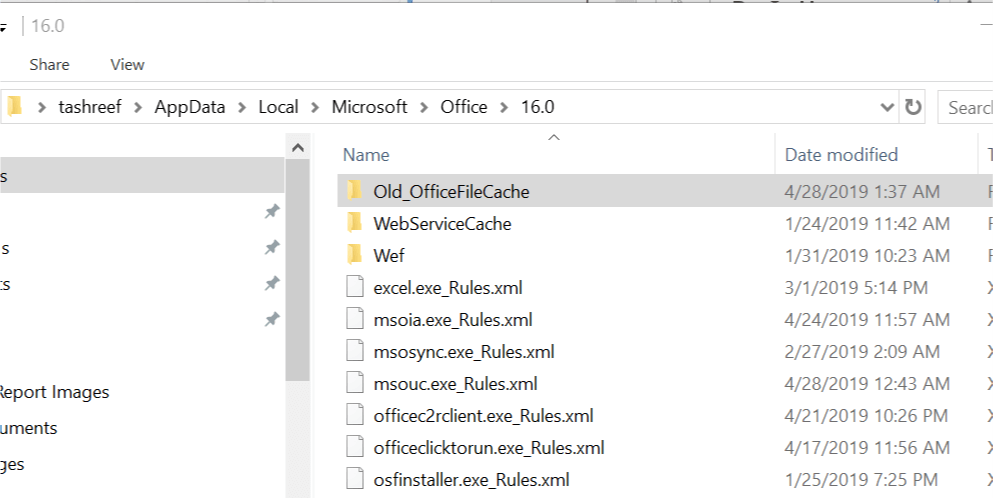
- Select the OfficeFileCahche folder and rename it as Old_OfficeFileCache.
- After the file is renamed, reboot/restart the system.
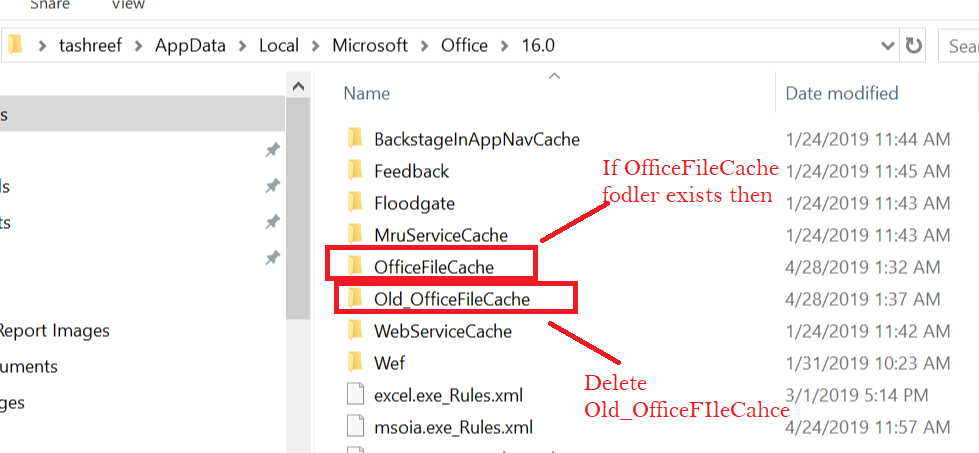
- After the Restart check if the Microsoft Upload Center is recreating the folder named OfficeFileCache inside
%userprofile%AppDataLocalMicrosoftOffice16.0 - If the new OfficeFileCache Folder is created, delete the Old_OfficeFileCache folder.
3. Uninstall Skydrive
If you have SkyDrive installed, you can fix the issue by uninstalling Skydrive and then reinstalling it. Here is how to do it.
- Launch Skydrive and remove your computer from the drive.
- Go to Control > Program > Programs and Features. Select Skydrive and click on Uninstall.
- Download and Install Skydrive.
- Reboot your system and check for any improvements
4. Use third-party software for Office errors
Another solution is to use a reliable third-party tool that is compatible with every version of Microsoft Office and aims to repair, as well as recover damaged or corrupted files.
This is an easy and safe way to retrieve important data you lost in its original form and fix .doc, .docx, XLS/.XLSX, and .ppt/.pptx/.pptm files.
⇒ Get Stellar Repair for Office
RELATED STORIES YOU MAY LIKE:

User forum
0 messages