Unable to Install Windows on Dynamic Disk Partition? Try This
Give a try to these quick methods right away
4 min. read
Updated on
Read our disclosure page to find out how can you help Windows Report sustain the editorial team. Read more
When you try to install Windows 10 on a dynamic disk, you may encounter the Windows cannot be installed to this hard disk space error. This error occurs because, to install Windows, you must convert the dynamic disk space to a basic disk.
The full error reads:
Windows cannot be installed to this hard disk space. The partition contains one or more dynamic volumes that are not supported for installation
As discussed earlier, to resolve this error, you must convert the dynamic disk to basic, which can be done in multiple ways.
If you are also troubled by this error, here are the three ways to resolve Windows that cannot be installed to this hard disk space error while installing Windows.
How do I fix the Windows installation hard disk error?
1. Convert dynamic disk to basic using the Disk Management tool
- Press the Windows Key + R to open Run.
- Type diskmgmt.msc and click OK to open Disk Management.
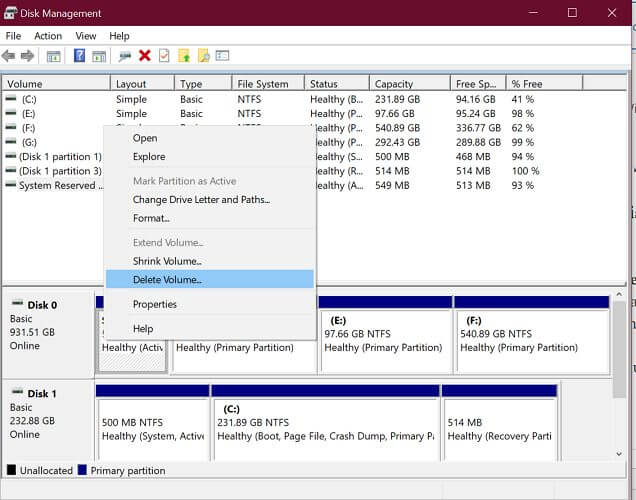
- The dynamic disk that needs converting will be shown in Disk Management.
- Right-click on every volume on the dynamic disk and select Delete Volume.
- Once all the volumes on the dynamic disk are deleted, you will see the dynamic disk presented as unallocated disk space.
- Right-click on the disk and select Convert to basic.
- Once the disk is converted to basic, try to install Windows and check for any improvements.
The built-in disk management tool makes it easy to convert dynamic disk to basic disk. However, the process deletes all the data on the disk during conversion.
2. Convert with professional software
- Download AOMEI Partition Assistant from the official website.
- Install and launch the AOMEI Partition Assistant.
- The tool will detect the dynamic disk.
- Click on Launch AOMEI Dynamic Disk Manager.
- It will launch AOMEI Dynamic Disk Manager.
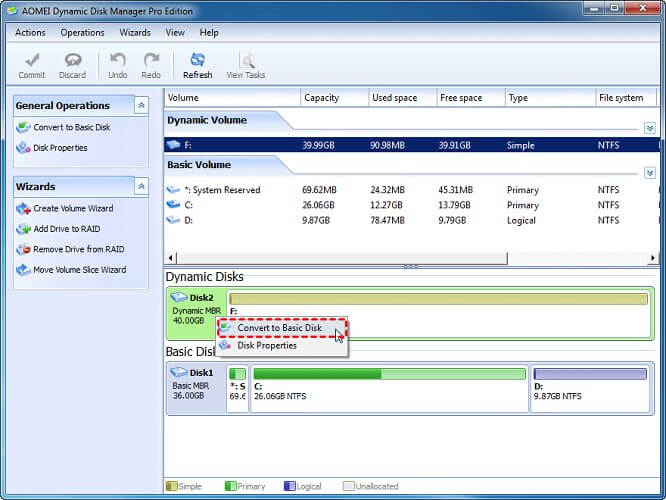
- In the main interface, find the dynamic disk that you want to convert.
- Right-click on the dynamic disk and select Convert to Basic Disk.
- Click OK to confirm the action.
- Return to the main interface again.
- Click on Commit and then click on Proceed to complete the process.
The AOMEI Partition Assistant tool may take a few minutes to complete the task. Once done, the disk is ready to install Windows without losing any data.
While the Windows OS has a built-in disk management tool, it cannot convert the disk to basic from dynamic without deleting the data.
3. Convert dynamic disk to basic using Diskpart
- Press the Windows Key + R to open Run.
- Type diskpart and click OK to open the Diskpart tool.
- This Command Prompt-based utility requires you to execute a few commands to convert the disk.
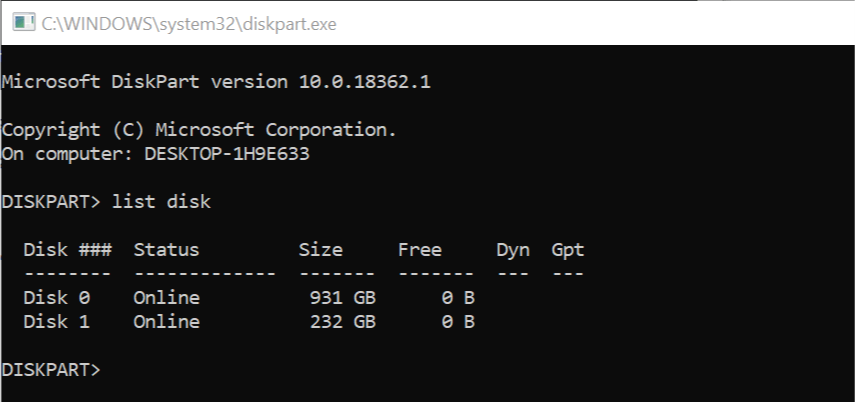
- In the command prompt, enter the following command to list disks.
- list disk
- Enter the following command to select the disk you want to convert. In the below command N refer to the disk number of the dynamic disk that you want to convert.
- select disk n
- Next, enter the following commands one by one:
- list volume
- select volume m
- m is the number of the volume on the dynamic disk
- delete volume
- Repeat the two commands select volume m and delete volume to delete all volumes
- select disk n
- convert basic
- While executing the command, make sure you have selected the right disk before deleting the volume and converting it.
Windows cannot be installed on this hard disk space since the partition contains one or more dynamic volumes not supported for installation. If you’re struggling with this solution, you can find a complete guide on how to convert your dynamic disk to a basic disk on Windows.
Let us know which of the above methods worked best for you by leaving us a message in the comments section below.



User forum
0 messages