How to Fix ACPI.sys Error on Windows 10 & 11
Run a disk check to resolve the issue
Key notes
- This error occurs if your system files are corrupted, there are hardware issues or the driver related to it is outdated.
- To fix it, update ACPI drivers, run SFC & DISM scans, use an antivirus tool, or perform a system restore.

The ACPI.sys file is a critical system file that controls power management and other related functions on Windows 10 and 11. If you encounter ACPI.sys error, it can cause your computer to crash or become unresponsive.
In this guide, we will discuss several potential solutions to fix this issue and ensure your PC runs smoothly.
What causes the ACPI.sys error on Windows 10 & 11?
There could be various reasons for this error; some of the common ones are mentioned here:
- Corrupted system files – If the ACPI.sys file or other system files become damaged or corrupted; it can cause the error. Try repairing the system files using an SFC scan.
- Outdated or faulty drivers – Outdated or incompatible drivers can also cause the ACPI.sys error. To fix it, you must keep your drivers updated to the latest version.
- Malware infection – Malware can infect critical system files on your PC, causing this error. Run a deep scan using an antivirus tool to fix it.
- Incompatible software – Some software programs or apps can also cause issues, like ACPI.sys error if incompatible with your computer.
- Hardware issues – Faulty hardware components, such as RAM or hard drives, can also cause the error. Try running a disk check to fix the problem.
Now that you know the causes of the error, let’s jump into the solutions.
How can I fix the ACPI.sys error on Windows 10 & 11?
Before engaging in advanced troubleshooting steps, you should consider performing the following checks:
- Try restarting the computer.
- Uninstall the unwanted applications.
- Make sure there are no pending Windows updates.
If these minor tweaks don’t work for you, move to the detailed methods mentioned below.
1. Update or rollback the ACPI driver
- Press Windows + R to open the Run dialog box.

- Type devmgmt.msc and click OK to open Device Manager.
- Locate and click System devices.
- Right-click the ACPI driver and Update driver.

- Click Search automatically for drivers.

- Follow the onscreen instructions to complete the process.
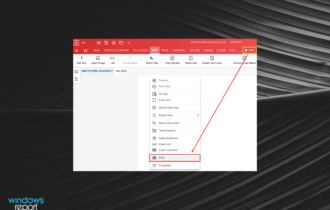
- If that doesn’t work, right-click the ACPI driver and click Properties.

- Go to the Driver tab, and select Roll Back Driver.

- Select the reason and click Yes.

The driver will be reverted to the previous version in a few minutes.
However, you always have a better alternative to update drivers on your PC without much effort or time.
There is a dedicated application that can diagnose all the outdated drivers and update them automatically in minutes.
2. Run SFC & DISM scans
- Press the Windows key, type cmd, and click Run as administrator.

- Type the following command to repair system files and hit Enter:
sfc/scannow
- Wait for the scan to complete, copy & paste the following command to restore the Windows OS image, and press Enter:
Dism /Online /Cleanup-Image /RestoreHealth
- Once the scan is complete, your PC will automatically connect to the Windows Update service to download and replace the corrupt files.
- Restart your computer to save the changes.
3. Run a disk check
- Press Windows + E to open File Explorer.
- Click This PC, then right-click system drive and select Properties.

- Go to the Tools tab, and under Error checking, click the Check button.

- Click Scan drive.

- Follow the onscreen prompts for Windows to detect and resolve the errors.
- Restart your PC to confirm the changes.
4. Run a malware scan
- Press the Windows key, type windows security, and click Open.

- Go to Virus & threat protection and click Scan options.

- Select Full scan and click Scan now.

- The scan will scour for infected files and list them. Delete them to fix the issue.
5. Perform a System Restore
- Press the Windows key, type control panel, and click Open.

- Select Large icons as View by and click Recovery.

- Click Open System Restore.

- On the System Restore window, select Choose a different restore point and click Next.

- Select a restore point and click Next.

- Click Finish.

Windows will restart and restore the computer to the previous version. If System Restore didn’t complete successfully, we advise you to read the informative guide to find the solutions.
Before you go, don’t forget to check our in-depth guide on ACPI BIOS ERROR for more potential solutions. We also have a guide on how to download the ACPI ATK0110 driver, so you might want to check it out.
So, these are methods that you can follow to fix the ACPI.sys error. If you have questions or suggestions, feel free to mention them in the comments section below.
Read our disclosure page to find out how can you help Windows Report sustain the editorial team. Read more


Improve this guide


User forum
0 messages