Active Directory Web Services Not Running: Error 1053
Changing the timeout settings will provide the app with additional time
![]() 4 min. read
4 min. read
![]() Published on
Published on
Share this article
Improve this guide
Read our disclosure page to find out how can you help Windows Report sustain the editorial team. Read more
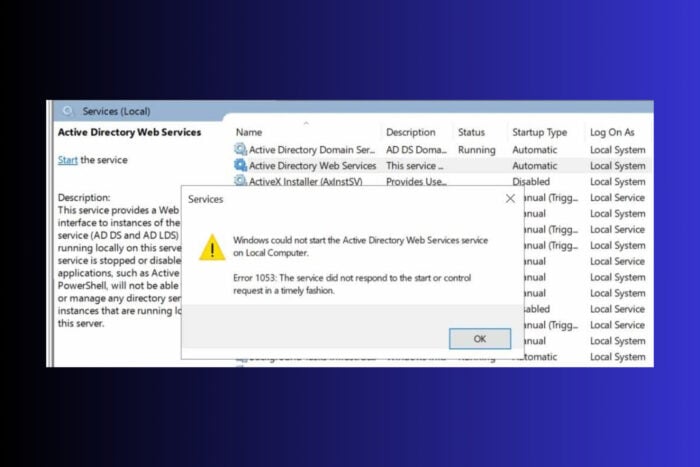
Dealing with the Active Directory Web Services error 1053 can be a real headache. This error typically indicates that a service is taking too long to start, leading Windows to declare it unresponsive. Let’s dive into some effective solutions to tackle this issue.
How do I fix the Active Directory Web Services error 1053?
1. Change the timeout settings from the Registry
- Press Win + R keys to open the Run dialog box, type regedit and hit Enter to open the Registry Editor.
- Navigate to the following path:
HKEY_LOCAL_MACHINE\SYSTEM\CurrentControlSet\Control - Right-click on the right pane and select New > DWORD (32-bit) Value.
- Name the new value ServicesPipeTimeout.
- Double-click on ServicesPipeTimeout and set its Value data to 180000.
- Click OK and close the Registry Editor, then restart your computer to apply the changes.
This solution increases the service timeout period, allowing the service more time to start before Windows declares it unresponsive, which can resolve the 1053 error if it’s caused by timeout issues.
2. Check system file corruptions
- Press Win + S to open the search bar, type cmd, and select Run as administrator.
- In the Command Prompt, type sfc /scannow and press Enter.
- Wait for the scan to complete and repair any corrupted system files.
- If issues are found that cannot be repaired, type the following commands one by one and press Enter after each:
DISM /Online /Cleanup-Image /CheckHealthDISM /Online /Cleanup-Image /ScanHealthDISM /Online /Cleanup-Image /RestoreHealth
- Restart your computer after the scan completes.
Running System File Checker (SFC) and the Deployment Imaging Service and Management Tool (DISM) can fix any corrupted or missing files that might be causing the 1053 error.
3. Check for Windows Updates
- Press Win + I to open the Settings app.
- Navigate to Update & Security.
- Click on Check for updates and install any available updates.
- Restart your computer after installing the updates.
Updating Windows can often resolve underlying issues that cause services to fail to start by patching known bugs and improving system stability.
4. Reset Winsock
- Press Win + S, type cmd and select Run as administrator.
- In the Command Prompt, type the following command and press Enter to run it:
netsh winsock reset - Now, type the next command and press Enter:
ipconfig /renew - Restart your computer.
Resetting Winsock and renewing the IP configuration can fix networking issues that prevent services from starting properly, which can sometimes cause the 1053 error.
5. Check the .NET Frameworks
- Press Win + S to open the search bar and type Windows Features.
- Click on Turn Windows features on or off.
- Ensure that all necessary .NET Framework versions are checked (e.g., .NET Framework 3.5 and 4.8).

- If any required versions are missing, download them from the official Microsoft website and install them.
- Restart your computer.
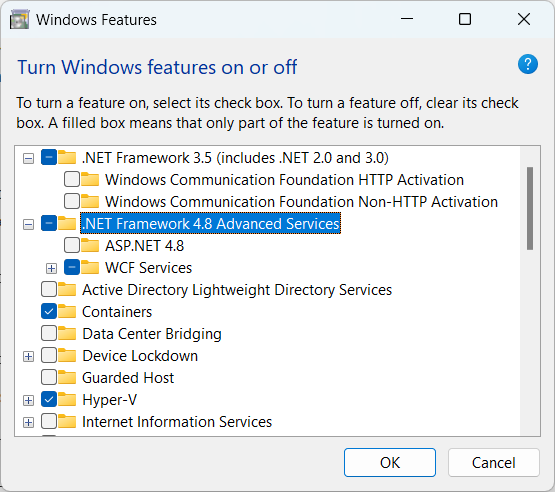
Ensuring that the required .NET Framework versions are installed can resolve compatibility issues that cause services to fail to start.
6. Take ownership of the application
- Navigate to the folder where the application resides.
- Right-click on the application folder and select Properties.
- Go to the Security tab and click on Advanced.
- Click on Change next to the owner field.
- Enter your username and click Check Names to ensure it’s correct.
- Click OK and then Apply.
- Ensure your user account has full control permissions on the folder.
- Click OK to apply the changes and close the properties window.
Taking ownership of the application folder can resolve permissions issues that prevent services from starting.
7. Reinstall the application (if applicable)
- Press Win + R, type appwiz.cpl, and press Enter to open the Programs and Features window.
- Locate the problematic application, right-click on it, and select Uninstall.
- Follow the prompts to remove the application.
- Restart your computer.
- Download the latest version of the application from the official website.
- Install the application and retry starting the service.
Reinstalling the application ensures that all its components are correctly installed and up-to-date, which can fix the 1053 error if caused by a corrupt installation.
Keeping your system updated and regularly checking for file corruptions can prevent many issues, including the Active Directory Web Services Error 1053.
While we’re at this, here’s our guide on how to enable Active Directory Users and Computers on Windows 11.
If the Active directory domain services is unavailable, click on the highlighted link for the guide that will help you fix the problem.
Did you manage to fix the Active Directory Web Services error 1053 using our solutions? Let us know in the comments below.


User forum
0 messages