Add a Switch Power Plan Option to Desktop in Windows 10
Learn how to add power plans to desktop and switch them
Key notes
- Before adding the Change Power Plan option on the Desktop context menu, create a restore point.
- Now you need to add a few values to the Registry Editor for adding Power Plans in the Desktop Background folder.
Windows 10 lets you customize your various PC settings, including Power Plan options, to have a personalized experience.
Power plans control various settings, such as display brightness, processor performance, and sleep timers, to optimize computer performance or conserve energy.
However, despite the numerous power plan options available in Windows 10, users have long desired a convenient and accessible way to switch between them directly from the desktop.
In this article, we will discuss the steps to add a submenu to your Desktop on Windows 10 to switch Power Plan with 2 clicks.
How can I create a desktop shortcut to switch Power Plans?
Before proceeding with any steps to create a desktop shortcut to switch Power Plans, go through the following preliminary checks:
- Make sure you are logged in using a user account with administrator privileges.
- Back up the registry entries (Go to File, click Export, and save the .reg file in the desired location).
- Create a restore point.
- Back up your important data.
Once done, move to the step-by-step instructions to get the job done.
1. Know the GUIDs of Power Plan options
 NOTE
NOTE
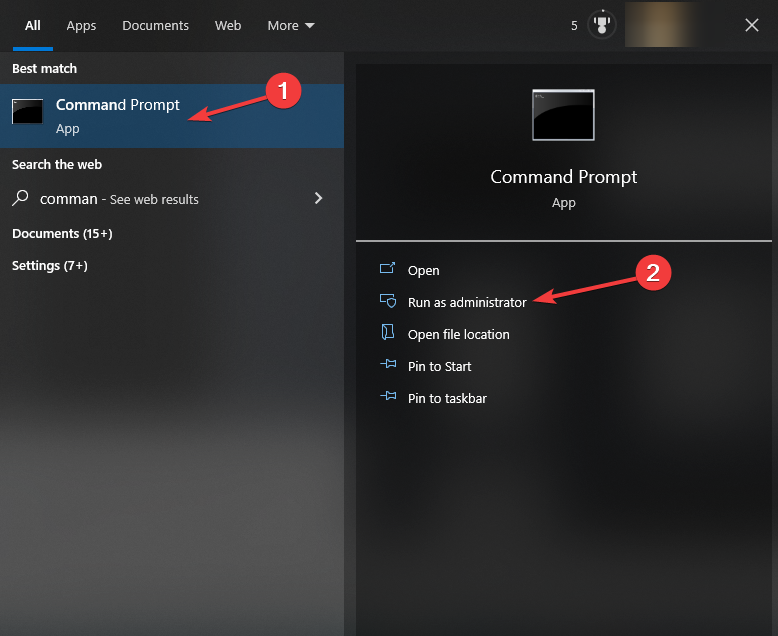
- Press the Windows key, type cmd, and click Run as administrator.
- Type the following command to know the existing power schemes and hit Enter:
powercfg /L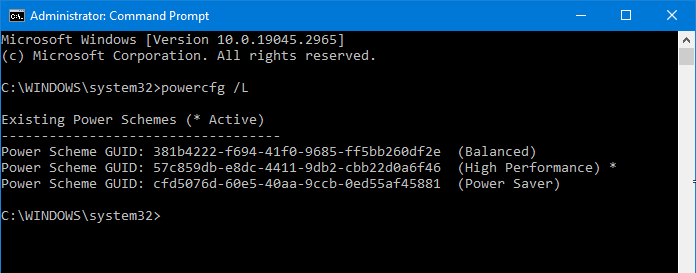
- You will get the list of Power plans along with the GUIDs. Note down the GUID for the customized plan.
2. Save the script in Notepad
- Press the Windows key, type notepad, and click Open.
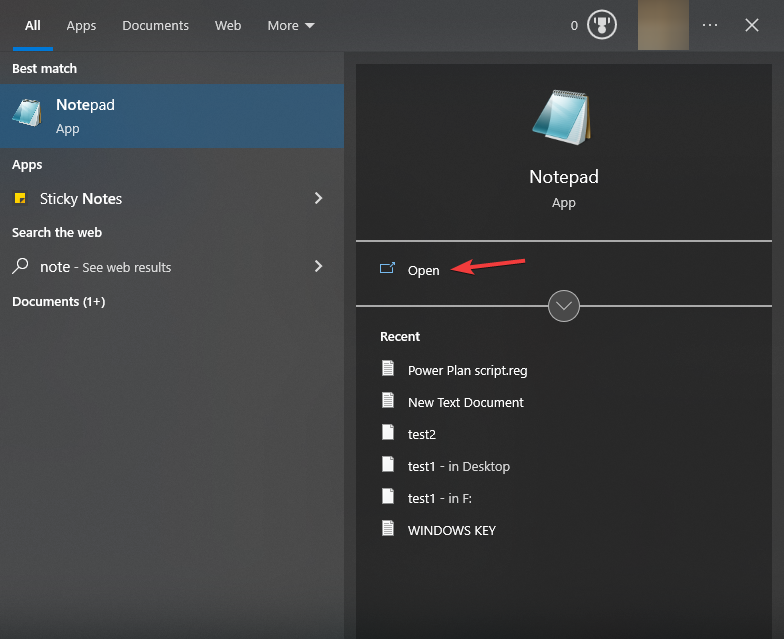
- Copy & paste the following script and press Enter:

Windows Registry Editor Version 5.00
[HKEY_CLASSES_ROOT\DesktopBackground\Shell\PowerPlan]
"Icon"="powercpl.dll"
"MUIVerb"="Choose Power Plan"
"Position"="Middle"
"SubCommands"=""
[HKEY_CLASSES_ROOT\DesktopBackground\Shell\PowerPlan\Shell\01menu]
"MUIVerb"="Power Saver"
"Icon"="powercpl.dll"
[HKEY_CLASSES_ROOT\DesktopBackground\Shell\PowerPlan\Shell\01menu\command]
@="powercfg.exe /setactive a1841308-3541-4fab-bc81-f71556f20b4a"
[HKEY_CLASSES_ROOT\DesktopBackground\Shell\PowerPlan\Shell\02menu]
"MUIVerb"="Balanced"
"Icon"="powercpl.dll"
[HKEY_CLASSES_ROOT\DesktopBackground\Shell\PowerPlan\Shell\02menu\command]
@="powercfg.exe /setactive 381b4222-f694-41f0-9685-ff5bb260df2e"
[HKEY_CLASSES_ROOT\DesktopBackground\Shell\PowerPlan\Shell\03menu]
"MUIVerb"="High Performance"
"Icon"="powercpl.dll"
[HKEY_CLASSES_ROOT\DesktopBackground\Shell\PowerPlan\Shell\03menu\command]
@="powercfg.exe /setactive 8c5e7fda-e8bf-4a96-9a85-a6e23a8c635c"
[HKEY_CLASSES_ROOT\DesktopBackground\Shell\PowerPlan\Shell\04menu]
"MUIVerb"="Ultimate Performance"
"Icon"="powercpl.dll"
[HKEY_CLASSES_ROOT\DesktopBackground\Shell\PowerPlan\Shell\04menu\command]
@="powercfg.exe /setactive e9a42b02-d5df-448d-aa00-03f14749eb61"
[HKEY_CLASSES_ROOT\DesktopBackground\Shell\PowerPlan\Shell\05menu]
"MUIVerb"="Power Options"
"Icon"="powercpl.dll"
"CommandFlags"=dword:00000020
[HKEY_CLASSES_ROOT\DesktopBackground\Shell\PowerPlan\Shell\05menu\command]
@="control.exe powercfg.cpl"
- Click File, then Save as.

- Now for the File name, type Power Plan.reg, and for Save as type, choose All Files from the drop-down.
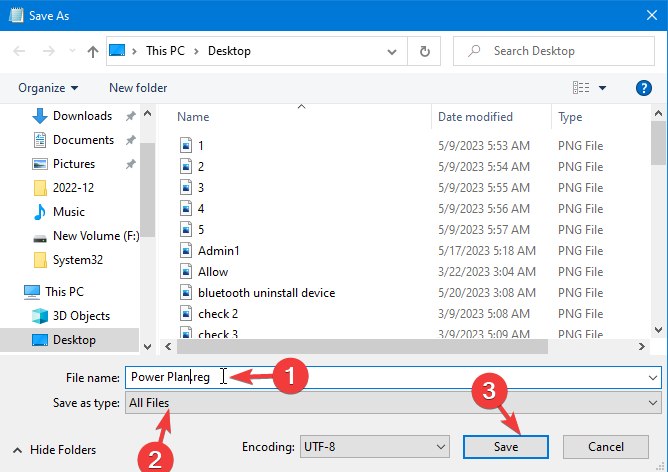
- Save it on the Desktop and click Save.
- Double-click the file to run, and click Yes on the UAC prompt by Registry Editor.
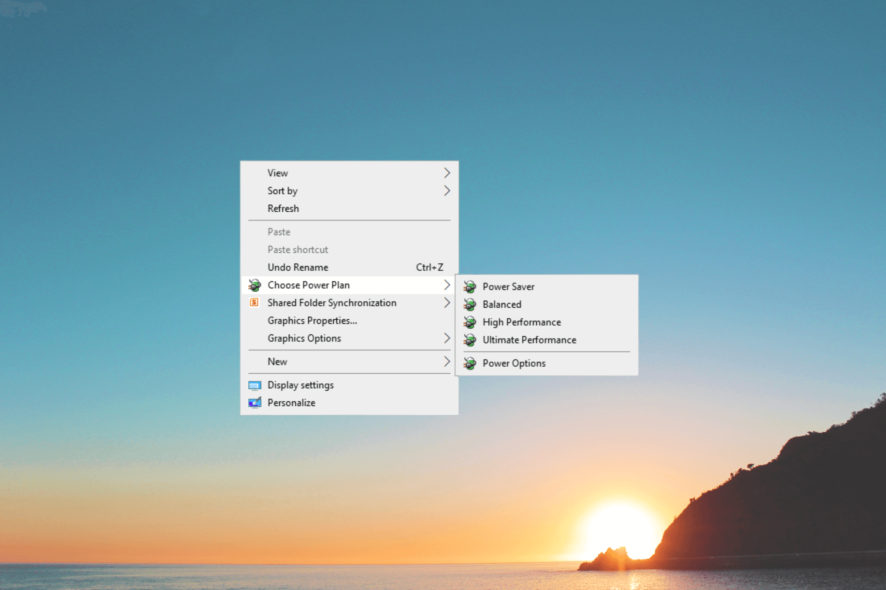
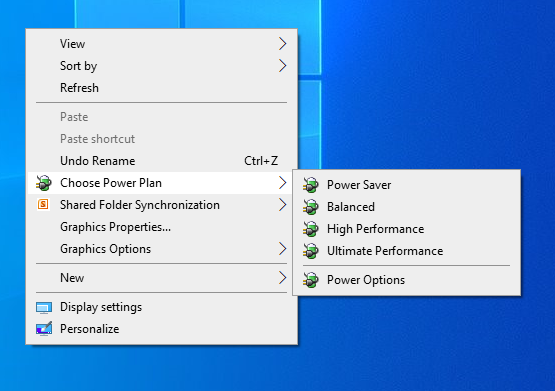
- Once the script has run, right-click on the desktop, select Choose Power Plan, and choose any of the plans you want.
If you have created a customized Power Plan, you can add it to the script along with its GUID to make it appear on the Desktop menu.
How can I remove the Change Power Plan submenu from Desktop?
- Press Windows + R to open the Run window.
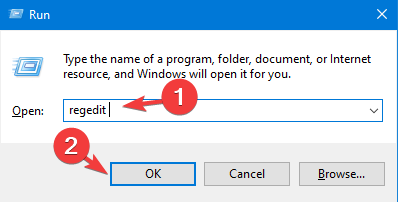
- Type regedit and click OK to open the Registry Editor.
- Navigate to this path:
Computer\HKEY_CLASSES_ROOT\DesktopBackground\Shell\PowerPlan - Right-click the Power Plan key and choose Delete to remove it.
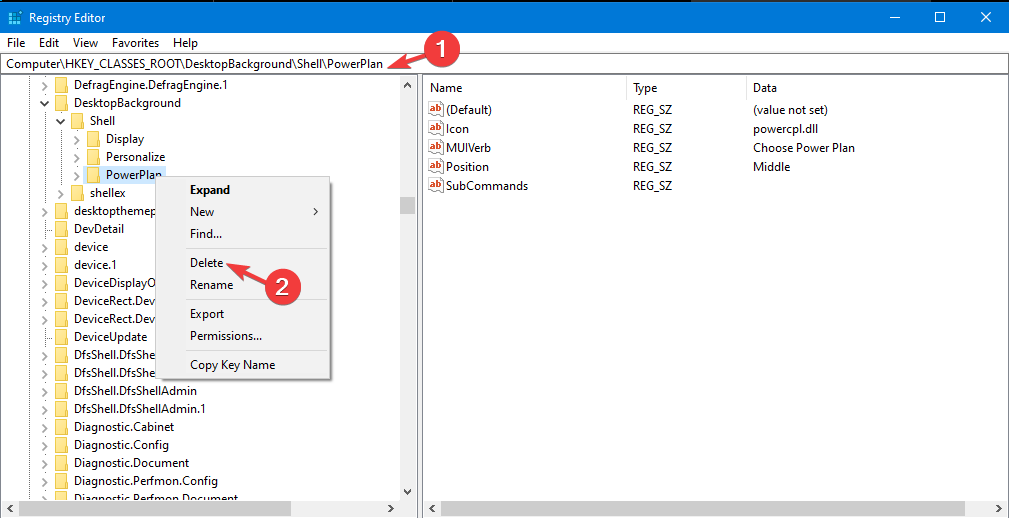
- Restart your computer to let the changes take effect.
So, these are steps that you can use to add switch power plan options on your Desktop for quick access to Power Plans and get better control over your computer’s performance.
If your Power Plan keeps on changing and you are looking for solutions, we suggest you check out this guide for solutions.
Please feel free to give us any information, tips, and your experience with the subject in the comments section below.
Read our disclosure page to find out how can you help Windows Report sustain the editorial team. Read more


Improve this guide


User forum
0 messages