Anycubic Kobra Neo 3D Printer Hands-on Review
Anycubic Kobra Neo is an affordable but sturdy 3D printer
Key notes
- If you’re a maker, Anycubic Kobra Neo is an affordable but sturdy 3D printer that will get you started.
- It’s easy to assemble and all the tools required are provided in the package.
- The 3D printer has a LeviQ auto-leveling feature that is great for beginners and seasoned users as well.

3D printers are now a must tool for makers and the ones who are passionate about DIY.
There are more 3D printer types but the most affordable are the plastic extruding printers.
We’ve tested the Anycubic Kobra Neo, one of the most affordable of its kind but, as you will see below, it does a pretty good job.
The Anycubic Kobra ships in a semi-assembled state and doesn’t require any decent experience and knowledge to put it together. This provides a beginner-friendly assembly experience.
In this article, we’re going to talk about the 3D printer’s installation, features, software, and how you can actually use it.
What are Anycubic Kobra Neo’s technical specifications?

First, let’s overview Anycubic Kobra Neo’s characteristics:
| Leveling | 25-point automatic leveling |
| Printing platform | 8.7 x 8.7 inches / 22 x 22 cm |
| Printing material | PLA / ABS / PETG & TPU |
| Nozzle size | ø 0.4 mm (replaceable) |
| Nozzle temperature | ≤ 500 °F / 260 °C |
| Hot bed temperature | ≤ 230 °F / 110 °C |
| Printing speed | ≤10cm/s (Max speed) |
| Control panel | 2.4″ LCD screen with a control knob |
| Z-axis | Single threaded rod |
| Printing dimensions | 25x22x 22 cm (HWD) |
| Machine dimensions | 49.0 x 44.5 x 44.3 cm |
Although it’s easy to look at the technical specifications to know what you’re dealing with, we need to mention some features that you usually don’t get from such an affordable 3D printer.
What are the best features of Anycubic Kobra Neo?
1. Easy automatic leveling with inductive sensor

The most important aspect of a 3D printer is to keep everything smooth and precise and the LeviQ 25-point auto-leveling technology makes things a lot easier for beginner users.
Manual leveling is time-consuming and requires decent experience and judgment. With the automatic leveling, you just select the calibration from the menu and in just a few minutes, the printer is ready for the job.
2. Double-sided PEI Spring Steel sheet

The heated printing platform is covered with a double-sided magnetic sheet that is wear-resistant, less breakable, and bendable.
Textured PEI beds make part removal easier because prints will stick to less surface area than on a smooth sheet, and the dips and highs of the bed will force the parts to pop off once the bed cools down.
So you can easily remove the prints, even the larger or more sticky PETG prints.
3. Direct Drive Extruder

The extruder is included in the print head and the Direct Drive system feeds the filament to the extruder at the right pace for constant flow during the printing process.
This way, you don’t need to worry about any filament entanglement and the finished print will be a lot more accurate.
Moreover, the printer also comes with a filament unloading option that pulls out the thread after you’re done printing.
4. 2.4-inch knob control LCD screen

The Kobra Neo also comes with a 2.4’’ knob-control LCD screen. The display is an easy-to-read display and the knob helps you navigate the menu system.
Truth be told, we were a bit surprised that it wasn’t a touchscreen but the push-knob was extremely convenient to use and we could perform all the actions quickly.
➡ High printing speed – Kobra Neo prints at a typical speed of 6cm/s and reaches 10cm/s at its highest speed which is not bad at all within the industry standards
Now that we know about its most important features, let’s see how we can actually assemble and use Anycubic Kobra Neo.
How do I use the Anycubic Kobra Neo 3D printer?
1. Anycubic Kobra Neo package and assembly

Everything comes packed safely, all the parts are protected by plastic foam so we didn’t find any pieces affected by transport although the box was sent all the way from China.
First of all, you should know that all the tools you need for the assembly and set-up of the printer are provided in the box.

Anycubic even included the SD card and USB flash drive with the software and user manual for the device.
You will also find a replacement nozzle, a nozzle cleaning tool, and 10 m of PLA filament to start your printing adventure.
It took us only about 20 minutes to assemble and tune-up of the printer because it’s extremely easy to do that.
Mounting the frame on the base with 4 screws, another 4 screws to mount the printing head on the frame, and another screw to mount the X-axis limit switch.

The last part is to mount the 2.4-inch screen with another 2 screws on the right side of the base.
2. Anycubic Kobra Neo set-up and printing
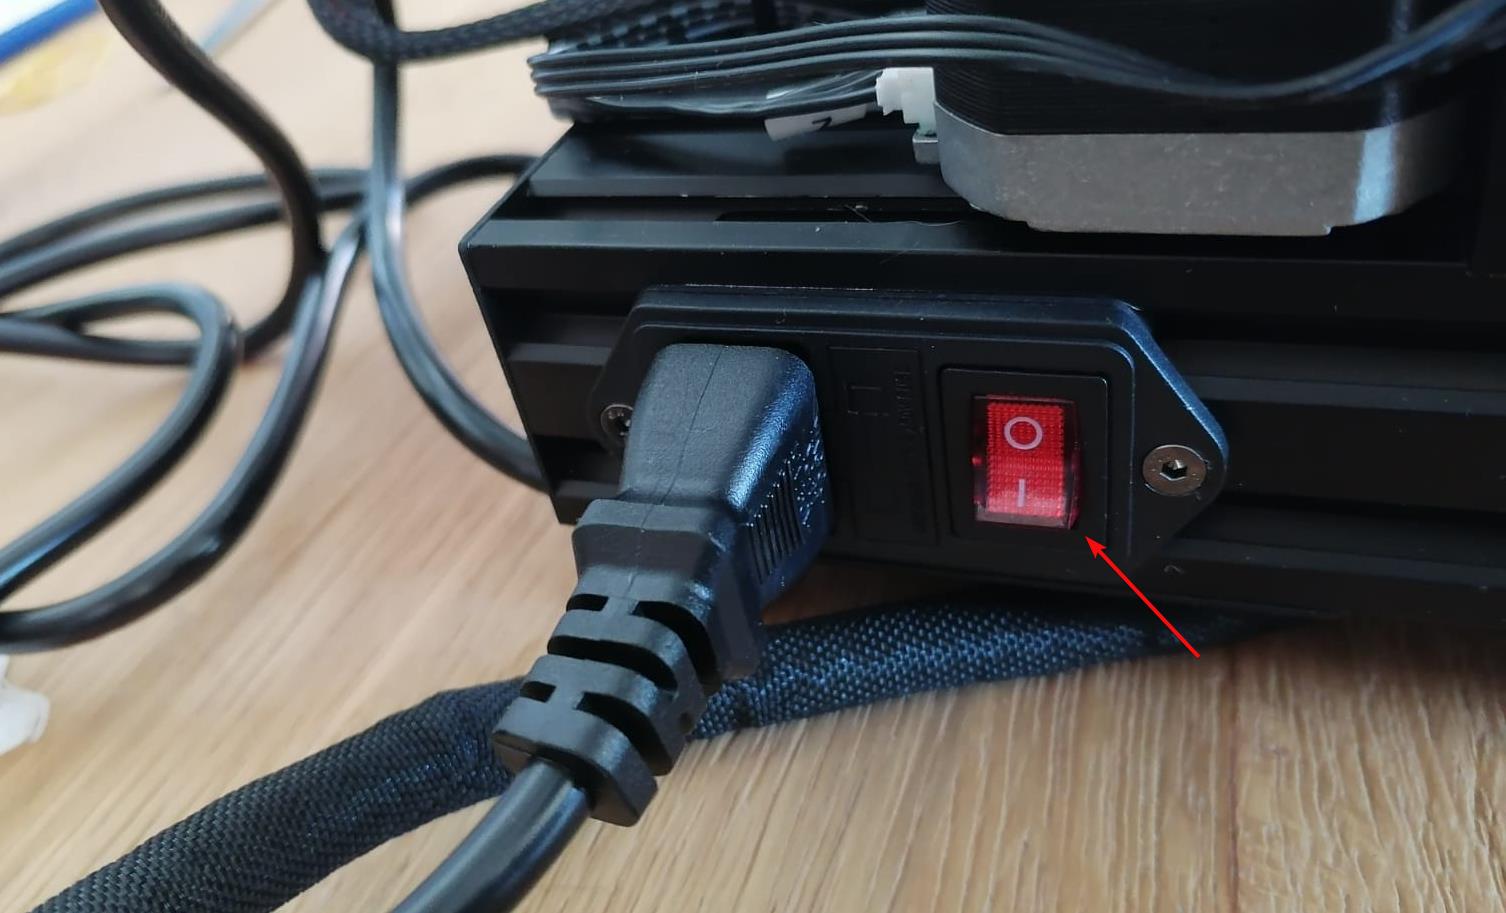
- After you finish installing all the components, look at the back of the printer and make sure that the power supply is set up for the right voltage available in your country (110V or 220V).

- Now, plug the power cord into the printer and outlet, then turn on the device.
- The screen will turn on. Turn the knob until you highlight the Menu, then press the knob.

- Turn the knob to reach Leveling and press the knob, then select Automatic leveling.
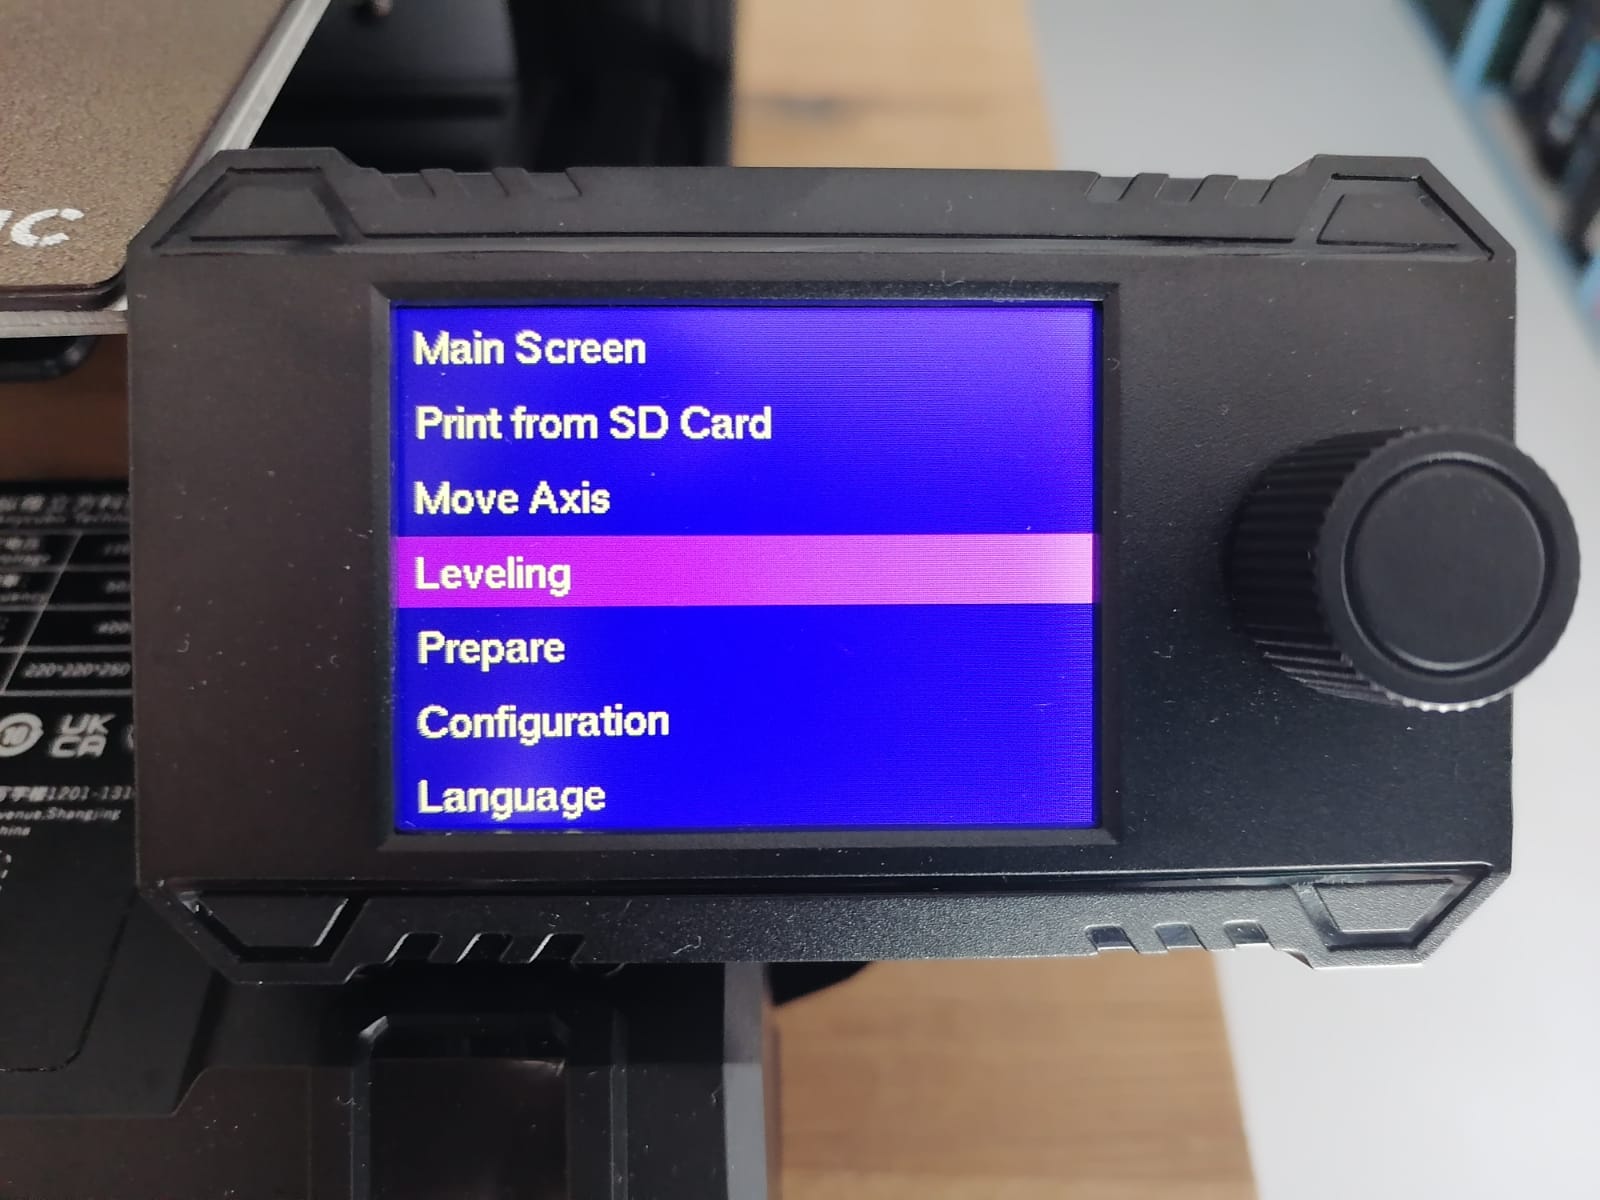
- The printer has a 25 points automatic leveling technology and the process will take a few minutes.
- After the process is done, you will see that on the screen.
- Now, cut the PLA filament to a 45-degree angle with the cutter from the package.
- Pull the lever on the print head, then insert the filament all the way down in the orifice.

- Now, insert the SD card provided with the package in the slot from the lower right part of the printer base.

- Rotate the screen knob to get to Menu, then select Print from SD card and press the knob.
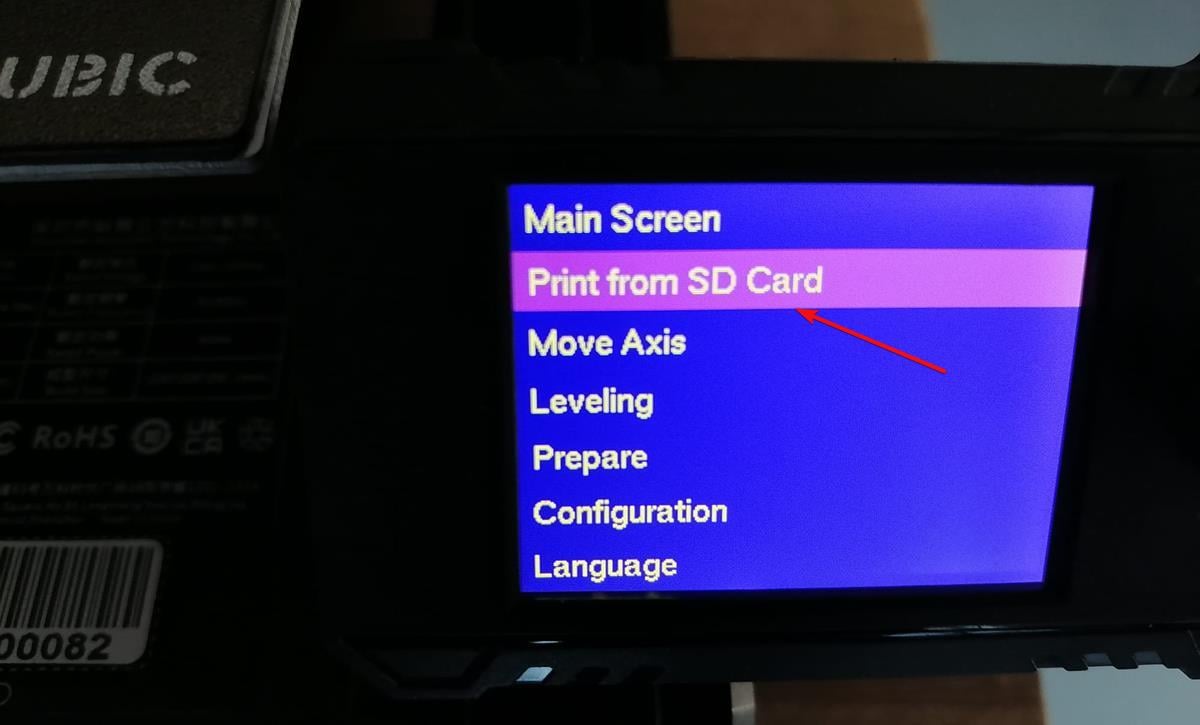
- You will see that you already have a small 3D model on the SD card which is perfect for testing your printer.
- After you select it, the nozzle will heat up and when it reaches the right temperature, the printing will start.
3. Printing 3D models from your PC
- Connect your PC/laptop to the printer with a USB-C cable. This one, unfortunately, is not supplied but you probably have one from your smartphone. That’s the one we used and it worked perfectly.

- Use the supplied USB flash on your laptop or PC and install the Cura software for 3D printing. If you have issues with the stick, you can find all the drivers and slicing app on the Kobra webpage.

- Once the software is installed, you will be prompted to add a printer. If not, click on the Settings menu, hover your mouse pointer over Printer and select Add a printer.

- Scroll down and click on Anycubic to expand the list of available printers. If you don’t find Kobra Neo within the results, go for Anycubic 4Max and click Add. It worked for us.

- Now, click on the Folder icon from the top-left corner and select the 3D model you want to print.

- After you load your 3D model, click the Slice button.

- Finally, hit the Print button.
After you start the printing, it will take a few minutes for the nozzle to reach the correct temperature. And within the software, you will be able to monitor the printing process, view the elapsed and estimated time for printing.
What were the Anycubic Kobra Neo printing results?
First, we chose a small 3D model to see how things work out. It took about 45 minutes to print. If you’re new to 3D printing, you should know that the machine doesn’t only print the 3D model itself.
It needs a base, a support structure that you need to remove after the printing is finished.

In the image above, on the left, you can see how the model looked right after finishing printing. On the right, we removed the excess support material and sanded the model a little bit.
Also, you should know that the Cura software is only a slicer, a program that breaks the model into layers so that the printer knows how to build the structure.
If you want to create your own objects, you will need a 3D modelling software and save your work in SLT or 3MF format. The software and printer support a lot of other formats, but these are the most used.
Next, we switched to a full-blown skeleton hand that turned out amazing, but it took about 5 hours to complete.

The image above was taken after removing the support PLA and sanding, but the whole process was smooth and uneventful.

We also got a large roll of silver color PLA, and we found a much larger model to try it out on.
The idea was to test the actual largest printing object that we could create with Anycubic Kobra Neo and we were not disappointed.
It took approximately 12 hours to print but after removing the scaffolding and sanding it looked amazing.
How do I get Anycubic Kobra Neo and what is its price?
It’s going to be a shocker but this 3D printer is priced at only $249 and it’s available for ordering straight from the manufacturer’s website.
Actually, if you hurry ups, there’s even an offer with extra $20 off sitewide $100+ order via PayPal Pay. Just use the code PAYPAL when you order to benefit from this deal.
- Pros
- Simple and easy installation
- Anycubic LeviQ auto-leveling
- All the tools for installation are included
- High volume printing dimmensions
- High printing speed
- Cons
- It doesn't come with a protection cover
- No wireless connectivity
Verdict
For this price, Anycubic Kobra Neo is really a remarkable tool. It’s very easy to assemble even for a beginner and it feels sturdy enough for any build.
The auto-levelling feature took all the pain away from any manual tweaking and the fact that absolutely all the required tools were inside the package helped a lot.
We only discovered a few downsides, the lack of wireless connectivity and the absence of a USB cable for connection.
However, for this small price, the provided SD card is more than enough to load up your 3D models.
Speaking of models, you might be interested in the best STL file software for 3D printing because you will need them to start creating.
We hope that our review raised your interest and knowledge of 3D printers. Tell us your opinion in the comments section below.
Read our disclosure page to find out how can you help Windows Report sustain the editorial team. Read more


Improve this guide


User forum
0 messages