How to Disable Microsoft Confidential Watermark in Windows 10, 8.1

Steps to remove Microsoft Confidential Watermark
- Tweak your Registry and create a new DisplayNotRetailReady key
- Change Ease of Access settings
- Additional solutions
If your Windows 10, Windows 8.1 operating system automatically installs new updates, this is because you chose to do so when you first installed Windows 10, 8.1. Unfortunately, if the operating system downloads and installs updates automatically, you might end up with a Microsoft confidential watermark on your desktop. Seeing that this can get pretty annoying sometimes, we will show you how you can disable this watermark and get on with your work.
The tutorial below will show you how to disable the Microsoft confidential watermark you have on your Desktop. You’ll access the Registry Editor feature you have in Windows 10, 8. From the “Registry Editor” feature, you’ll make the proper adjustments in the system to make the Microsoft watermark disappear. Make sure to follow the instructions in this tutorial very carefully. If you modify other options, this might cause various Windows 10, 8.1 errors.
Remove Microsoft confidential watermark
1. Tweak your Registry
- Press and hold on your keyboard the buttons “Window” and “R”.
- A “Run” window will pop up and in the run window type “regedit” without the quotes.
- Press the “Enter” button on the keyboard”.
- You will get a pop up from “User Account Controls” where you need to proceed by left clicking on “Yes”.
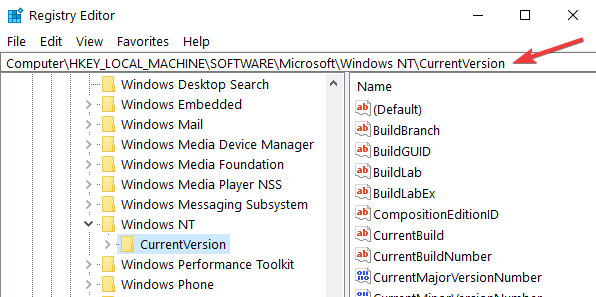
- Left click in the left side of the “Registry Editor” window on “HKLM”.
- In the “HKLM” folder left click on “Software”
- In the “SOFTWARE” folder left click on “Microsoft”.
- In the “Microsoft” folder left click on “Windows NT” to open it.
- In “Windows NT” folder left click on CurrentVersion”
- And finally, in the “CurrentVersion” folder, left click on “Windows”
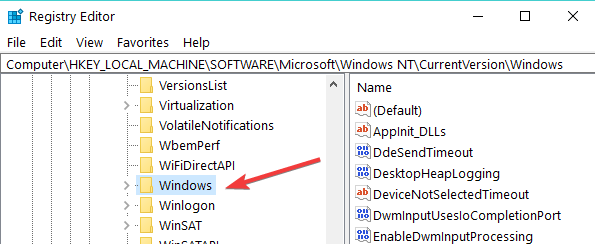
- On the right side, you will need to create a new “DWORD” file with the name “DisplayNotRetailReady” and double click on it to open.
- After you are in the Edit DWORD window of the “DisplayNotRetailReady” you created, write in the “Value data” the number “0” without the quotes or just leave it blank.
- Left click on the “OK” button you have in the “Edit DWORD” window.
- Close the Registry Editor.
- Now after a reboot of the Windows 10, 8 operating system, your watermark will be gone.
2. Change Ease of Access settings
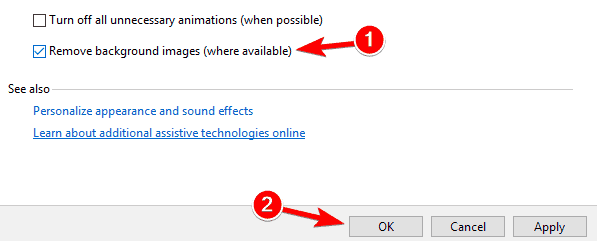
Another quick way to remove your Microsoft Confidential watermark is to change Ease of Access settings. Keep in mind that this solution also removes background images.
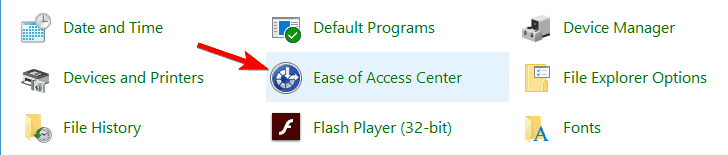
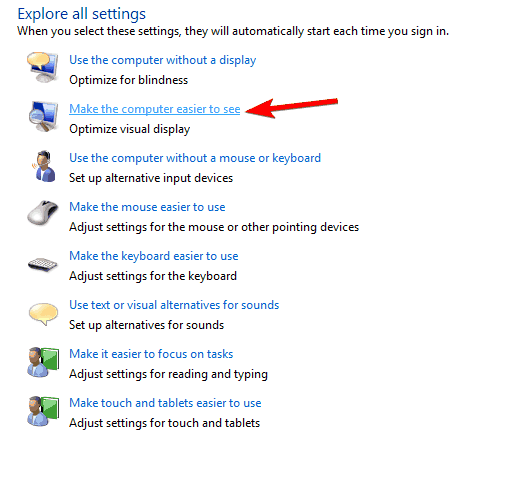
- Open Control Panel
- Go to Ease of Access Center
- Select Make the computer easier to see.
- Check Remove background images (where available) > Apply > OK.
3. Additional solutions
If your watermark is still there, you can also use our general troubleshooting guide on how to remove watermark in all Windows OS versions. Hopefully, one of the solutions listed there will help you fix the problem.
As you can see, you should be able to remove he Microsoft confidential watermark in Windows 10, 8.1 in just a few minutes. For any other questions on the subject, use the comment section. We will reply in the shortest time possible.
RELATED STORIES TO CHECK OUT:
- Erase watermarks with these watermark remover tools for Windows PCs
- Batch watermark software: The best tools to protect your images online
- Photo Stamp Remover: Windows 10, Windows 8 Watermark and Logo Removal Software
Read our disclosure page to find out how can you help Windows Report sustain the editorial team. Read more


Improve this guide


User forum
1 messages