BIOS Code 99: How to Fix it Effectively
Setting the SATA mode into AHCI should do here
Key notes
- The BIOS code 99 on a black screen is triggered by a hardware problem that prevents the OS from loading properly.
- In order to fix it, make sure that the SATA mode is set correctly in the BIOS.
- Also, check the time and date in the BIOS, as they can cause this problem.

If you try to boot or reboot your Windows device, but you get stuck on a black screen with the motherboard or BIOS error code 99 displayed in the bottom right corner, it means that something isn’t functioning as it should.
No, it’s not a Windows system malfunction but a hardware issue that is preventing the OS from loading properly, and that’s why the boot/reboot sequence cannot be completed.
Simply put, the Windows OS cannot be initiated. The motherboard 99 code is not even an actual error. It shows what stage it’s currently running, and in this case, we are discussing problems within Super IO Initialization.
Of course, the motherboard can cause the issue, but it might be something with the BIOS setup too. In this article, we will try to find the proper fix for PC error code 99 and kidiconnect error code 99, so keep reading.
How can I fix the BIOS error code 99?
Before delving into the solutions in this section, try the troubleshooting steps below:
- Verify the supply cables and make sure that HDD SATA is properly connected.
- Check all the other connections from your motherboard and make sure that everything is working by the book.
- Go to BIOS and check if the HDD is detected or not; if the HDD isn’t shown, you might have a faulty HDD.
- Disconnect the peripherals before initiating a new reboot – just remove any external devices attached to your Windows device.
- Try to boot up only the motherboard – unplug everything else besides your keyboard. Also, remove RAM and anything else that might not be required for an initial boot (including audio and USB from the motherboard). Please note that sound cards and NIC cards should be also disconnected.
- If you built your own PC, make sure that everything is connected as it should and that you didn’t forget anything else. Again, don’t hesitate and ask for an experienced opinion, depending on your own system configuration.
If the issue persists, proceed to the solution below:
1. Set the SATA mode into AHCI
- Press the Windows key, and type cmd.
- Right-click on Command Prompt, and select Run as Administrator.

- In the Command Prompt, enter the following command and hit the Enter key:
bcdedit /set {current} safeboot minimal (ALT: bcdedit /set safeboot minimal) - Restart your PC, and enter BIOS Setup.
- Set the SATA mode to AHCI instead of IDE or RAID.
- Select Save and exit.
- Now, launch Command Prompt as an admin again.
- Type the following command, and hit the Enter key:
bcdedit /deletevalue {current} safeboot (ALT: bcdedit /deletevalue safeboot) - Restart your PC once more, and Windows will automatically start with AHCI enabled.
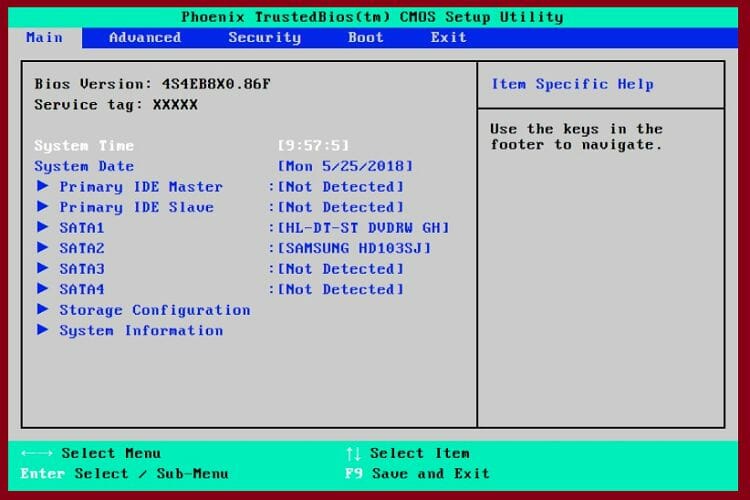
If you can go to BIOS, you should start the troubleshooting process by ensuring that the SATA mode is set into AHCI instead of IDE. Moreover, the boot order should follow the UEFI protocol by default.
2. Verify the Time and Date from BIOS
- While your PC boots, keep pressing Del or a certain F key to enter BIOS. Usually, there will be a message saying to press a certain key (F1, F2, F10) to enter SETUP. If you can’t find this key, check your motherboard manual.
- Once you get to the Main menu, you have to locate the Time and Date section. Navigate to the section by using the arrow keys, and verify the time and date.

- Select Save and Exit to exit.
3. Reset or update CMOS
You can even choose to reset or update CMOS, as this can easily fix the error code 99. Do note that depending on each manufacturer, the BIOS options might differ.
Updating BIOS without booting into Windows is possible only for newer motherboards, while making a reset can be done by accessing factory settings.
You can also reset the motherboard by removing and re-applying the BIOS battery, though this is a complex process that will imply disassembling your PC, so be careful and try not to mess things up even worse.
Don’t be afraid to ask for more experienced help if you are not a tech expert.
As already outlined, the debug code 99 describes Super IO Initialization issues. So, the fixes should focus on this particular field.
We hope that we managed to fix this problem with the help of the solutions listed above.
If you have any other suggestions or questions, please feel free to access the comment section below, we are very happy to hear from you.
Read our disclosure page to find out how can you help Windows Report sustain the editorial team. Read more


Improve this guide

User forum
0 messages